Thursday, December 31, 2009

Happy New Year!! Try This Cheese Ball!

I love this cheese ball.  I've been making it for our New Year's Eve festivities for a few years now.  The recipe uses sharp cheddar cheese, cream cheese, and garlic for great flavor.  Then you roll the ball in pecans.... you can see I was in a hurry today and didn't completely cover the poor ball.  It's still fun though.  I also forgot the parsley... oops.  This recipe comes from Allrecipes (and that is my pic on the recipe page... my ball looked better back then, and I'm using the same blue plate!  Ha ha ha).  When I make this, I only want one small cheese ball, so I cut the recipe into 1/3.

Cheese Ball
from Allrecipes.com

1 (8 ounce) package cream cheese, softened
1 garlic clove, minced
1 teaspoon Worcestershire sauce
1/2 teaspoon hot pepper sauce
5 ounces shredded Cheddar cheese
1/3 cup pecans, coarsely chopped
1 tablespoon and 1 teaspoon chopped fresh parsley

1.In an electric food processor or blender, combine cream cheese, garlic, Worcestershire sauce and hot pepper sauce. Blend well. Add Cheddar cheese and process until the Cheddar is fine, but still very visible. Shape the mixture into a ball or a log. Wrap individually in plastic wrap and place in the freezer.*

2.While the balls are in the freezer, combine the ground pecans and parsley in a shallow bowl. Remove the balls from the freezer and roll them in the pecan and parsley mixture. 
 
*(Or you can just be lazy like me and roll it in pecans right away and forget the freezer altogether).

** This post and photos are property of http://dishingwithdish.blogspot.com/ **

Tuesday, December 29, 2009

Smoked Sausage Primavera


This easy, fast and yummy recipe comes from the Taste of Home Family of magazines.  I made this last year when we first moved here and were still living in a hotel (with a kitchenette).  I made it again last week, to use up some veggies that were hanging out in the fridge.  It's a one-dish meal, and it comes together quickly.  The original recipe calls for 1/2 pound of smoked sausage, but I just use the full pound so I don't have to figure out what to do with the other half pound of sausage.  (Although you could always try out my spaghetti recipe!)  So use 1/2 pound or the full pound- it's up to you.

Smoked Sausage Primavera
adapted from Taste of Home

8 ounces uncooked spaghetti (I like whole-grain Barilla Plus)
1-1/2 cups (or more) fresh broccoli florets
1 sweet red pepper (or yellow or green), julienned
1/4 cup coarsely chopped onion
1/2 lb (or 1 lb) smoked sausage, cut into 1/2-inch slices
1/4 cup water
3/4 cup evaporated milk
2 tablespoons butter
1/2 teaspoon Italian seasoning
1/4 cup grated Parmesan cheese

1.  In a Dutch oven, cook spaghetti according to package directions, adding broccoli, pepper and onion during the last 4 minutes.

2.  Meanwhile, in a large skillet, bring sausage and water to a boil. Reduce heat; cover and simmer for 7-8 minutes or until heated through. Add the milk, butter and Italian seasoning; cook and stir until butter is melted.

3.  Drain spaghetti and vegetables; return to the pan. Add cheese and sausage mixture; toss to coat. Yield: 4 servings.
 
** This post and photos are property of http://dishingwithdish.blogspot.com/ **

Friday, December 25, 2009

Christmas Cake

Some years, I'll make this easy chocolate pound cake for Christmas Eve (and then we eat it on Christmas Day, too, of course).  Usually I make the full recipe in a bundt pan, but this year I didn't want to be inundated with cake (after partaking of so many other holiday sweets this season), so I halved the recipe and baked it in a loaf pan.  (If doing this, start checking for done-ness at 45 minutes).  To halve the recipe, go to Allrecipes, and where it says "Servings", scale the recipe to 8.  It will call for 2 1/2 eggs, so I used 2 whole eggs and 1 egg yolk.  We don't drink coffee, and don't keep it around either, so when the recipe calls for coffee, I just use extra buttermilk.

I tried to make up my own white chocolate glaze for this, but the chocolate separated pretty badly, so I just slopped it on the top.  It ended up looking ok, but I won't be including that "recipe".  Ha ha.

Chocolate Pound Cake
adapted from Allrecipes.com

1 1/2 cups unsalted butter, softened
3 cups white sugar
5 eggs
2 teaspoons vanilla extract
1 1/4 cups buttermilk
2 cups all-purpose flour
3/4 cup unsweetened cocoa powder
1/2 teaspoon baking powder
1 teaspoon salt

1.Preheat oven to 325 degrees F (165 degrees C). Grease and flour a 10 inch Bundt pan. Mix together the flour, cocoa, baking powder, and salt. Set aside.

2.In a large bowl, cream together the butter and sugar until light and fluffy. Beat in the eggs one at a time, then stir in the vanilla. Beat in the flour mixture alternately with the buttermilk. Pour batter into prepared pan.

3.Bake in the preheated oven for 60 to 70 minutes, or until a toothpick inserted into the center of the cake comes out clean. Let cool in pan for 20 minutes, then turn out onto a wire rack and cool completely.
**This post and photos are property of http://dishingwithdish.blogspot.com/ **

Merry Christmas! Feliz Natal!

I hope everyone is having a wonderful Christmas day.  Our little family has just enjoyed relaxing today, and hanging out together.  Here is a pic of our Christmas dinner- Spiral Cut Ham (easy- just take out of the package and bake), steamed green beans, leftover Favorite Wheat Rolls, and Ranch Potato Casserole.  We had sparkling apple juice to drink.  Way too much food, but really yummy.  Merry Christmas!

**This post and photos are property of http://dishingwithdish.blogspot.com/ **

Thursday, December 24, 2009

Classic Caramels

We've been making these caramels every year for at least 8 years.  My husband is the one who does all the stirring, and that is definitely the hardest part, because it requires quite a bit of stirring.  I LOVE these caramels.  I have a very unhealthy relationship with them.  I was kind of sad about the fact that we gave so many away- we might have to make another batch just for us.  :)  In years past, I've found myself to be short on corn syrup, so I've used up to 1/2 cup honey (in place of some of the corn syrup- so 1/2 cup honey, 1/2 cup corn syrup).  It' really yummy with that honey flavor, too.  This year, I just used all corn syrup. 

So, this is the last recipe I will share for my Christmas plates this year.  I did make one more thing- a Maraschino Cherry Cookie, but they really didn't taste like much, so that one will not be a repeat, and it's not worth posting here.  (Although they do look nice).  I did want to make some Peppermint-White Chocolate bark also, but all of the stores around here were out of white chocolate.

Merry Christmas, and do try these caramels sometime- they are simple, and SO GOOD!

Classic Caramels
adapted from Allrecipes.com

2 cups white sugar
1 cup packed brown sugar
1 cup corn syrup (can use half honey)
1 cup evaporated milk
1 pint heavy whipping cream
1 cup salted butter
1 1/2 teaspoons vanilla extract

1.Grease a 9x13 inch pan. (Do NOT line with foil!)

2.In a large-size pot, over medium heat, combine sugar, brown sugar, corn syrup, evaporated milk, whipping cream, and butter. Monitor the heat of the mixture with a candy thermometer while stirring. When the thermometer reaches 235 degrees F, remove the pot from the heat.

3.Stir in vanilla. Transfer mixture to the prepared pan and let the mixture cool completely. When cooled cut the carmel into small squares and wrap them in wax paper for storage.
 
**This post and photos are property of http://dishingwithdish.blogspot.com/ **

Eggnog Thumbprint Cookies


Here's another Christmas-plate-repeat recipe.  I love these little guys.  The recipe comes from Eating, Etc.  These are really yummy- they taste just like eggnog.  I just use regular vanilla in the dough, since I don't have any vanilla-rum extract but I'm sure it would be even better with the vanilla-rum.  (See Eating, Etc.'s original post for a link to a recipe for homemade vanilla-rum extract).  I also use rum flavoring in the frosting, instead of real rum.  To make this recipe go farther for my Christmas plates, I use my tiny cookie scoop to scoop the dough, and get a little over 40 cookies. 

Eggnog Thumbprint Cookies

The Cookie Dough:
3/4c unsalted butter, softened
1/2c white sugar
1/4c brown sugar
1 egg
1/2tsp vanilla extract
2c all-purpose flour
1/4tsp salt

1) Preheat oven to 350ºF.

2) In a medium bowl or in bowl of electric mixer, cream together butter, white sugar, & brown sugar.

3) Add egg & vanilla and beat until well-mixed.

4) Combine flour & salt; blend into creamed mixture.

5) Roll dough into 1” balls (or smaller). Place on cookie sheets, 2” apart.

6) Make fairly deep indentation in center of each cookie with thumb.

7) Bake for 8-10 minutes.

8) Cool COMPLETELY (or your icing will melt & go flat).

The Frosting:
1/4c butter, softened
1+c powdered sugar (add more until frosting is fairly stiff, but still able to ooze through zip-bag)
1/2 teaspoon rum extract
milk, if needed
ground nutmeg, to taste (freshly ground from a nutmeg nut is most flavorful!)

1) In a small bowl, mix together 1/4c butter, powdered sugar (more if too runny), & rum extract (and milk, if needed to help with consistency).

2) Place mixture in small ziplock bag. Cut small triangle from one corner of bag. Squeeze icing onto thumbprint indentation of each cookie.

3) Garnish with nutmeg.


**This post and photos are property of http://dishingwithdish.blogspot.com/ **

Chocolate-Covered Peanuts

Merry Christmas!  A few days ago, we baked and put together plates of Christmas goodies for friends and neighbors.  It was a lot of fun.  The easiest thing we made was chocolate-covered peanuts.  Melted some chocolate, added peanut butter, and dropped onto piles of roasted, salted peanuts.  Easy!  You may need more or less chocolate, and peanuts.  I kind of made this up as I went along.

Chocolate-Covered Peanuts
by What A Dish!

1 lb, 5 oz chocolate chips (I used a mix of milk and semi-sweet chocolate)
1/3 cup smooth, natural peanut butter
3 cups (more or less) roasted, salted peanuts

Line two large baking sheets with wax paper.  Lay peanuts in small piles on the wax paper, about 5 per pile.  In a double boiler, melt chocolate chips and peanut butter, stirring frequently.  When smooth, drop spoonfuls of the pb chocolate over the salted peanuts.  Place in the fridge until chocolate is hardened and set.  Enjoy.
**This post and photos are property of http://dishingwithdish.blogspot.com/ **

Chocolate Walnut Fudge

Here is another recipe I made for the Christmas plates.  Like last year, I used orange extract in the recipe instead of vanilla.  I liked it, but next year I'll go back to vanilla extract.  I've been making this fudge recipe for a few years- it's always set up for me; it's easy to put together and I love it!

Chocolate Walnut Fudge

1/2 cup butter
1 cup semisweet chocolate chips
1 teaspoon vanilla extract (or orange extract)
2 cups white sugar
1 (5 ounce) can evaporated milk
10 large marshmallows
1 cup chopped walnuts

1.Butter an 8x8 inch dish.  (I line a dish with foil and grease the foil- then you can lift out the fudge all in one piece, for easier cutting).

2.Place butter, chocolate chips and vanilla in a mixing bowl. Set aside.

3.In a medium saucepan over medium heat, combine sugar, milk and marshmallows. Bring to a boil, stirring frequently. Reduce heat to low and cook 6 minutes more, stirring constantly. Remove from heat.

4.Pour marshmallow mixture over contents of mixing bowl. Beat entire mixture until it thickens and loses its gloss. Quickly fold in nuts and pour into prepared pan. Refrigerate several hours until firm.
**This post and photos are property of http://dishingwithdish.blogspot.com/ **

Tuesday, December 22, 2009

Sugar Cookie Cut-Outs

These are the same sugar cookies my Mom always makes- they use powdered sugar instead of granulated.  This makes a softer cookie.  I think I rolled mine a little too thin- they were too delicate and browned too much around the edges, but they were still yummy, especially with some butter frosting!  Merry Christmas.  :)

Soft Sugar Cookies
from Betty Crocker's Cookbook

1 cup butter, softened
1 1/2 cups sifted confectioners' sugar
1 egg
1 teaspoon vanilla extract
1/2 teaspoon almond extract
2 1/2 cups all-purpose flour
1 teaspoon baking soda
1 teaspoon cream of tartar

1.In a large bowl, cream together the butter and confectioners' sugar until smooth. Beat in the egg and stir in the vanilla and almond extract. Combine the flour, baking soda and cream of tartar; blend into the creamed mixture. Cover and chill for at least two hours.

2.Preheat the oven to 375 degrees F (190 degrees C). Divide the dough into two parts. On a lightly floured surface, roll each piece of the dough out to 3/16 inch in thickness. Cut into desired shapes with cookie cutters. Place cookies 1 1/2 inches apart onto greased cookie sheets.

3.Bake for 8 minutes in the preheated oven, until lightly browned. Allow cookies to cool on baking sheet for 5 minutes before removing to a wire rack to cool completely.  Frost, if desired.
 
Butter Frosting
 
1/2 cup salted butter, softened
1 pound powdered sugar (3 3/4 cups)
1 teaspoon vanilla extract
2-3 tablespoons milk

Cream butter, powderes sugar, vanilla, and milk together until smooth and creamy.  Add more or less milk to get the desired spreading consistency. 

*Makes enough to frost the sugar cookie recipe above.

**This post and photos are property of http://dishingwithdish.blogspot.com/ **

Saturday, December 19, 2009

Portuguese Mac and Cheese

This really isn't a Portuguese dish; rather an American dish using Portuguese ingredients.  It's a mac and cheese made with Portuguese Castelinho cheese and some presunto (Porugal's prosciutto).  I used  local brand of pasta in a "buzio", or conch-shell, shape.  I tired Castelinho cheese for the first time when I made this.  It's a local-made, semi-soft, buttery mild cheese, kind of like gouda.  We all really liked it, and it was delish combined with the presunto in this baked mac and cheese dish. 
I based this recipe on my "original" mac and cheese

Portuguese Mac and Cheese
by What A Dish!

150 grams presunto, coarsley chopped
1 tablespoon olive oil
9 ounces small pasta shapes
1 1/2 tablespoon butter
1 1/2 tablespoon olive oil
3 tablespoons flour
1 1/2 cups milk
fresh ground pepper, to taste
1 teaspoon sweet paprika
1/4 teaspoon smoked paprika
1/4 teaspoon garlic powder
12 ounces shredded Portuguese cheese, or Gouda

Preheat oven to 350.  In a large skillet, heat olive oil, and sautee presunto until lightly browned.  Meanwhile, heat water to boiling in a large pot to cook the pasta.  Cook according to package directions; drain.  When presunto is browned, remove to paper towels.  Do not wash skillet. 

Using the same skillet, heat the 1 1/2 tablespoons olive oil and 1 1/2 tablespoons butter on medium heat.  Whisk in the flour, and then the milk, and cook until thick and smooth.  Add paprikas and garlic powder.  Turn the heat down, and add the cheese slowly to the thickened milk, stirring until melted.  Stir in the browned presunto.  Then, mix in the cooked pasta.  Pour into a greased baking dish (9x9 or 10x10) and bake for about 15 minutes. 

**This post and photos are property of http://dishingwithdish.blogspot.com/ **

Friday, December 18, 2009

Chicken Parmigiana


My husband requests this for his birthday dinner every year.  (He prefers eating in on his birthday to eating out).  I've made it pretty often in the past, so I don't really need a recipe anymore.  This is an easy recipe, yet it's impressive, too, and very yummy.  I used to make my own pasta sauce, but in the last year or so, I've used a jarred pasta sauce.  It tastes very similar and saves me a lot of time.  (I like the Classico brand of pasta sauces). 

Last time I made this, the only chicken I had on hand was boneless, skinless chicken tenders, and it was so good that way.  It did take a little more time to make, since I had to cook them in batches on the stove, but they were so tender they didn't need pounding, and they cooked in less time.  If you want a really tender dish, and you're using regular boneless, skinless chicken breasts, you will want to pound them before you start cooking. 

Chicken Parmigiana
by What A Dish!

3-4 boneless, skinless chicken breasts, or 7-9 chicken tenders
1 egg
3 tablespoons milk
2/3 cup Italian seasoned bread crumbs
1/4 cup grated Parmesan cheese, plus more for sprinkling on chicken
1 teaspoon Italian seasoning
1-2 tablespoons olive oil
1 jar (24-26 ounces) pasta sauce
1 cup shredded mozzarella cheese
hot cooked angel hair pasta

Preheat the oven to 325 degrees F.  In a large, shallow bowl, beat the egg and milk together.  In another large, shallow bowl, mix the bread crumbs, 1/4 cup parmesan cheese, and Italian seasoning together. Heat a large skillet over medium heat, and add the olive oil.  One by one, dip a chicken breast (or chicken tender) into the milk/egg mixture, let drain briefly, and then dredge into the bread crumb mixture.  Make sure the bread crumbs are coating all sides.  Lower the chicken ino the hot pan.  Repeat until the pan is full (but not too full- don't crowd it.  You may have to work in batches).  Cook and brown the chicken about 5 minutes on each side; longer for breasts. 

Spray a 9x13 baking dish with cooking spray; dump the whole jar of pasta sauce into the baking dish.  Lay the browned chicken on top of the pasta sauce in a single layer.  Sprinkle with extra Parmesan, and all of the mozzarella.  Bake for about 10 minutes, for chicken tenders, and 15-20 minutes for breasts.  Use an meat thermometer to make sure the chicken is done all the way through.  (Should read 165-170 degrees F). 

Serve chicken and sauce over cooked pasta. 

**This post and photos are property of http://dishingwithdish.blogspot.com/ **

Thursday, December 17, 2009

Layered Lettuce Salad


My Mom made a salad like this while I was growing up, and I think some of my relatives make a similar salad.  Even though the "dressing" is a little plain, the whole thing comes together and it's very delicious.  This is my version of this recipe; made from memory and without a recipe.  The lettuce my mom and relatives always used was Iceburg; I've tried this with Romaine, too, and it's good with that.  You need a sturdy lettuce to stand up to all the ingredients.  When I made it the other day, I used Iceburg, because that's all my store usually has over here.  But it makes it seem more "traditional" to me, since that's what I grew up with. 
When I make this, I layer all the ingredients separately; and when people scoop it out onto their plates, it kind of mixes.

Layered Lettuce Salad
by What a Dish!
(Easily cut in half to fit an 8x8 or 9x9 pan)

1 head lettuce (iceburg or romaine) washed and torn into bite-sized pieces
1 cup chopped celery
1 1/2 cups frozen peas, thawed (not cooked)
3 eggs, hard-boiled; peeled and sliced
1 1/4 cups good-quality mayonnaise (try using half plain Greek yogurt)
1 teaspoon sugar
1 tablespoon grated Parmesan cheese
8 ounces shredded sharp cheddar cheese
5-6 pieces bacon, cooked and crumbled

1. Place lettuce in a 9x13 pan.  Layer on celery, then peas, and hard-boiled egg slices.  In a small bowl, mix mayo, sugar, and Parmesan.  (This is your "dressing").  Spread the mayo mixture evenly over the top of the salad, and top with shredded cheese and bacon.  Refrigerate a few hours until ready to serve. 
**This post and photos are property of http://dishingwithdish.blogspot.com/ **

Tuesday, December 15, 2009

Dulce de Leche and Vanilla Bean Birthday Cake

For my husband's birthday, I made a Dulce de Leche (Doce de Leite) cake.  I made the cake out of this recipe for yellow, vanilla bean cake, filled the middle with pure Dulce de Leche, and incorporated Dulce de Leche into the frosting for the top and sides.  Needless to say, this cake was super sweet, so a little really goes a long way. 

Dulce de Leche Birthday Cake
by What A Dish!

For the Vanilla Bean Cake:
1 cup unsalted butter, softened
1 1/2 cups white sugar
8 egg yolks
3/4 cup milk
2 teaspoons pure vanilla extract
2 cups cake flour
2 teaspoons baking powder
1/2 teaspoon salt
2 vanilla beans, split and seeds scraped out

To Make the Vanilla Bean Cake:
Preheat oven to 350 degrees F (175 degrees C). Butter and flour two 8-inch round pans. Line bottoms with waxed paper and butter the wax paper. Whisk together the flour, baking powder and salt. Set aside. In a large bowl of a stand mixer, cream together the butter and sugar until light and fluffy. Beat for 3-5 minutes to get a nice, light and fluffy cake. Beat in the egg yolks one at a time, then stir in the vanilla and vanilla bean seeds. Beat in the flour mixture alternately with the milk, mixing just until incorporated. Pour batter into prepared pan. Tap pan on countertop a few times to get rid of air bubbles. Bake in the preheated oven for 25 to 30 minutes, or until top springs back when lightly tapped, or toothpick comes out clean. Cool 15 minutes before turning out onto cooling rack. Let cool completely before frosting/filling.

For the Filling:
1 can (about 14 oz.) Dulce de Leche

For the Dulce de Leche Frosting:
1 cup salted butter, softened
1-1/2 pounds powdered sugar (4-6 cups, or until desired consistency)
1/2 of a 14. oz can of Dulce de Leche
1 teaspoon milk
1 teaspoon pure vanilla extract
2 vanilla beans, split and seeds scraped out

To Make the Dulce de Leche Frosting:
Cream together butter and powdered sugar (starting with a few cups and working up).  Add the Dulce de Leche, milk, vanilla, and vanilla bean seeds.  Cream everything together.  If mixture is too thin, add more powdered sugar.  If mixture is too thick, add more milk or Dulce de Leche.

Assembly:
Spread one full can of Dulce de Leche evenly over one cake layer.  Top with the other cake layer, and use the Dulce de Leche frosting to frost the sides and top of cake.  With extra frosting, pipe a design on your cake border. 
**This post and photos are property of http://dishingwithdish.blogspot.com **

Monday, December 14, 2009

Mint Lemonade

I found fresh mint for really cheap at my store last week, but didn't really know what to do with it.  I finally settled on making mint lemonade.  It was good!  I prefer ginger lemonade, though. 

Mint Lemonade
by What A Dish!

1 cup white sugar
1 cut water
1 cup fresh mint, packed
1 1/2 cup fresh lemon juice
7 cups cold water

Wash mint and coarsley chop.  Bring sugar and 1 cup water to boil in a small saucepan, let simmer until sugar is completely dissolved, about 5 minutes.  In the meantime, crush the chopped mint in a mortar and pestle.  Add to the simmering water for the last minute or so; then turn off heat.  Let mint steep in sugar water for 15-20 minutes.  Strain into a pitcher, pessing on mint leaves with the back of a spoon to extract any liquid.  Discard mint.  Add fresh lemon juice and cold water to pitcher; stir.  Store in the fridge for a few hours or until cold.

**This post and photos are property of http://dishingwithdish.blogspot.com **

Thursday, December 10, 2009

Herbed Rice Pilaf

Here's an easy, good Rice Pilaf for all of your side-dish needs.  This recipe comes from my Mom, and I think she got it from Taste of Home.  It combines rice, butter, some herbs, and dry chicken noodle soup mix.  In case you don't know what that is, it looks kind of like this: dry soup, although I use a different brand.  You'll need one of the pouches from that box, and you use the whole pouch.  Just dump it in.  I usually use brown rice for my cooking, but I've tried this with brown and it's not very good, so I use white.  I never have pimientos on hand, so I leave them out.

Herbed Rice Pilaf

1 cup uncooked, long grain white rice
1 cup chopped celery
3/4 cup chopped onion
1/4 cup butter
2 1/2 cups water
1 pouch (2 to 2 1/2 ounces) dry chicken noodle soup mix
2 tablespoons minced fresh parsley
1/2 teaspoon dried thyme
1/4 teaspoon rubbed sage
1/4 teaspoon pepper
1 tablespoon chopped pimientos, optional

In a large skillet, cook the rice, celery, and onion in butter, stirring constantly, until rice is browned.  Stir in the next 6 ingredients, bring to a boil.  Reduce heat; cover and simmer for 15 minutes.  Stir in pimientos.  Remove from heat and let stand, covered, for 10 minutes. 

**This post and photos are property of http://dishingwithdish.blogspot.com **

Tuesday, December 8, 2009

Good Eatin' on the Island

For my birthday last weekend, we went to one of our fave restaurants here.  They specialize in steak and seafood, and I usually order fish, since we live on an island and all.  But everytime I do, I end up being extremly jealous of the delicious steak my husband gets, and wishing I had ordered that instead.  (I don't even love beef that much, I usually prefer fish, but this restuarant makes a greak steak). 

When we arrived, I noticed that the had re-vamped the whole menu.  There were 3 or 4 things that looked really, really good and I was having a hard time deciding.  With the help of a seasoned waiter, I selected Grilled Tenderloin with a São Jorge cheese sauce.  I was so good!  I love São Jorge cheese on its own, but in a yummy sauce over steak, with fries on the side, it was a whole new experience!  There was some kind of sweetish glaze or reduction drizzled over the sauce and steak too; I'm not sure what that was, but it was good.  ;) 
My husband ordered what he always does- a steak that comes out sizzling on a large flat slab of rock.  That was very good too.  It came with salad, fries and 3 flavored mayonnaises. 

Restuarant here don't open for dinner until 7pm, so before we ate, we strolled through the town, looking at all the Christmas lights.  They put them up, banner-style, hanging up between apartments and buildings, or streetlights, lining the narrow streets.

The town square and the cathedral were all lit up for the season.  I love this time of year!
**This post and photos are property of http://dishingwithdish.blogspot.com **

Monday, December 7, 2009

Peanut Butter Cup Ice Cream

ic1W
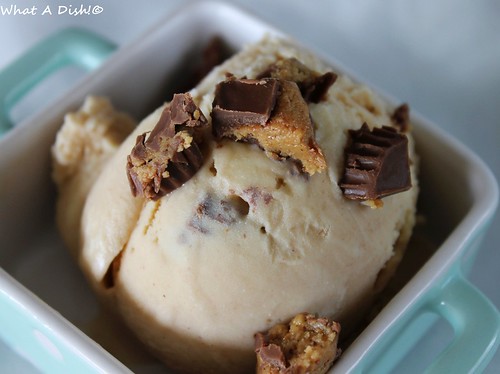
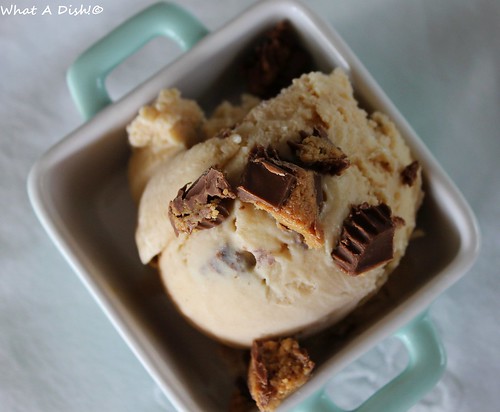
The other day, I started to make another batch of Nutella Gelato, but when I got my Nutella jar down, I realized I was almost out of Nutella.  So, I decided to use peanut butter instead.  I ended up adding some extra peanut butter, because the taste wasn't strong enough for me at first.  After making this in my ice cream maker, I stirred in some coarsley chopped Reeses PB Cups. 

I loved this ice cream- the texture was silky smooth; one of the smoothest, and creamiest ice creams I've ever made.  It didn't have the super heavy mouth feel that some ice creams can have.  I used natural peanut butter; I happened to have the no-stir kind on hand.  (Usually I use the kind that requires stirring.  I'm not sure if using that kind would change the texure). 

Note: I made this for my daughters birthday April 2014 and updated the pics.
ic6W
Peanut Butter Cup Ice Cream
by What a Dish!

2 cups whole milk
1 cup heavy cream
1/2 cup sugar, plus 1/4 cup
4 egg yolks
1/2 teaspoon vanilla extract
3/4 cup smooth peanut butter
1 cup coarsley chopped peanut butter cups

1. In a saucepan combine the milk, cream, and 1/2 cup sugar over medium heat. Cook until the sugar dissolves, about 5 minutes.

2. Meanwhile, in a medium bowl whip the egg yolks with the remaining sugar using an electric mixer until the eggs have become thick and pale yellow, about 4 minutes. (A Kitchenaid is handy for this- I set mine near the stove). Pour 1/2 cup of the warm milk and cream mixture into the egg mixture and stir. Add this mixture back into the saucepan. Cook over very low heat, stirring constantly, until the mixture becomes thick enough to coat the back of a wooden spoon, about 3 to 7 minutes.  (160-170 degrees F on a candy or meat thermometer). 

3. Place a strainer over a medium bowl and pour the warm custard mixture through the strainer. Whisk in the vanilla and peanut buter until it dissolves. Chill mixture completely before pouring into an ice cream maker and follow manufacturer's instructions to freeze. Transer into a freezer-safe container, stir in chopped peanut butter cups, and freeze until hardened.
ic3W
**This post and photos are property of http://dishingwithdish.blogspot.com/ **

Friday, December 4, 2009

Easy Dinner for Hectic Days

Here's a recipe so easy, you can do it pretty much in your sleep.  It's pretty good, too, and uses the crockpot to make it even easier.  I serve this over brown rice.  I like having easy recipes like this to rely on when life gets really busy!

Creamy Crockpot Chicken and Black Beans
adapted from Recipezaar.com

3-5 boneless chicken breasts
1 (15 1/2 ounce) can black beans, drained and rinsed
1 (15 ounce) jar salsa, any kind
1 1/2 cups frozen corn
1 (8 ounce) package Neufchatel cheese, softened

Place chicken breasts in the crockpot (I have used frozen before).  Add the black beans and salsa (I don't use fresh salsa for this, the jarred is fine).  Cook on High for 4-5 hours, or on Low for about 8 hours.  About 30 minutes before you are ready to eat, stir in the frozen corn, and shred the chicken with 2 forks (if you want shredded chicken).  Throw the cream cheese on top (no need to stir yet) and replace the crockpot lid.  After 30 minutes, stir the cream cheese into the chicken mixture.  Serve over brown or white rice, or in tortillas. 

**This post and photos are property of http://dishingwithdish.blogspot.com**

Thursday, December 3, 2009

Eggnog Pancakes

I love the Holiday season; there are so many good things about it- one of those being eggnog!  :)  Here's a good recipe to use up any leftover eggnog you may have laying around.  I made these a few times a few years ago, and remember really liking them.  I made them again for dinner a few nights ago, and still liked them, but not as much as I like buttermilk pancakes.  These are still very good though, with a hint of nice eggnog flavor.  I've had good results using part whole-wheat pastry flour in the past.  (My whole wheat pastry flour is gone now; I am patiently waiting for a large shipment of it to arrive!)

You may need some extra liquid (more eggnog or milk) to get the batter to the right consistency.  I used 1/4 tsp. rum flavoring, but it was a very faint flavor- you may want to use more if you want more of that flavor.

Eggnog Pancakes

2 cups all-purpose flour
4 teaspoons baking powder
1/2 teaspoon salt
1/2 teaspoon ground nutmeg
2 eggs
1 1/2 cups eggnog
2 tablespoons butter or margarine, melted
1/4 teaspoon rum flavoring

In a bowl, combine the flour, baking powder, salt and nutmeg. In another bowl, beat eggs, eggnog and butter; stir into dry ingredients just until moistened. If batter is too thick, add additional eggnog, or milk.  Pour batter by 1/4 cupfuls onto a lightly greased hot griddle. Turn when bubbles form on top; cook until second side is golden brown.

**This post and photos are property of http://dishingwithdish.blogspot.com**

Wednesday, December 2, 2009

Caramel Popcorn Balls

ball2W

This is my mom's recipe that we've been making ever since I can remember.  I'm not sure where it came from originally.  It' easy, and good!  And uses few ingredients!  These popcorn balls disappear way too fast; they're so delicious and addicting.  We just made these the other night as a family activity; even my 3-year old got involved and made one tiny little popcorn ball, which he proudly showed us, and then ate. 

*The recipe states to pop enough popcorn to make 9-10 quarts.  I've never really measured this.  I pop my popcorn on the stove (and you should too!); no micorwave stuff for this recipe.  (Although, an air popper would be good, or popping in a paper bag in the microwave.  I just don't want anyone using hydrogenated-laden processed micro popcorn for this).  When I made this recipe, I usually do about 3 "batches" of popcorn, using a little over a cup of unpopped kernels.  Hopefully this info is helpful.  The more popcorn you pop, the drier your popcorn balls will be; the less you pop, the  more caramel-ier your popcorn balls will be.  :)

*After popping the corn, kind of sift through it and get all the unpopped kernels out (they'll usually be on the bottom of the bowl).  This way, you don't bite into a hard unpopped kernel and hurt your tooth.

*Be careful when forming this into balls; the caramel is super hot and can burn your hands.  Wait a few minutes to form balls, but not too long, or the caramel will start to set. 

*We spray our hands with Pam when forming balls, so our hands don't stick; it makes the job a lot easier.

*When we made these recently, I found I only had a half a cup of corn syrup on hand, so I used 1/2 cup mild honey to make up the difference.  It was really yummy that way!

*We just made these again for Christmas season 2013.  This time around, I added some sea salt for a salted caramel flavor- add to taste.  I also added 1/2 tablespoon of my homemade vanilla extract.  So good!

*This recipe doesn't use a candy thermometer, but the firm ball stage instead.  This is the definition of the firm ball stage: 245° F–250° F; Drop a little of this syrup in cold water and it will form a firm ball, one that won’t flatten when you take it out of the water, but remains malleable and will flatten when squeezed.
ballW
Caramel Popcorn Balls

9-10 quarts popped popcorn
1 pound brown sugar (approx 2- 1/4 cups)
1 cup white corn syrup (can use half honey, if desired)
1/2 cup (1 stick) salted butter
1 (14 oz) can sweetened condensed milk
1/4 tsp. sea salt, optional
1/2 tablespoon pure vanilla extract

1.  Set popcorn aside in a few large bowls.  We like to go through this and get rid of any un-popped kernels to save our teeth.  

2.  In a large, heavy pan, combine brown sugar and corn syrup.  Bring to a boil, stirring constantly. Add butter and stir until melted.  Add sweetened condensed milk and cook to the firm ball stage.  (See tip above.)  Remove from the heat.  Stir in sea salt and vanilla extract.  Pour over popped popcorn and stir well.  Let cool slightly, then form balls and set them on wax paper to set.

**This post and photos are property of http://dishingwithdish.blogspot.com/**/