Friday, January 29, 2010

Middle-Class Brioche


I discovered a new blog I love; The Winter Guest ; or, El invitado de Invierno en Español.  This blogger is a Spanish woman who writes her blog both in English and Spanish- very impressive!  There are many delicious-looking recipes on there; I'm excited to try some of the Spanish ones.  The recipe that first caught my eye was her "Middle-Class Brioche"; called that, because it uses less butter than some brioche recipes (but it still seemed like a lot of butter!)  You can read her original post for more explanation.  I converted her recipe from metric into cups; go to her original recipe for metric.  (I just used my kitchen scale to convert, and it seemed to work; nevertheless, these measurments aren't exact).
I had a hard time forming the dough into balls; maybe because of all the butter in the dough.  I finally just formed non-perfect looking rolls and set them to rise.  I let my rolls rise (after being formed) for way too long; they puffed up almost scarily; I thought they might burst!  Next time, I'll only let them rise for 1 1/2 hours, like the recipe suggests.  Because they rose for too long, the tops of the rolls, after baking, had tiny little holes and pock-marks in the surface.  (When kneading the dough, try not to add too much extra flour, or the dough might be dry or tough.  Mine was a little sticky).
These tasted wonderful; light and fluffy, and melt-in-your-mouth flaky.  I could just eat these for dinner; forget a soup or something to go with them! 

Middle-Class Brioche
El Invitado de Invierno

2 1/2- 3 cups white flour
1/4 cup sugar
2 teaspoons yeast
1 pinch salt
1/3 cup milk
3 medium eggs
13 tablespoons butter at room temperature

Mix all the ingredients except the butter in a mixer or by hand. Then knead for 5 minutes by machine or 8 minutes by hand, till the dough is smooth. Add the diced butter and knead again for 5 minutes by machine or 10 minutes by hand. Put the dough into a bowl, cover tighly and leave in the fridge overnight.

Take the dough out of the fridge the next day and make 60 g balls while cold.  Then shape the balls and put them into the mold, with seam face under, leaving quite some room among them as they expand quite a lot. Cover the formed brioche and leave to proof at least one and a half hour, till more than double in size.   In the meantime preheat the oven to 200 ºC. Once the oven is a the right temperature, bake it for 20 minutes.
**This post and photos are property of http://dishingwithdish.blogspot.com/ **

Thursday, January 28, 2010

Creamy Corn and Basil Soup

I made this soup a few years ago and remember really liking it.  I made it again the other day, and it was good, but I felt it could really use a little something else, so I added some sharp cheddar, and then some shredded Parm for a garnish.  The original recipe does not have any basil; I had some fresh basil that was really on it's last leg (not so fresh anymore), so I thought "What the heck!" and threw it in.  It was delicious in there!  Like many soups, this one improved with some time in the fridge, and I liked the leftovers better than the original.  For some of the corn (and to add creaminess) you can add one can of creamed corn.  But make sure to use mostly frozen corn, so you don't have that canned-corn taste.

Creamy Corn and Basil Soup

1 small onion, chopped
1 clove garlic, minced
1 tablespoon butter
3 tablespoons all-purpose flour
3 cups milk
2 cup chicken broth
3 cups frozen corn
1 ounce cream cheese (or Neufchâtel cheese)
1/4 teaspoon garlic salt
1 teaspoon ground black pepper, or to taste
1/2 cup shredded Sharp Cheddar cheese
1/2 cup chopped fresh basil

Shredded Parmesan cheese, for garnishing

1.In a large pot over medium heat, combine the onion, garlic, and butter. Saute for about 5-10 minutes, or until onions are tender.

2.Add the flour, stirring well, to make a pasty mixture. Whisk in the milk and the broth. Add the corn and the cream cheese and allow to heat through. (You may need to whisk like crazy to dissolve the cream cheese).  Add the garlic salt, and black pepper to taste. Stir in the Cheddar cheese, then the fresh basil, and serve.  Garnish with Parmesan.
 
**This post and photos are property of http://dishingwithdish.blogspot.com/ **

Wednesday, January 27, 2010

Manchego Garlic Bread

Although I live on a Portuguese island, and Portugal (mainland Portugal, not my island) borders Spain, it is very hard to find Spanish food products here.  For instance, I've been looking for Manchego cheese for the past year, at least, and they only just got it in right around Christmas time.  It probably has something to do with long-ago rivalries between the two countries.  I mean, the main grocery stores here (where I'm looking for these Spanish products) are even Spanish-owned!  Just pure crazyness.  (For the record, I do buy, and enjoy, many Portuguese food products as well!  I used to live in Spain and would enjoy some Manchego and Spanish tuna once in a while.... that's all.)

Manchego is a very common and popular cheese in Spain.  It's a sheep's milk cheese, only made in a certain region of Spain (La Mancha).  The sharpness level varies, and I've tasted everything from very mild to so sharp, I could hardly stand it.  The variety I purchased over here was pretty mild.  It shredded easily in my food processor, like a nice block of parmesan. 

We had already eaten our fill of the Manchego plain with crackers, and I needed to use the rest before it went bad, so I made some garlic bread on a baguette and threw the rest of the Manchego (shredded) on top and melted it.  It made a nice, flavorful bread.  The whole family loved it and was fighting over the last pieces! 

Manchego Garlic Bread
by What A Dish!

1 baguette
4 tablespoons butter, room temperature
salt, to taste
garlic powder, to taste
fresh or dried parsley
1-2 cups shredded Manchego cheese

Preheat oven to 375 F.  Cut the baguette in half lengthwise, and spread butter evenly over the cut surfaces.  Sprinkle on salt, garlic powder, and parsley.  Add Manchego over the top of the seasonings.  Wrap in foil and bake for about 10 minutes, or until cheese melts.  If you want to crisp up the baguette, unwrap the foil a little and leave in the oven a few minutes longer.
**This post and photos are property of http://dishingwithdish.blogspot.com/ **

Tuesday, January 26, 2010

Hot Fudge Sauce

This is my go-to recipe for hot fudge sauce.  It's easy, I always have the ingredients on hand, and I love the flavor.  It's from the Betty Crocker Cookbook, 1996 Edition.  When I graduated from high school and was going away to college, my mom got this for me.  For a long time, it was the only cookbook I owned.  There are some good, basic recipes in there!  After my first baby was born, my husband and I would often eat this over vanilla ice cream, late at night after the baby finally went to bed.  I'd have more hot fudge in my bowl than ice cream.  Good memories!  This recipe did contribute to some extra post-baby poundage though, so be careful!  :)  I only make it once in a while these days.

Hot Fudge Sauce
adapted from Betty Crocker

1 (12 ounce) can evaporated milk
1 (12 ounce) package semi-sweet chocolate chips*
1/2 cup sugar
2 tablespoon butter
1 teaspoon pure vanilla extract

1.  Place milk, chocolate chips and sugar in a medium saucepan.  Heat to boiling over medium heat, stirring constantly.  Remove from heat, and stir in butter and vanilla (sauce will thicken while it is cooling).  Serve warm over ice cream.

2.  Makes about 3 cups and will last, covered in the fridge, about a month.  After refrigerating, reheat gently in the microwave before use. 

*Note:  Mini semisweet chips come in 12-oz. bags and work best for this recipe because they melt easily and quickly.  Most other chocolate chips come in 10 oz. bags now.  If you only use 10 oz, this recipe won't work.  Use the 10 oz. bag plus 2 oz. of chocolate chips- a kitchen scale is the best, easiest way to measure this!  :)
**This post and photos are property of http://dishingwithdish.blogspot.com/ **

Monday, January 25, 2010

Ham & Cheese Pretzel Bites

I made these Pretzel Bites for the "Main Course" of our Friday night mini-food party.  I got the recipe from Pennies on a Platter, and I am totally coveting her photo of these babies!!  I've never made any kind of pretzel before.  You boil them in a baking soda bath, and I think I let some of mine boil too long, because they started coming "undone".  They were tasty anyway, and we loved them.  The ham and cheese combo was good, but because I love cheese, I might lose the ham next time so I can just focus on cheese!  We dipped them in homemade honey mustard dip. 

Ham & Cheese Pretzel Bites

1 package (1/4 oz) active dry yeast (or instant yeast)
2 Tablespoons plus 1 teaspoon packed brown sugar, divided
1/4 cup warm water (110-115˚F)
1 cup warm milk (110-115˚F)
2 1/2 to 3 cups flour
1/2 cup finely chopped ham (about 3 ounces)
1/2 cup shredded cheese of choice (I used cheddar)
6-8 cups water
4 teaspoons baking soda
4 Tablespoons unsalted butter, melted
1-2 Tablespoons coarse salt

Combine the yeast, 1 tsp brown sugar, and warm water in a large bowl. Set aside until foamy, 5-8 minutes. (If using the instant yeast, you can skip this step and just add it to the flour.) In another bowl, stir together the remaining 2 Tbsp brown sugar and warm milk until dissolved.

Add 2 1/2 cups flour and milk mixture to the yeast. Stir with a wooden spoon until a soft dough forms. Add the remaining flour as needed. Turn the dough out onto a lightly floured surface and gently knead a few times, forming a smooth ball.

Brush the inside of a large clean bowl with olive oil. Transfer the dough to the bowl and cover tightly with plastic wrap. Allow to rise in a warm, draft free area for about 2 hours, until dough has doubled in size and bubbles appear on the surface.

Turn out the dough onto a lightly floured surface. Divide into 4 equal pieces. Lightly dust your hands and rolling pin with flour. Roll one of the four sections into a 12×4-inch rectangle. With the long side facing you, gently press 1/4 of the ham and cheese into the bottom third of the dough, and roll as tightly as possible, starting with the end that has the filling. Cut into 12 1-inch pieces and transfer to a sheet pan lined with parchment paper. Repeat with remaining 3 portions of the dough.

Let rest, uncovered, at room temperature for 30 minutes. (Again, if using instant yeast you may choose to skip this step as it only requires one rise.) Meanwhile, preheat oven to 400˚F.

Bring 6 cups of water to a boil. Add the baking soda and reduce heat to a gentle simmer. Boil pretzels in batches, cooking about 20 seconds each, turning once. They should be slightly puffed. Use a slotted spoon to transfer them back to the baking sheets.

Bake until puffed and golden-brown, about 15 minutes.

Brush warm pretzel bites with melted butter and sprinkle with salt. Serve warm or at room temperature.

**This post and photos are property of http://dishingwithdish.blogspot.com/ **

Sunday, January 24, 2010

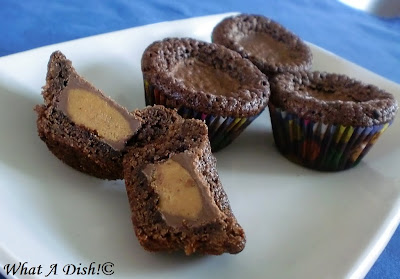
Peanut Butter Brownie Bites

Last Friday night, we had a little "family party", where we ate mini foods in front of the TV while we watched a movie.  These Mini PB Brownies were on the menu for dessert.  They were so good!  The brownie part alone is a great-tasting recipe with a wonderful texture.  I found this recipe on the blog Savory Sweet Life.  Go check out her blog and pictures- it's a great-looking blog. 

For some reason, my brownie bites overflowed the muffin tin a little and that top (muffn-top, lol) stuck so badly to the pan, I was unable to remove the bites intact.  I was only able to bake 24 at a time, since I only have one mini-muffin pan, so for the next batch, I used tiny paper baking cups and that solved the sticking problem.  (That second pic shows the carnage that was my 1st batch). 

I only had one bag of Reese's Mini PB cups on hand, so I was only able to use as many as were in there- 30 something.  I still had leftover batter, so I just made plain brownie bites with the rest. 

Peanut Butter Brownie Bites
Makes approx. 40 brownie bites

INGREDIENTS
3/4 cup butter, melted
3/4 cup white sugar
3/4 cup brown sugar, packed
2 teaspoons vanilla extract
2 eggs
3/4 cup all-purpose flour
1/2 cup unsweetened cocoa powder
1/2 teaspoon salt
40 mini Reese’s Peanut Butter Cups, unwrapped from the brown paper

Preheat oven to 350 degrees F. Spray mini cupcake pan with non stick spray. In a medium bowl, mix melted butter, sugars and vanilla. Beat in eggs one at a time. Gradually add flour, cocoa, and salt and mix until combined. Fill each cupcake slot slightly more than halfway but not more than 2/3 full. Place a peanut butter cup in each slot pressing it down until it is almost level with the batter. Bake in preheated oven for 12-18 minutes or until done. Allow the brownie bites to cool for 5 minutes before removing from the cupcake tin. Enjoy!

*Notes: Be sure to remove brownie bites 5 minutes after coming out of the oven. Otherwise they might cool and stick to the sides making it difficult to get out. If baking these in a pan, your baking time will increase to 25-30 minutes. You can be sure they are close to being done when you can smell them from your oven.
**This post and photos are property of http://dishingwithdish.blogspot.com/ **

Friday, January 22, 2010

Turkey-Ricotta Meatballs


We had these turkey meatballs last night for dinner, from the blog, Eating, Etc, and they were very good!  My whole family ate them up and wished there was more.  My 3-year old took more than his share; every chance he could, he swiped another one from the baking sheet they were on!  These were very simple to make, too.  I would suggest sauteeing them in a non-stick pan so they don't stick too badly.  We had these with Eating, Etc's homemade marinara sauce

Turkey-Ricotta Meatballs

Makes about 2 dozen meatballs
from Eating, Etc., via Cooking Light

1lb ground turkey meat (not breast-only)
1/2c part-skim ricotta cheese
1 egg
1/2c seasoned dry breadcrumbs
1/4c fresh basil, finely chopped
Italian seasoning (I eyeballed it and probably added 2-3tsp)
1/4tsp salt
1/4tsp ground black pepper

1) Preheat oven to 375°F.

2) In large mixing bowl, combine ground turkey with remaining ingredients & mix well.

3) Shape into about 2 dozen meatballs.

4) Heat a large skillet over medium-high heat. Coat pan with cooking spray.

5) Add meatballs and brown on all sides.

6) Transfer meatballs to a foil-lined baking sheet coated with cooking spray.

7) Bake for 15-20 minutes or until done.

**This post and photos are property of http://dishingwithdish.blogspot.com/ **

Marinara Sauce

I stalk the blog Eating, Etc.; I can't help it!  Last night, I made the marinara sauce she had recently posted, and it was very good!  I didn't have any celery, so I left that out.  I also didn't use the full half-cup of olive oil.  I think you can play around with the type of tomatoes you use here.  For instance, Eating, Etc. used home-canned tomatoes (no, I'm not jealous!), but I used some canned ones, along with a little over 1 cup of leftover Muir Glen Pizza sauce I had in my fridge.  It turned out swell!  See, you can use almost anything.  Since I used some pizza sauce, my marinara wasn't super-chunky, so I didn't have to blend it up.  I served this with multigrain spaghetti, peas, and Eating, Etc's Turkey-Ricotta Meatballs.  This was a meal the whole family enjoyed.  And, I was able to freeze two jars of leftover pasta sauce after we finished dinner.  Can't wait to use that in another dish, like this Cheesy Tortellini

Homemade Marinara Sauce
Makes 2 quarts
adapted from Giada at The Food Network, via Eating, Etc.

1/2c extra-virgin olive oil
2 small onions, finely chopped
2 fresh garlic cloves, minced
2 celery stalks, finely chopped
2 carrots, finely chopped
sea salt, to taste
1/2tsp freshly ground black pepper
2 quarts canned tomatoes, crushed
2 dried bay leaves
1T Italian seasoning

1) In a 4-quart (or larger) saucepan, sauté onions & garlic in olive oil over medium-high heat until onions are translucent (about 10 minutes).

2) Add celery, carrots, salt & pepper and sauté until vegetables are soft (about 10 minutes).

3) Add tomatoes, bay leaves, & Italian seasoning. Simmer, uncovered, over low heat until sauce thickens (1-2 hours).  Stir a couple of times.

4) Remove & discard bay leaves. Adjust seasonings to taste.

5) Run through food processor for a smoother sauce, if desired.

6) Serve over pasta, and/or cool & refrigerate or freeze.

**This post and photos are property of http://dishingwithdish.blogspot.com/ **

Thursday, January 21, 2010

Lemon Chicken with Olives and Ricotta


I receive a gift subscription of the magazine "Better Homes and Gardens" and this recipe is from their recipe section.  It caught my eye because it looked simple and   yummy, and I usually have all of these ingredients on hand.  I forgot the fresh herbs, but my local store's fresh herb supply is only existant once a month or so.  (I do live on a small island in the middle of nowhere.)  I LOVE all kinds of olives, but I think one cup is probably too much for this recipe.... maybe 2/3 cup would be better.  (I'll include that change below.)  If you don't want to use the lasagna noodles, this would probably be good with fettucini or something similar. 

This was well-recieved by my oldest child, only half-recieved by my middle child, and my youngest child refused to touch it at all and insisted on eating only salad instead.  The child has never tried salad in his life.  Goober.......  My husband said "It was way better than I thought it would be!"  Goober!  I, personally, liked it; it was something a little different, it was easy, and I didn't have to print off the recipe or drag the laptop down into the kitchen.  :) 

Lemon Chicken with Olives and Ricotta
adapted from BHG

8 No-boil (oven ready) lasagna noodles
1 lemon
8 small skinless, boneless chicken tenders
2/3 cup garlic-stuffed or pitted green olives
1 cup part-skim ricotta cheese
salt and pepper
Fresh Rosemary (optional)

1. In Dutch oven bring 3 inches water to boiling. Add noodles and 1/2 teaspoon olive oil. Cover. Cook 6 minutes or until tender; drain. Lay noodles in single layer on waxed paper. Cover; set aside.

2. Meanwhile, shred peel from lemon; halve lemon. Juice 1 half, cut remaining into wedges. Season chicken with salt, pepper, and 1/2 of lemon peel. In skillet heat 1 tablespoon oil over medium-high heat. Add chicken. Cook 10 minutes or until no pink remains, turning once. Add olives; heat through. Remove from heat.

3. In microwave-safe bowl combine ricotta, the lemon juice and 1/2 teaspoon each salt and pepper. Microwave on 100 percent power (high) for 1 minute, stirring once.  If still luke-warm, microwave for 30 seconds to 1 minute more. 

4. Spoon ricotta mixture into pasta bowls. Top with noodles, chicken, and olive mixture, remaining lemon peel, and the fresh rosemary. Pass lemon wedges. Makes 4 servings.


**This post and photos are property of http://dishingwithdish.blogspot.com/ **

Wednesday, January 20, 2010

Alfajores- My First Attempt

I've been wanting to make Alfajores- Dulce de Leche filled sandwich cookies, for a long time, and finally did so a few days ago when we had some friends over.  I tried this recipe

That blogger made some perfect-looking cookies with that recipe, but the dough wasn't being very nice to me.  It was so soft... I added extra flour, but didn't want to add too much, since I didn't want the dough to be tough.  I tried to chill the dough and roll it out, but it didn't work... it was still a goopy mess after a few minutes at room temp.  Next, I rolled the dough into a log, wrapped it in plastic wrap, and stuck it in the freezer.  After a while, I took it out, sliced it and baked it.  It was still too soft to really slice well, but it worked better than rolling out.  It also spread a lot in the oven.  I wonder if the soft dough had anything to do with the high humidity here.  I won't bother including the recipe; you can click on the blog link above if you're interested.  Now my quest will be to find an Alfajores recipe that actually works for me!

**This post and photos are property of http://dishingwithdish.blogspot.com/ **

Tuesday, January 19, 2010

Local Night Scenes


After that "Men at Work" post, I really wanted my next post to be a recipe of some sort, but it's just not working out for me.  Because of busyness, lazyness, and having guests over, I've been making tried-and-true things lately.  Nothing new and exciting to blog about (except for some cookies I tried yesterday, but I'm not sure if the pics have turned out well or not, yet).  So today, I will share with you some more scenery pictures.  My husband actually took these, with my new camera.  (Apparently, he knows how to work it way better than I do!)  This is a night scene from a look-out point; it's featured on my blog here, but in the daytime. 

On this particular look-out point (there are a few that we go to) there is a huge statue.  This statue is, I believe "Our Lady of Fátima".  I think she's the same thing as the Virgin Mary, but I'm not sure, and I get confused easily.  So if you want to know more, go read that Wiki article.  I have no idea how tall this stature is, but it is tall.  It has a little bar/restaurant in the statue pedestal.  Anyway, here is a cool night picture of her.

**This post and photos are property of http://dishingwithdish.blogspot.com/ **

Tuesday, January 12, 2010

Men at Work- Azores Style

You'll have to excuse the slight grainy-ness of this photo; I was undercover, tyring to shoot pics of these guys without them noticing.  I was also zoomed all the way in on my little point-and-shoot. 

I really wanted to get this shot; this photo captures something my husband and I see and discuss often.  Over here in the Azores, they do road construction all the time.  There are actually times where it seems that they'll tear up a perfectly fine road, just to re-pave it.  I'm not sure if it's an empolyment program or what.  Other times, there are roads so awful that you bounce up and down as you drive down them, and those ones never get fixed.  It's a real mystery. 

Anyway, every time you see men working on the roads here, there is ALWAYS one (or sometimes two) guys working, with 2-4 (or more) men just watching the poor guy who is working.  I don't think I've ever not seen this situation when I noticed road work.  It is hilarious.  Often, the men who are watching are smoking a cigarette and/or leaning on a shovel.  In the picture above, we have both going on.  I'm having a hard time not laughing out loud right now.  :) 

** This post and photos are property of http://dishingwithdish.blogspot.com/ **

Friday, January 8, 2010

Oatmeal Carmelitas

If you want something really rich, sweet and satisfying, try these bars.  They might be too much for some people.  We brought these over to our friends house when we went over for dinner, and they were very well-recieved.  They're easy to put together, too, just a little time consuming, as any food with layers usually is. 

This recipe, as written, didn't work for me for one main reason: there's supposed to be enough "cookie" layer to have a layer both on the top and bottom, but I found there was only enough for one bottom layer.  So I made a half-recipe of the cookie for the topping.  I used SO much butter, it's almost a crime.  I noticed as I was making the half-recipe that I could probably have used a little less butter, so in the recipe I'm posting 1/3 cup instead of the 1/2 cup that I used. 

After I fixed the topping problem, these came together very nicely and were very delicious.  For the caramel, I used Kraft Caramel Bits so I didn't have to unwrap caramels.  I used 14 oz. of them, so I had to use one full bag and part of another. 

Other changes I made were using whole, rolled oats instead of quick, some whole wheat pastry flour, mini chocolate chips (all I had on hand), and cutting down on the brown sugar.  If you don't have unsalted butter on hand, just use salted butter and cut out the salt.

As the recipe is originally written, I bet it would work great in a 9x9 pan with no changes.  That way you wouldn't have to increase the cookie part, and could probably get away with using 11 ounces of caramel bits and not have to open up another bag to get 14 ounces.

Oatmeal Carmelitas
heavily adapted from Allrecipes.com

Caramel Layer:
14 ounces caramels bits
1/2 cup evaporated milk

Bottom Layer:
1 cups all-purpose flour
1 cup whole wheat pastry flour
2 cups rolled oats
1 cups packed brown sugar
1 teaspoon baking soda
1/2 teaspoon salt
1 cup unsalted butter, melted

Chocolate/Walnut Layer:
2 cups semisweet chocolate chips
1 cup chopped walnuts

Top Layer:
1 cup flour (can mix white and whole wheat)
1 cup rolled oats
1/2 cup packed brown sugar
1/2 teaspoon baking soda
1/4 teaspoon salt
1/3 cup unsalted butter, melted

1.Preheat oven to 350 degrees F (175 degrees C). Grease a 9x13 inch baking pan.

2.Make the Caramel Layer: In a saucepan over low-medium heat, melt the caramels with the evaporated milk, stirring frequently until smooth. Set aside.

3.Make the bottom layer:  In a medium bowl, stir together the flour, oats, brown sugar, baking soda, and salt. Stir in the melted butter. Press this mixture into the bottom of the prepared pan.

4.Bake for 10 minutes in the preheated oven. Remove from the oven, and sprinkle the crust with chocolate chips and walnuts. Drizzle the caramel mixture over all. Make the top layer and crumble it evenly over the top, and pat down lightly.

5.Bake for an additional 15 to 20 minutes, or until the top is golden. Cool before cutting into bars.
** This post and photos are property of http://dishingwithdish.blogspot.com/ **

Thursday, January 7, 2010

French Beef Stew


This is called French Beef Stew because of the addition of some Dijon mustard, I presume.  (Apologies to any French folk reading this!  Ha ha).  To add even more French flavor to this, I added 1 teaspoon of Herbes de Provence.  I also like to add fresh green beans to this stew.  And, like most of my stews, I cook this on in the crockpot.  I love the deep flavor that Dijon imparts to this.  I picked up a set of different flavors of Dijon mustard, and my Herbes de Provence, this summer when we went to a few grocery stores in France.  This stew is perfect served with a warm, crusty baguette. 

French Beef Stew
adapted from Allrecipes.com

1 pound cubed beef stew meat
1/4 cup all-purpose flour
2 tablespoons olive oil
1 (14.5 ounce) can diced tomatoes
1 cup beef broth
1/2 medium onion, chopped
1 garlic clove, minced
4 carrots, chopped
2 potatoes, peeled and chopped
1-2 cups fresh green beans, washed, trimmed and cut into 2-inch pieces
1 teaspoon Herbes de Provence
1/4 teaspoon dried thyme
2 tablespoons Dijon-style prepared mustard
pepper to taste
2 teaspoons flour mixed with 1 teaspoon cold water, for thickening, optional

1.  Place the flour in a large, shallow bowl, and dredge the beef in the flour. 

2.In a large skillet, brown beef in hot olive oil. Season with pepper, if desired.  Place meat in slow cooker. 

3.Add diced tomatoes, beef broth, onion, garlic, carrots, potatoes, Herbs de Provence, and thyme. Cover and cook on low for 8-10 hours or on high for 4-6 hours, or until meat is tender.  I like to wait about 3 hours before serving to add the green beans. 

4.Blend in mustard.  If  stew needs additional thickening, blend in the flour/water mixture and cook for a few minutes (on High) until thickened.

** This post and photos are property of http://dishingwithdish.blogspot.com/ **

Monday, January 4, 2010

Penuche Fudge

When I spied this Penuche Fudge over at Everything Nice blog, I knew I had to make it, and soon!  So I whipped some up for our New Year's Eve festivities.  It is SO GOOD- the texture is perfect and the flavor is sweet and caramel-y.  (I'm gonna tag it under 'caramel', even though it't not caramel).  I decided to add nuts to my fudge, to cut the sweetness and add some crunchy texture.  I added 1/3 cup of chopped pecans at the end. 

I usually use my probe thermometer in candy-making (it's made for meat, but it works for other things too).  After I had my ingredients simmering on the stove, I realized that my thermometer wasnt' working.  Darn it!  I had to resort to the cold water test.  Luckily, I had the laptop in the kitchen (because I was making this recipe) so I quickly looked up the cold-water test stages.  I cooked this to the Soft Ball stage: 235° F–240° F.  At this temperature, sugar syrup dropped into cold water will form a soft, flexible ball. If you remove the ball from water, it will flatten like a pancake after a few moments in your hand.  Fudge, pralines, and fondant are made by cooking ingredients to the soft-ball stage.

It worked!  The fudge turned out perfectly.  We all loved it.  It was perfect- the texture, and the flavor. 

Penuche Fudge
via Everything Nice Blog, via Martha Stewart

Vegetable oil cooking spray
1 5-oz can evaporated milk
1 1/2 cups packed light-brown sugar
5 oz (1 1/4 sticks) unsalted butter
1/4 teaspoon salt
1/2 cup confectioners' sugar
1 teaspoon vanilla extract
1/3 cup chopped pecans or walnuts, optional

Coat a 5-by-10-inch loaf pan with cooking spray. Line with plastic wrap leaving a 2-inch overhang on 2 sides.

Bring evaporated milk, brown sugar, butter, and salt to a boil in a medium saucepan, stirring constantly. Reduce heat to medium-low, and simmer, stirring frequently, until mixture registers 236 degrees on a candy thermometer, about 25 minutes.

Transfer to a mixer bowl, and beat in confectioners' sugar on low speed. Scrape down sides of bowl as needed. Increase speed to medium, and beat until mixture is thickened and smooth, 2 to 4 minutes. Reduce speed to low, and add vanilla.  Mix in optional chopped nuts.

Spread mixture in pan, smoothing top. Refrigerate, uncovered, until firm, about 25 minutes. Unmold fudge using plastic overhang, and discard plastic. Cut into small pieces. Penuche will keep, covered, for up to 1 week.

** This post and photos are property of http://dishingwithdish.blogspot.com/ **

Friday, January 1, 2010

Happy 2010!!


We took some friends on a drive a few days ago and were able to take these pics.  Actually, we had planned on stopping at a park so the kids could play, but we were accosted with a very sudden rainstorm right before we got there.  It had been beautifully sunny, and in a matter of about 5 minutes, this rainstorm just swept in onto us, from the ocean.  You could actually see it moving in from off the ocean- it was so cool.  The weather conditions were just right to form this beautiful rainbow.  It was stunning; the pics don't even do it justice.  Darn-it-all, but I just LOVE living here!!


** This post and photos are property of http://dishingwithdish.blogspot.com/ **