Wednesday, September 29, 2010

Blueberry Bread

This blueberry bread is so quick to make, and tender and yummy.  It's an interesting recipe; you make a batter and then spread it, free-form, onto a flat baking sheet (best to use one with sides).  To me, this is somewhere, in texture, between a quick bread and scone; but almost being too light and fluffy for a scone.  This comes together and bakes very quickly and is ready for breakfast in almost no time!  It is very good hot, but I have to admit I left some out after everyone was done, and came back a few hours later, ate some, and it was still just as good!  Don't leave off the cinnamon-sugar topping! 

I did use frozen blueberries with good results (just don't overmix once you add them or you'll have greenish-blue hued batter :) ) and I used a very small amount of whole wheat pastry flour; only 1/4 cup.  The bread was still nice, light and fluffy!  I did set my oven to about 425 instead of 450, because my oven seems to burn things very easily. 

Thanks to one of my good cooking friends (the same one who provided this great recipe) for turning me onto this recipe! 

Blueberry Bread
from Best American Recipes 1999, via Cookin' Mama

2 cups unbleached all-purpose flour
1 tablespoon baking powder
3 tablespoons sugar
1/2 teaspoon salt
8 tablespoons (1 stick) cold unsalted butter
1 large egg
3/4 cup plus 1 Tablespoon milk
1 cup blueberries, rinsed and stemmed (do not rinse frozen)
1 Tablespoon cinnamon, or more to taste, mixed with ¼ cup sugar (optional)

1.  Preheat the oven to 450°F and set a rack on the middle level.  Lightly butter a baking sheet or spray it with vegetable oil.

2.  Mix the flour, baking powder, sugar and salt in a medium bowl. Cut in the butter with two table knives or a pastry blender until it is the size of peas. Set aside.

3.  Beat the egg in a small bowl, and then beat in the milk.

4.  Add the blueberries to the dry ingredients, then quickly add the egg mixture, stirring until just moistened. The dough will be sticky. Pat it out ½ inch thick on the baking sheet into a rough rectangle, about 9 x 12. Sprinkle with the cinnamon sugar, if using.

5.  Bake until slightly risen and browned, about 12 minutes. Break apart and serve hot.

**This post and photos are property of http://dishingwithdish.blogspot.com/ **

Tuesday, September 28, 2010

Homemade "Refried" Beans

This recipe for refried beans doesn't involve any frying at all; only mashing cooked pinto beans.  It's so easy; all the work is done in the crockpot, and then you have a delish side dish to go with any Mexican-themed meal.  I've been making this recipe for a while; whenever I needed some refried beans to go with something.  These are also good used in other recipes, like Spoon Tacos or Burritos

The onion used in this recipe can get so soft that you can mash it up right with the beans, but if it doesn't get that soft (what happened to me last time), you can just discard the onion after cooking.  The good flavor will still be there.

A lot of times I'll cook these on low overnight, and throughout the next day.  Works great.  It is a little unsettling to wake up at 3am to the smell of beans cooking, but it's worth that weirdness. 

I've kind of taken a break from cooking much lately; as my husband is working hard on his Master's degree and hasn't been home very often for the last two weeks.  There have been a lot of grilled cheese or cold cereal or yogurt nights here lately.  Maybe I'll get my groove back again soon!

Homemade "Refried" Beans
from Allrecipes

1 onion, peeled and halved
3 cups dry pinto beans, rinsed (approx. 1 pound)
1/2 fresh jalapeno pepper, seeded and chopped
2 tablespoons minced garlic
1-2 teaspoons salt (to taste!!)
1 teaspoons fresh ground black pepper
1/8 teaspoon ground cumin, optional
9 cups water

1.Place the onion, rinsed beans, jalapeno, garlic, salt, pepper, and cumin into a slow cooker. Pour in the water and stir to combine. Cook on High for 8 hours, adding more water as needed. Note: if more than 1 cup of water has evaporated during cooking, then the temperature is too high.

2. Once the beans have cooked, strain them, and reserve the liquid. Mash the beans with a potato masher, adding the reserved water as needed to attain desired consistency.
 
**This post and photos are property of http://dishingwithdish.blogspot.com/ **

Friday, September 17, 2010

Rosemary Ranch Chicken Kabobs

These chicken kabobs were so tasty and so easy to prepare!  I wanted to use up the last of my homemade ranch dressing, and I also wanted to use some fresh rosemary, so this was the perfect recipe.  We had these with skillet potatoes and lemony steamed broccoli.  The original recipe called for 3 TBS Worcestershire sauce plus 2 teaspoons salt- that would have been waaaay too much.  W. Sauce is super salty already.  I only used 2 TBS of the W. sauce, and NO extra salt.  The chicken was absolutely perfect, salt-wise.  Don't use the two teaspoons of salt!

Rosemary Ranch Chicken Kabobs
adapted from Allrecipes

1/4 cup olive oil
1/2 cup ranch dressing
2 tablespoons Worcestershire sauce
1 tablespoon minced fresh rosemary
1 teaspoon lemon juice
1 teaspoon white vinegar
1/4 teaspoon ground black pepper, or to taste
1 tablespoon white sugar, or to taste (optional)
5 skinless, boneless chicken breast halves - cut into 1 inch cubes

1.In a medium bowl, stir together the olive oil, ranch dressing, Worcestershire sauce, rosemary, lemon juice, white vinegar, pepper, and sugar. Let stand for 5 minutes. Place chicken in the bowl, and stir to coat with the marinade. Cover and refrigerate for 30 minutes.

2.Preheat the grill for medium-high heat. Thread chicken onto skewers and discard marinade.

3.Lightly oil the grill grate. Grill skewers for 8 to 12 minutes, turning a few times, until the chicken is no longer pink in the center, and the juices run clear.
 
**This post and photos are property of http://dishingwithdish.blogspot.com/ **

Thursday, September 16, 2010

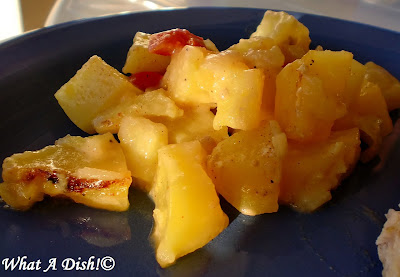
Cheese Potatoes

It's hard to photograph a pile of potatoes and make it look good, but these are really tasty (and easy!) so I'd urge you to give them a try.  :)  Just imagine a sprinkle of fresh chopped parsley garnishing these babies.  If only my parsley hadn't died within a few days of being in my presence.  Oh well.  This is an older recipe from Taste of Home- my mom started making this when I still lived at home, and that was a while ago, now; 10 years!  This is one of the first recipes I tried when I started cooking "real" meals, with side dishes and everything!  It's so easy; you can't really screw it up. 

The full recipe makes a ton, so I've always cut it in half for us, and it still makes a good amount for our family.  I do have one non-potato eater, though (wierdo!) but he doesn't eat much anyway.  I'll post the recipe the way I make it- cut in half.  I never peel my potatoes.  You can, but I don't see why you'd go to the extra work for this recipe, unless your peels were really thick and tough or something.

A note about the milk: when I cut this recipe in half, 1/2 cup of milk doesn't seem to be enough; the potatoes aren't done by the time it is evaporated.  So, I start out with 1/2 cup, and when that's gone, I test the potatoes for tenderness.  If they're not tender yet, I pour in a little more, and test when that's gone.  I keep going with this until the potatoes are tender enough. 

Cheese Potatoes
from TOH
3-4 Servings

3 large potatoes, thinly sliced
1 1/2 tablespoons butter
1/4 teaspoon salt, or to taste
1/8 teaspoon pepper
1/2 cup milk
1 cup (4 ounces) shredded cheddar cheese
Minced fresh parsley

1.  In a large nonstick skillet, cook potatoes in butter until crisp-tender and lightly browned. Sprinkle with salt and pepper. Pour milk over all; cover and cook until milk is absorbed. Sprinkle with cheese; stir until melted. Garnish with parsley.

**This post and photos are property of http://dishingwithdish.blogspot.com/ **

Wednesday, September 15, 2010

Overnight Soft Herb Rolls

I love bread products that you can let rise overnight and bake the next day.  It's nice to get that work done ahead of time, and I love knowing there's some dough in the fridge, rising and ready for me when I want it.  :)  I bought a parsley plant a while ago, and a rosemary plant.  The parsley plant lasted almost 4 days before it totally died.  I'm hanging my head in shame here... it's like plants die just being in my presence.  However, the rosemary plant is holding out strong!  I don't think much could kill rosemary... unless I forgot to water it for a few months.  That actually happened a few years ago; I bought a "Christmas tree" rosemary plant from Trader Joe's, but became pregnant shortly after, and the morning sickness made me hate that rosemary plant.  Just walking by it would make me want to hurl.  So, I killed it slowly by not watering it for a few months, and the poor thing finally died.  Sticking it outside in the snow may have helped as well.  Anyway.......

I used the last of my poor parsley plant for this recipe, along with fresh rosemary.  I threw in some fresh basil, because I had some, but the rest of the herbs were dried.  These were really good and the kids liked them too.  The herbs add a nice little something without being overpowering.  Eating, Etc uses vital wheat gluten, which is a great thing, but I can't buy that over here so I don't use it anymore.  If you have access to it, use it!  It helps with rising, especially if you are using whole wheat flour. 

Overnight Soft Herb Rolls
from Eating, Etc, via Sunset Mag.
Makes 12 rolls

1/4 cup cool water (70°F)
2-1/4 tsp active dry yeast (or 1 pkg)
3 Tablespoons sugar
1 tsp sea salt
1 Tablespoon Italian flat-leaf parsley, finely chopped
1 Tablespoon fresh dill, finely chopped, or 1 tsp dried dillweed
1 Tablespoon fresh chives, finely chopped, or 1 tsp dried chives
2 tsp fresh rosemary, finely chopped
2 Tablespoons unsalted butter, melted
1 large whole egg
1 cup milk (I used 1%)
2-1/4 cups to 2-1/2 cups all-purpose flour
1 cup whole wheat pastry flour (can use regular whole wheat)
1/4 cup vital wheat gluten (if not available, just use equal amount flour)
1 Tablespoon melted butter, for brushing after baking

1) In bowl of electric stand mixer, sprinkle yeast over cool water. Let stand, about 5 minutes, until dissolved.

2) Mix in sugar, sea salt, herbs, melted butter, egg, & milk.

3) Add 3 cups of the flours, plus the vital wheat gluten, and stir to moisten.

4) Knead dough in mixer, adding flour, as needed, by tablespoonful until dough is elastic and not sticky, about 15 minutes.

5) Shape dough into 12 balls; place in well-buttered 9x13 pan.

6) Cover tightly with plastic wrap & refrigerate overnight.

7) Let dough rise in warm place until doubled, about 1 hour.

8) Preheat oven to 350°F.

9) Brush rolls with beaten egg & sprinkle with coarse sea salt. (I skipped the egg and salt).

10) Bake at 350°F, for 25-30 minutes, or until golden brown.  Brush with the additional butter.

**This post and photos are property of http://dishingwithdish.blogspot.com/ **

Tuesday, September 14, 2010

Tomato & Basil Soup


This is my fave tomato soup ever, I think.  A former Allrecipes.com addict, I first made this recipe with fresh, farmer's market heirloom tomatoes, and it was delish.  It was delish when I made it again recently, with home-grown tomatoes from a good friend.  I've copied the way Eating, Etc. makes it; cutting down the butter and using half-and-half instead of cream.  It's still just as good- and there's no reason not to cut out some extra calories.  I hope to get some more home-grown tomatoes from my friend so that I can make it at least once more!

(Note: I've made this a few times this winter and I'm happy to report it is still DELICIOUS with winter tomatoes!  This stuff is so good!!

Note 2:  My store was out of fresh basil when I made this March 2011.  I have a small fresh sage plant so I used sage instead- it was still very good!)

I was a dork and forgot to write tomato juice on my grocery list, and I don't keep it around the house.  So, online, I looked up a tomato juice substitute and found that one could use equal parts tomato sauce and water.  I used 2 cups (or one 15 or 16 oz. can) tomato sauce and 2 cups water.  It worked out great, but I do prefer using tomato juice.  We like to have this with Parmesan Focaaccia bread.

Note:  I made this 9/8/2012 and only had two tablespoons heavy cream on hand, and I also used just 2 Tbs. butter and it was just fine!!  Very good, in fact.  No need to add so much fat to this recipe.

Tomato & Basil Soup
from Eating, Etc, via Allrecipes
4 servings

4 medium tomatoes
4 cups tomato juice (can use up to 6 cups)
2-3 fresh garlic cloves, minced
14 leaves fresh basil (probably just under 1/4c)
1 cup half & half or 2-3 Tbs. heavy cream
2-4 Tablespoons butter, to taste
freshly ground black pepper, to taste

1) Place tomatoes, juice, & garlic in a large pot over medium heat. Cover and bring to a simmer, cooking for 30 minutes. Remove from heat.

2) Add basil leaves to tomato mixture and purée (I used an immersion blender but a regular blender or food processor is fine too.  If you use a regular blender, you  must vent the lid or you might have a hot tomato soup explosion).

3) With tomato-basil mixture back in large pot, over medium heat, stir in half & half, butter, and pepper if desired. Heat, stirring until butter is melted. Do not boil!

4) Serve immediately with shredded parmesan cheese, or garnish of your choice. 
 
**This post and photos are property of http://dishingwithdish.blogspot.com/ **

Monday, September 13, 2010

Dilled Cucumber Salad

This is a good way to use up some garden-fresh summer cucumbers.  The sour cream/dill dressing is very refreshing.  It reminds me of veggie salads I had while in Germany.  You could use plain yogurt instead of sour cream.  My cucumbers were very large- I should have cut the slices in half, to make them easier to eat.  I will next time. 

Dilled Cucumber Salad
Serves 6

2 large cucumbers, unpeeled and thinly sliced
1/3 cup thinly sliced onion (red onion is nice)
1 Tablespoon fresh dill or 1 teaspoon dried dillweed
1 tablespoon white wine vinegar
1/2 teaspoon salt
1/8 teaspoon ground white pepper
1/8 teaspoon sugar
3/4 cup sour cream (I used light)

1.  Pat cucumber slices between paper towels.  Combine cucumber, onion, and next 5 ingredients in a bowl; toss gently.  Fold in sour cream; cover and chill up to 3 hours.  Serve on lettuce leaves, if desired. 

**This post and photos are property of http://dishingwithdish.blogspot.com/ **

Friday, September 10, 2010

Fairy Toast- Kid's Birthday Breakfast

I don't remember where I first saw this idea; maybe in a parenting magazine (which I think are usually cheesy and I hardly ever read, but obviously, sometimes there are good ideas in there!)  This Fairy Toast recipe originates in Australia, I think, and I'm not sure if I'm doing this the right way, but my kids love it.  I toast bread, and then spread butter on top, and immediatley cover the butter with small sprinkles.  This "recipe" is especially good if your child has a birthday that falls on a school day- it's quick and easy.  Make sure to use a whole grain bread.  :)

Fairy Toast (Sprinkle Toast)

1-2 pieces of your favorite bread
soft butter
tiny sprinkles

Toast bread, and immediately spread with soft butter.  Add the sprinkles right away, and serve.  :)

**This post and photos are property of http://dishingwithdish.blogspot.com/ **

Wednesday, September 8, 2010

Grilling a Whole Chicken

We love whole roasted chicken, and we also love grilled chicken, so we wanted to put them together!  To grill a whole chicken, it should be butterflied first, so it can lay flat on the grill.  To do this, you have to cut out the backbone.  Fun times!  I used a pair of sturdy, sharp kitchen shears, and it wasn't really easy.  Too bad my husband wasn't home- I totally would have made him do it.  Anyway, I found this YouTube vid extremely helpful, and watched it a few times before starting. 

After that whole thing, I layed the chicken out in a 9x13 pan and poured some marinade over it- I was going to make my own lemon/rosemary marinade, but was too tired after all the work of butterflying.  So I got out my trusty, store bought, all-purpose marinade, Goya Mojo Criollo.  It's garlicky, oniony, and citrusy.  Very good. 

A whole butterflied chicken takes anywhere from 45-60 minutes to grill.  We grilled it alongside these potatoes, and we also had a creamy cucumber salad.  Everything was so good!  The kids LOVED the chicken; they kept eating and eating it; the whole chicken was gone in no time, and they all wanted more. 
Grilled Whole Chicken

1 whole chicken, guts removed, and butterflied
marinade of your choice

1.  Place butterflied chicken in a large baking pan with sides, and pour marinade over.  Refrigerate for a few hours, until ready to grill. 

2.  Oil grill grates, and pre-heat grill to medium-high heat.  Place chicken on grill, and cook for 45-60 minutes, turning every 15 minutes or so.  If chicken is cooking too quickly or there are grill flare-ups (because of the dripping fat), turn down the grill.  Test the temperature with a meat thermometer; it should register 165-170 degrees in the thickest part when it is done. 
Sorry for the unflattering shot, Ms. Chicken.

**This post and photos are property of http://dishingwithdish.blogspot.com/ **

Tuesday, September 7, 2010

Grilled Potato Casserole

This is a great recipe for a potato casserole that is cooked on the grill!  It's so cool; you make a spiced roux, add raw potatos and onions, and put it all in a foil packet.  It all cooks to perfection in about 45 minutes.  We were roasted a whole, butterflied chicken too, so we just put them on there side by side and they were done in about the same time.  I used a red bell pepper instead of green, because I bought the wrong one.  This recipe comes from a good cooking friend and was published on Allrecipes!  :)

Next time I make this, I think I'll make two separate packets instead of one big one, as I think that would be easier to turn on the grill. 

Grilled Potato Casserole

3 tablespoons butter
3 tablespoons all-purpose flour
1 teaspoon salt
1/2 teaspoon seasoned pepper
1/4 teaspoon celery seed
1 1/2 cups milk
4 medium potatoes, peeled and cubed
1 cup chopped onion
1/2 cup chopped green bell pepper
1/4 teaspoon paprika

1.Preheat an outdoor grill for medium-high heat.

2.Melt the butter in a saucepan over medium-low heat. Whisk in the flour, salt, seasoned pepper, and celery seed; cook and stir for 1 minute. Gradually whisk the milk into the flour mixture, and bring to a simmer over medium heat. Cook and stir until the mixture is thick and bubbly, 5 to 10 minutes.

3.Stir in the potatoes, onion, and green bell pepper. Pour the potato mixture onto a large sheet of heavy duty foil. Sprinkle with paprika. Fold the foil loosely around the potato mixture and seal tightly. Grill on covered grill, turning the packets every 15 minutes, until the potatoes are tender, about 45 to 50 minutes.

**This post and photos are property of http://dishingwithdish.blogspot.com/ **

Sunday, September 5, 2010

Easy Chocolate Pudding

This is one of the first homemade puddings I ever made, and I love the fact that it's so easy to make.  It's almost as easy as opening a box of instant (or the boxed cook and serve) kind of pudding.  Almost!  My mom used to make me homemade pudding when I was little, and serve it to me warm with chocolate (or white) chips melting into it, especially if I was home sick from school.  I think my Dad's mom did the same thing.  It's the best thing ever!  When I made this last, I had some peanut butter chips on hand, so I used those, and the pb/choco combo was to die for!  The whole fam loved this, especially the kids.  We all enjoyed it warm, but it's also good cold.

I had some organic sugar on hand that I was wanting to use up (had forgotten about it), so I used that in this recipe and it out very well. 

Easy Chocolate Pudding
from Allrecipes

1/2 cup white sugar
3 tablespoons unsweetened cocoa powder
1/4 cup cornstarch
1/8 teaspoon salt
2 3/4 cups milk (skim or 1% milk will work)
2 tablespoons butter
1 teaspoon vanilla extract

In a saucepan, stir together sugar, cocoa, cornstarch and salt. Place over medium heat, and stir in milk. Bring to a boil, and cook, stirring constantly, until mixture thickens enough to coat the back of a metal spoon. Remove from heat, and stir in butter and vanilla. Let cool briefly, and serve warm, or chill in refrigerator until serving.

**This post and photos are property of http://dishingwithdish.blogspot.com/ **

Friday, September 3, 2010

Tzatziki Sauce

tzat1W
We LOVE Tzatziki Sauce around here!  (A Greek cucumber/yogurt sauce).  I love all the flavors together- it's just divine.  I've made this recipe often, but it always gets scarfed down too fast for me to get a photo.  The other day, I made this for dinner, and it was our main dish, along with some homemade Naan bread.  Some garden-fresh veggies completed the meal (not from my garden, unfortunatley.  Actually, I don't even have a garden.  I'm hanging my head in shame!)  We're lucky enough to have a friend who is supplying us with a copious amount of fresh cucumbers, and some occasional tomatoes (they're not "on" yet over here, but will be soon).  I can't wait for the maters!!  My kids all like this, by the way, and two of them even love it.  :)

Tzatziki is great with some fresh herbs added.  Dill would be wonderful, or fresh mint.  I recently bought a fresh parsley and a fresh rosemary plant, so I threw some fresh parsley into this.  Also, if your cucumber peel is tender, leave it on, because the flecks of green make your tzatziki really pretty.  I partially peeled my cukes this time around since the peel was a little tough in spots. 

Use Greek yogurt for the best Tzatziki, or drain regular yogurt to get out some of the liquid.  (To do this, place your yogurt in layers of cheesecloth, or a coffee filter, set in a strainer over a bowl for a few hours).  If you're not using Greek yogurt and are straining it, I would add a little extra.

I use a little more yogurt than the original recipe calls for, and usually a long English cucumber, or two shorter, regular ones.
tzat3W
Tzatziki Sauce
adapted from Eating, Etc.

1 1/2 cups plain yogurt
1 long cucumber or two shorters ones, shredded (squeeze out excess water with hands)
2 tablespoons fresh lemon juice
1/2 teaspoon salt
1 fresh garlic clove, minced
fresh herbs, optional

1) Combine all ingredients together and stir well.  Refrigerate for a few hours before serving. 

2) Serve with pita or naan bread.

3) Refrigerate leftovers (if there are any- which there never are in my house!)
**This post and photos are property of http://dishingwithdish.blogspot.com/ **

Wednesday, September 1, 2010

Snake Cake!!

This is the second Snake Cake I've made.  I made this today for my little guy who is turning four, and I made it two years ago, for my other little guy who turned 4 back then.  :)  This is so easy to make- you just make a pound cake in a bundt pan, cut it in half, and arrange the halves in an "S" shape.  Then you frost everything, cover the thing with some round candies to look like big dots, use a fruit roll-up or fruit by the foot for your tongue, and you're all set!  For much better directions, head to the Family Fun website, where I got this idea in the first place. 

For the cake itself, I used my fave pound cake recipe, and used a plain bundt pan (meaning a non-fancy bundt pan) to bake it in.  I took some of the batter and made a tiny, 4-inch cake with it that I later let my boys decorate together using peanut butter M&M's.  I used a simple butter frosting recipe, that's not really a recipe at all.  This amount of frosting was enough to frost this snake cake the the tiny little cake, too.
Butter Frosting

1 cup (2 sticks) salted butter, room temp
1 teaspoon pure vanilla extract
2-4 tablespoons milk, or to taste
4-5 cups powdered sugar
gel food coloring, optional

1.  With an electric mixer, cream the butter, vanilla, milk, and powdered sugar until combined and smooth.  Add more or less milk and powdered sugar to get the consistency you want.  Add food coloring slowly until the frosting is tinted as desired. 
**This post and photos are property of http://dishingwithdish.blogspot.com/**