Thursday, March 31, 2011

Cinnamon Pull-Apart Bread

This was a fun project.  I made this bread with my 4-year old during the day, and when the older kids got home from school, we all ate some for a snack.  Good times!!  This recipe is from Joy the Baker; I will post the recipe here, but I highly recommend that you head over to her blog if you want to make this- she has step by step photos, which are very, very helpful when making an unusual bread like this. 

We loved this bread.  It wasn't quite done baking when I thought it was, but we ate it anyway, lol.  Next time, I'd cover it with foil and leave it in for 10 more minutes.  Some of the top edges were starting to burn already.  I would love to make mini versions of this bread, too! 

Cinnamon Pull-Apart Bread
Makes: one 9×5x3-inch loaf

For the Dough:
2 3/4 cups plus 2 tablespoons all-purpose flour
1/4 cup granulated sugar
2 1/4 teaspoons (1 envelope) active dry yeast
1/2 teaspoon salt
2 ounces unsalted butter
1/3 cup whole milk
1/4 cup water
2 large eggs, at room temperature
1 teaspoon pure vanilla extract

For the Filling:
1 cup granulated sugar
2 teaspoons ground cinnamon
1/2 teaspoon fresh ground nutmeg
2 ounces unsalted butter, melted until lightly browned

1.  In a large mixing bowl (I used just the bowl of my stand mixer) whisk together 2 cups flour, sugar, yeast, and salt. Set aside.  Whisk together eggs and set aside.

2.  In a small saucepan, melt together milk and butter until butter has just melted. Remove from the heat and add water and vanilla extract. Let mixture stand for a minute or two, or until the mixture registers 115 to 125 degrees F.

3.  Pour the milk mixture into the dry ingredients and mix with a spatula. Add the eggs and stir the mixture until the eggs are incorporated into the batter. The eggs will feel soupy and it’ll seem like the dough and the eggs are never going to come together. Keep stirring. Add the remaining 3/4 cup of flour and stir with the spatula for about 2 minutes. The mixture will be sticky. That’s just right.

4.  Place the dough is a large, greased bowl. Cover with plastic wrap and a clean kitchen towel. Place in a warm space and allow to rest until doubled in size, about 1 hour. *The dough can be risen until doubled in size, then refrigerated overnight for use in the morning. If you’re using this method, just let the dough rest on the counter for 30 minutes before following the roll-out directions below.

5.  While the dough rises, whisk together the sugar, cinnamon and nutmeg for the filling. Set aside. Melt 2 ounces of butter until browned. Set aside. Grease and flour a 9×5x3-inch loaf pan. Set that aside too.

6.  Deflate the risen dough and knead about 2 tablespoons of flour into the dough. Cover with a clean kitchen towel and let rest for 5 minutes. On a lightly floured work surface, use a rolling pin to roll the dough out. The dough should be 12-inches tall and about 20-inches long. If you can’t get the dough to 20-inches long… that’s okay. Just roll it as large as the dough will go. Use a pastry brush to spread melted butter across all of the dough. Sprinkle with all of the sugar and cinnamon mixture.
7.  Slice the dough vertically, into six equal-sized strips. Stack the strips on top of one another and slice the stack into six equal slices once again. You’ll have six stacks of six squares. Layer the dough squares in the loaf pan like a flip-book. Place a kitchen towel over the loaf pan and allow in a warm place for 30 to 45 minutes or until almost doubled in size.

8.  Place a rack in the center of the oven and preheat to 350 degrees F. Place loaf in the oven and bake for 30 to 35 minutes, until the top is very golden brown. The top may be lightly browned, but the center may still be raw. A nice, dark, golden brown will ensure that the center is cooked as well.

9.  Remove from the oven and allow to rest for 20 to 30 minutes. Run a butter knife around the edges of the pan to loosen the bread and invert onto a clean board. Place a cake stand or cake plate on top of the upside down loaf, and carefully invert so it’s right side up. Serve warm.


**This post and photos are property of http://dishingwithdish.blogspot.com/ **

Tuesday, March 29, 2011

Crab Cakes

I've been wanting to try making crab cakes for a really long time and finally did so last night!  These were so good.  I used Phillips Refrigerated Canned Crab, which is a high-quality crab and the best I can get here (besides fresh from the ocean.... but the crabs I've seen here are just tiny, so it wouldn't be very fun to get the meat off of them myself).  The crab did not have a stong fishy taste or odor; it was sweet and delicious. 

When I opened the can, there appeared to be no extra water, so I did not drain the meat at all.  When I was forming the patties, though, the mixture seemed very wet, so maybe I should have set the crab to drain slowly in the fridge.  I just gently squeezed out excess moisture and let it run out from between my fingers.  It was a bit of a messy buisness, forming these patties.... I had crabby hands, lol.  Luckily my 4-year old was with me to fetch an extra mixing spoon or whatever I needed so I didn't have to crabify my kitchen at all. 

When making crab cakes (I keep wanting to call them crabby patties, like my kids, lol), or salmon cakes, it's important to form them into patties at least an hour ahead of time, so they firm up in the fridge.  This makes them less likely to fall apart during cooking.  I made these into patties about 4-5 hours ahead of time and stuck them in the fridge.  They held up wonderfully during cooking- not falling apart at all.  I think I'll do that with my salmon patties from now on, too. 

I based these crab cakes on this salmon cakes recipe, which comes from the blog Eating, Etc.  I did modify a few things, like using a bit less mustard, etc, because I really wanted the flavor of the crab to shine through.  It did- these were so good!  For some reason, though, only my 4-year old seemed really excited about them.  My other kids ate about a half of one and that's it.  I don't know why; as they weren't fishy at all.  Oh well, that means leftovers for my lunch today- YAY!!!!

Crab Cakes
makes 8-10 Crab Cakes

16 oz crab meat
1/4 cup green onion, finely chopped
1/4 cup celery, finely chopped
freshly ground black pepper, to taste
5 Tablespoons mayonnaise
1/2 Tablespoon Dijon mustard
1/2 Tablespoon grainy sweet-hot mustard
1 teaspoon fresh lemon juice
1/2 teaspoon Worcestershire sauce
1/2 teaspoon garlic powder
1/2 teaspoon Old Bay seasoning
1 egg, lightly beaten
1/3 cup crushed Ritz cracker crumbs
1 cup Panko bread crumbs
1 Tablespoon butter
1 Tablespoon olive oil

1.  Drain crab well.  Set in a large bowl, and set aside (in the fridge).

2.  In a small bowl, mix green onion, celery, pepper, mayo, mustards, lemon juice, Worcestershire sauce, garlic powder, Old Bay, and the egg.  Mix in Ritz cracker crumbs. 

3.  Gently fold the mayo mixture into the crab, being careful not to break up the crab meat too much.  Form into 8-10 patties (I made 10).  Coat each pattie carefully in Panko, and set on a large plate or platter.  (To coat the patties, I held them in my hand and spooned the Panko over them.  This made a mess of my hands but coated the patties well without breaking them). 

4.  Cover the formed, Panko-coated crab cakes with plastic wrap, and set them in the fridge for a few hours to firm up.

5.  Melt butter and olive oil in a large skillet.  Over medium heat, cook the crab cakes for about 4-5 minutes, until browned.  Carefully flip and cook the other side for a few minutes until browned.  Cook 4 to 5 at a time; add more butter or oil if necessary, and cook the other cakes.  Drain on a paper-towel lined plate, and serve.

**This post and photos are property of http://dishingwithdish.blogspot.com/ **

Sunday, March 27, 2011

Blackberry Cobbler

This was really delicious, and very easy to put together, as well.  I used frozen blackberries, added some pure vanilla extract to the fruit, and used the seeds from one vanilla bean in the biscuit topping.  I also used 1/2 cup whole wheat pastry flour in the topping.  We ate this with vanilla ice cream. 
 
This is a Taste of Home recipe; I was de-cluttering my room and found a bunch of TOH mags from last year stacked on an end table.  Last week, I went through them all and earmarked recipes I wanted to make.  This one, and a peach pie recipe are the ones I most wanted to make. 

Blackberry Cobbler

3 cups fresh or frozen blackberries
1 cup sugar
1/4 teaspoon ground cinnamon
3 tablespoons cornstarch
1 cup cold water
1 tablespoon butter

BISCUIT TOPPING:
1-1/2 cups all-purpose flour (I used 1/2 cup whole wheat pastry)
1 tablespoon sugar
1-1/2 teaspoons baking powder
1/2 teaspoon salt
1/2 cup cold butter (I used unsalted)
1/2 cup 2% milk
Whipped cream or vanilla ice cream, optional

1.  In a large saucepan, combine the blackberries, sugar and cinnamon. Cook and stir until mixture comes to a boil (or just starts to cook down a bit). Combine cornstarch and water until smooth; stir into fruit mixture. Bring to a boil; cook and stir for 2 minutes or until thickened. Pour into a greased 8 or 9-in. square baking dish. Dot with butter.

2.  For topping:  In a small bowl, combine the flour, sugar, baking powder and salt. Cut in butter until mixture resembles coarse crumbs. Stir in milk just until moistened. Drop by tablespoonfuls onto hot berry mixture.

3.  Bake, uncovered, at 350° for 32-35 minutes or until filling is bubbly and topping is golden brown. Serve warm with whipped topping or ice cream. Yield: 9 servings.
**This post and photos are property of http://dishingwithdish.blogspot.com**

Saturday, March 26, 2011

Tender Butter Beef & Peas

This is such a yummy, simple recipe.  You brown onions and beef in butter, and set them to slow-cook (in an oven or slow cooker) for a while with tomato sauce.  Then add some light cream and peas, and serve over rice or mashed potatoes.  The first time I made this, I used the slow cooker, and the sauce didn't thicken, so the next time I made it, I used the oven.  The sauce did thicken a lot better that way, but I had just got back from the gym and I didn't want to wait longer than 15 minutes to eat... lol, so I took it out before it had thickened enough.  If you have more patience than I do, you can use the slow cooker and thicken the sauce on the stove right before eating.  Or, you can use the oven and just leave it in there until thickened to your preference.  
New pics added Oct. 2018; recipe made with paprika for color & flavor.

To make in the slow cooker, brown the beef and onions on the stove. Transfer to slow cooker with tomato sauce.  At the end, add the peas and cream.  To thicken, turn slow cooker to high and remove lid.  Cook for 15-30 minutes or until thickened to your liking.

The first time I made this, I used all of the butter, but the next time, I was trying to cut out some fat, so I only used about 3 tablespoons butter instead of 6, and it tasted just as good; I couldn't tell the difference.  So I'd just use 3 tablespoons in the future; 2 to brown the beef and onions, and 1 more added to the dish right before baking.  Also, I wasn't sure if my large pot had an oven-safe lid, so I transferred the meat to a casserole dish with a lid before baking.

We had this over mashed potatoes (the combo was so good!) with a green salad on the side.

Tender Butter Beef & Peas
adapted from The Gourmand Mom

1 1/2 pounds Stew Beef
1 small Onion, chopped
4-6 Tablespoons Butter, divided
1 cup Tomato Sauce
1 tsp paprika, optional
1 cup Light Cream
1 cup Frozen Peas
Salt and Pepper to taste (I found it was fine without any added salt)

1.  Preheat oven to 300 degrees.

2.  In a large dutch oven or oven-safe pan with a tight fitting lid, melt 2 Tablespoons of the butter over medium heat. Add the onion and cook for about 3 minutes. Season the beef with a bit of salt and pepper. Add the beef to the pan and cook for 3-5 minutes until lightly browned on all sides.

3.  Add the remaining butter (1-4 tablespoons, depending on how much you decide to use) and tomato sauce. Stir to combine. Cover and place on the middle rack of the oven. Cook for 2 1/2 hours. Remove the cover and stir in the peas and cream. Turn the heat up to 375 degrees. Cook for 15 minutes uncovered, until the peas are cooked and the sauce has slightly thickened. Season with salt and pepper, as desired.

(Note: For the slow cooker- brown beef & onions on stove.  Transfer to a small slow cooker, and add the tomato sauce and optional paprika.  Cook on Low for 5-6 hours or until beef is tender.  Add the cream and peas and cook until peas are tender.  If desired, thicken.  To thicken, turn slow cooker to high and remove lid.  Cook for 15-30 minutes or until thickened to your liking.)

4.  Serve over rice or mashed potatoes or hot, buttered noodles.

**This post and photos are property of http://dishingwithdish.blogspot.com**

Thursday, March 24, 2011

Orange French Toast

This french toast is tasty and rich.  It was made even better by the usage of tender Portuguese sweet bread-yummmm.  The original recipe calls for heavy whipping cream, but I find that half and half works just fine (I had some to use up).  Whole milk would probably work too... for that matter, any milk would probably be just fine!! 

We had this for dinner the other day with fried eggs.  I don't like calling them "fried" eggs, as that just sounds bad... I cook them with just a tiny bit of butter or cooking spray, so they're not really "fried", but I don't know what else to call them.  Anyway, this french toast was a hit and was gone very quickly.  This is the second time I've made this recipe and I loved it both times.  Serve with a tiny bit of maple syrup, if desired, but don't cover up the OJ flavor! 

Orange French Toast
adapted from Allrecipes

1 loaf French bread, Portuguese sweet bread, or Hawaiian sweet bread
1 cup orange juice
1/2 cup half and half, or heavy whipping cream
2 eggs
1 teaspoon ground cinnamon
1/4 cup white sugar (optional... I omitted this)
1 dash ground nutmeg
butter, for greasing griddle
confectioners' sugar for dusting

1.Cut loaf ends off and reserve for another use. Cut remaining loaf into 1 inch slices.

2.In a large bowl, combine orange juice, half and half or cream, eggs, ground cinnamon and white sugar, if using.  In a large skillet, melt butter over medium heat.  Dip bread slices into egg mixture; add bread slices to hot skillet and cook until browned on both sides, about 5 minutes.  Dust generously with confectioners' sugar and serve warm.

**This post and photos are property of http://dishingwithdish.blogspot.com**

Wednesday, March 23, 2011

Slow Cooker Indian Butter Chicken

I love Indian food.  I try to make it often, but I really need to make it more than I have been!  I'm not a fan of super hot, burn-your-mouth Indian food, but enjoy the warm, spicy (not heat-wise) flavors it has to offer.  I just love all of the spices together. 

I found this Indian Butter Chicken on Allrecipes, and it was very good, and quite easier than other Butter Chicken recipes I've tried.  I don't think it necessarily needs crockpot cooking, but it is convenient if you will not be home to make dinner.  Next time I make this, I think I will skip the crockpot (just making sure I cook my chicken all the way on the stove!)  Like I said, I liked the crockpot cooking, but 1)  The smell was teasing me all day- it smelled SO GOOD and I wanted it now; I did not want to wait for dinner!  2)  The spices lost some of their strength cooking all day, but I just added a bit more before serving  3)The coconut milk kinda separated- you can see it in the photo.  It still tasted SO good though, and I used light coconut milk, so that might have been a factor.  When I first added the coconut milk, it was so creamy and smooth- so I want to serve it right away next time. 

I waited to add the yogurt right before serving, since that is the general rule with dairy and crock-pot cooking.  This made a LOT of sauce- which is great, because I love sauce!  I had to make more rice to go with the leftovers the next day.  My kids loved this meal too- they love all the Indian food I've made.  We had this with brown rice, grilled naan bread, and steamed green beans.  This would have been great (and more colorful) with some fresh cilantro- I will have that on hand next time.  I used very thick, rich Greek yogurt, and found that I did not need the full 1 cup.  I would start with 1/2 cup and see what that is like, and then add more to taste.  It was very creamy already from the coconut milk.

Other Indian Recipes I've made that you should try :)  I plan on making some veggie Indian lentils soon:
Chicken Korma (LOVE this!!!)
Chicken Tikka Masala (Love this as well!)
Chicken Vindaloo (good, but not as creamy rich since there is no cream or yogurt!)

Slow Cooker Indian Butter Chicken
adapted from Allrecipes

2 tablespoons butter
2 tablespoons olive oil
4 large skinless, boneless chicken thighs, cut into bite-sized pieces
1 onion, diced
3 cloves garlic, minced
2 teaspoons curry powder
1 tablespoon curry paste (optional- I didn't have this, and it is usually very spicy anyway)
2-3 teaspoon garam masala
1 teaspoon ground ginger
1 (6 ounce) can tomato paste
15 green cardamom pods or 1 teaspoon ground cardamom
1 (14 ounce) can coconut milk
1/2 to 1 cup plain yogurt; add to taste
salt to taste

1.Melt the butter and olive oil in a large skillet over medium heat. Stir in the chicken, onion, and garlic. Cook and stir until the onion has softened and turned translucent, about 10 minutes. Stir in the curry powder, optional curry paste, garam masala, ginger, and tomato paste until no lumps of tomato paste remain. Pour into a slow cooker, and stir in the cardamom pods (or ground cardamom), and coconut milk.

2.Cook on High 4 to 6 hours, or on Low 6 to 8 hours until the chicken is tender and the sauce has reduced to your desired consistency.  Taste, and add salt if needed.  Remove and discard the cardamom pods (if using) before serving.  Stir in yogurt.

(For stovetop cooking- just continue cooking everything in the large skillet until chicken is cooked through and tender.  Add yogurt and cook until heated through; then serve). 
**This post and photos are property of http://dishingwithdish.blogspot.com**

Monday, March 21, 2011

Salmon Melt

Sometimes, lately, it's been hard for me to find something to eat for lunch that sounds good, isn't too hard, and is relatively healthy.  I was surfing some recipe sites the other day and I thought that a salmon melt (like a tuna melt, but with salmon instead) sounded SO good, so I looked up a few recipes for inspiration and quickly put together a sandwich for myself.  It was SO GOOD!!  It was just what I was wanting at the time.  The only thing is, since the melt contained cheese, mayo and salmon, it was a little salty, but I was ok with it.  I just drank lots of water.

I found the inspiration on the blog folkmann.ca, which is the blog one of our FAVORITE recipes comes from, Grilled Naan Bread.  (Which I will be making tonight, BTW!)  I looked at his recipe and changed the amounts of everything to make just one sandwich.  I used a ton less cheese, too, just what looked right.  I loved this and will probably have it often for lunch!  I used a small cup of salmon; it looks like this.  Each cup of salmon is 2.8 oz.

PS: Now that I'm more thoroughly reading the original recipe, I realize I was supposed to only mix in the Parm, and leave the cheddar on top- oops!!  I just mixed everything together.  I'm sure it's good both ways.

Salmon Melt
heavily adapted from Folkman

2.8 oz canned salmon, drained
1/2 teaspoon lemon juice
1 tablespoon mayo
fresh pepper, to taste
1 tablespoon Parmesan cheese
2 tablespoons shredded sharp Cheddar
2 slices whole-grain bread

1.  Preheat oven to 400 F.  (Or, you can use your broiler... but I'm too scared to)

2.  Mix salmon with mayonnaise, lemon juice, pepper, and parmesan cheese.  If desired, add cheddar at this point and mix in, or save it to top the salmon mixture in the oven. 

3.  Lightly toast the two slices of bread.  Spoon the salmon mixture onto 1 piece of the toasted bread. Top with cheddar cheese (if you had set it aside earlier).  Bake, open -face 3 to 4 minutes until cheese melts and is lightly browned.  Remove from the oven and place the remaining slice of bread on top.  Serve with a dill pickle.

**This post and photos are property of http://dishingwithdish.blogspot.com/ **

Sunday, March 20, 2011

Bacon, Tomato, Basil & Provolone Pasta

I made this pasta dish quite a while ago, when we had both bacon and fresh basil to use up from other dishes.  I threw together some ingredients in my mind and we had this for dinner, with some fruit, I think (it's been a while so I don't really remember!)  I used up some leftover dry pasta; that's why there are three different shapes.  Sometimes I'll have just a bit of bowtie or shell pasta leftover from another recipe. So this dish helped me use up quite a few things that needed using! 

The pasta is almost BLT-esque, and I meant to add black olives as well, but I forgot about them.  It would have been good with that extra saltiness, though.  Feta would also be great in this!

Bacon, Tomato, Basil & Provolone Pasta

10 oz. dry pasta shapes
1 cup (or more) cherry tomatoes, halved
3-4 slices smoked Provolone, chopped
1/2 cup fresh sliced basil
6-8 slices cooked bacon, crumbled
1/4 cup good quality olive oil
2 TBS. red wine vinegar
salt and pepper to taste
shredded Parmesan, to garnish, optional
extra basil, to garnish, optional

1.  Cook pasta according to package directions; drain.

2.  While pasta is cooking, put the cherry tomatoes in a large serving bowl.  Add the Provolone cheese, basil, and cooked bacon and stir gently.  In a separate small bowl, whisk together the olive oil, red wine vinegar, salt and pepper. 

3.  Pour cooked pasta over the cheese and tomato mixture, and pour the oil/vinegar dressing over the pasta.  Toss everything together gently to combine.  Garnish with extra basil and shredded Parmesan, if desired.  Serve.  (This is good at room temp, and would also probably be good refrigerated). 

**This post and photos are property of http://dishingwithdish.blogspot.com/ **

Saturday, March 19, 2011

Slow Cooker Pulled Chipotle Chicken

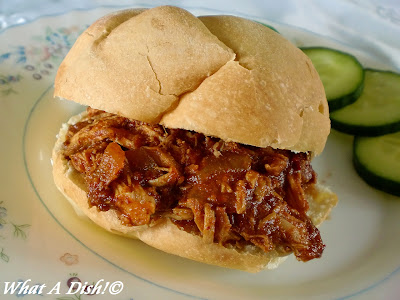
I opened a can of chipotles not long ago and was excited about using more of them- their spicy, smoky flavor is so delicious, even though I am a spice wimp.  (I can't get them here- my mom sent them to me.)  You need just a few added to a dish to taste their amazing flavor.  I like doing dishes in the slow cooker when I can, so when I came across this chicken recipe, using the slow cooker AND chipotles, I had to try it!  It's very good- richly flavored, and so easy to boot!  We had these on Kaiser rolls, and I found that the rolls held up better if toasted a bit in the oven first.  Also, the leftover chicken the next day tasted even better. 

I omitted the salt from the recipe and found it just fine; I also cut down the smoked paprika amount (that stuff is hard to come by for me!) and I only used about half of the chicken that the original recipe called for, but kept the sauce amount the same. 

Slow Cooker Pulled Chipotle Chicken
adapted from Beantown Baker

1 (14 oz.) can tomato sauce
2-3 chipotle chiles in adobo, finely minced
1/4 cup cider vinegar
3 Tbsp honey
1 tsp smoked paprika
2 Tbsp tomato paste
2 Tbsp Worcestershire sauce
3 tsp dry mustard
1 Tbsp chili powder (use part chipotle chili powder if you have it!)
1.5-3 lbs boneless, skinless chicken thighs and breasts, trimmed of fat
1 medium onion, chopped
3 cloves garlic, minced

1.  Stir tomato sauce, chiles, vinegar, honey, paprika, tomato paste, Worcestershire sauce, mustard, chili powder and salt in a 6-quart slow cooker until smooth.  (Since I used less chicken, I used my small (2.5 qt) crockpot and it was just fine).  Add chicken, onion and garlic; stir to combine.

2.  Put the lid on and cook on low until the chicken can be pulled apart, about 5-6 hours.

3.  Shred chicken with two forks. Stir well into the sauce and serve on rolls or garlic toast.

**This post and photos are property of http://dishingwithdish.blogspot.com/ **

Thursday, March 17, 2011

St. Patrick's Day!

Happy St. Patrick's Day!!  It's always fun to think of what green dessert I'll make on this holiday.  (This just has one layer of green, but still.)  These brownies are so good- a chewy brownie layer, topped by mint frosting, and covered with a melted mint chocolate mixture.  I did not realize how much butter this recipe entailed until after I started making it- holy butter!!  I almost didn't have enough butter in the house to make these- I only have one tablespoon left in the whole house now!!  Lol! 

This is my Mom's recipe.  She calls them BYU brownies, after the brownies her university had for sale in their food area (cafeteria?  I don't know what to call it).  I'm just going to call them Mint Brownies, myself, since I did not go to the same university.  :) 

These are not hard to make, but time-consuming, as you must make each layer and then wait for each layer to cool before adding the next.  I started these around 10am and was finished at about 2pm (doing lots of other stuff in-between, of course!).  One could make the brownie layer the night before to make prep faster.

Mint Brownies
from my Mom

Brownies:
1 cup butter
2 cup white sugar
4 eggs
2 teaspoons vanilla extract
2/3 cup unsweetened cocoa powder
1 cup all-purpose flour
1/2 teaspoon salt
1/2 teaspoon baking powder

Preheat oven to 350 F.  Grease a 9x13 pan.  In a large saucepan, melt butter.  Remove from heat and stir in sugar, eggs, and vanilla.  Beat in the cocoa, flour, salt, and baking powder (a whisk works well for this).  Spread batter into prepared pan.  Bake in preheated oven for 22-30 minutes, or until toothpick comes out almost clean.  Do not overbake.  Cool completely.

Filling:
2 cups confectioners sugar
1/2 cup butter, softened
1 Tablespoon milk or water
1/2 teaspoon mint extract
1//2 teaspoon vanilla extract
3 drops green food coloring (or use gel food coloring; just a dab)

Combine filling ingredients in a medium mixing bowl; beat until creamy.  Spread over cooled brownies.  Refrigerate until set. 

Topping:
1 (10 oz.) package mint chocolate chips (or 10 oz. mini semi-sweet choc chips and a few drops mint extract)
1/2 cup butter

Melt chocolate chips and butter over very low heat in a small saucepan until smooth (mine never got completely smooth- but it was still fine and looked good on the brownies).  Let cool for 30 minutes or until lukewarm, stirring occasionaly.  Spread over filling.  Chill before cutting.  Store in refrigerator. 
**This post and photos are property of http://dishingwithdish.blogspot.com/ **

Wednesday, March 16, 2011

Simple Roasted Asparagus

This asparagus is so good- roasting any vegetable takes it to a whole new level.  I've already posted a recipe for roasted asparagus with balsamic butter sauce, but roasted asparagus is so good on its own that I thought I'd post the method here.  If you think you don't like asparagus, or are just used to having it steamed (or boiled!), try this recipe.  Seriously, this stuff is so good- it's almost like eating popcorn for me.  The kids loved it too- we were all fighting over the last piece.  It was even a hit with my Picky Kid.  It is so simple to make, too- you only need fresh asparagus, good olive oil, salt, and pepper.  I like to use fancy sea salt and fresh ground pepper, but regular salt and pepper will work just fine, too.  We had this with this salmon, and they complimented each other very well. 


Roasted Asparagus

1 bunch asparagus, rinsed, and tough ends trimmed
drizzle of good-quality olive oil
sea salt or regular salt, to taste
fresh pepper or regular pepper, to taste

1.  Preheat oven to 400 degrees F. 

2.  On a baking sheet with sides, drizzle a bit of olive oil.  Lay the asparagus on the baking sheet in a single layer.  Drizzle with another bit of olive oil, and shake the pan gently from side to side to distribute oil evenly on the asparagus.  Sprinkle asparagus with salt and pepper to taste. 

3.  Roast in the hot oven for 8-12 minutes, or until asparagus is tender and has started to crisp and brown in spots.  If your asparagus is thick, it may need more time.  Mine was thin, and done in about 9 minutes. 
**This post and photos are property of http://dishingwithdish.blogspot.com/ **

Tuesday, March 15, 2011

Baked Onion Rings

Thanks to a cooking friend, I came across this recipe for baked onion rings.  She tried them and liked them, so I decided to give them a shot, as well.  They were delicious!  I wasn't expecting them to be as good as they were.  They tasted just like regular onion rings, and they are baked, so there is only a fraction of the fat there compared to the fried ones.  You dredge them in flour, then egg, and then Panko bread crumbs.  (Panko bread crumbs are GREAT- and they are available in most grocery stores!  I can even get them!).  The original recipe sprays the rings with cooking spray to crisp them up in the oven, but I used olive oil sprayed with my Misto sprayer- it's just olive oil with no chemicals.  I love my Misto, too!

I found preparing these onion rings to be very time-consuming (all the dipping and dredging of each individual ring), and my oven is a tiny European one, so I can only fit one tiny baking sheet in there (largest baking dish that will fit is 9x13).  So, I only did 1/2 of a large onion, which was fine, because it was mostly me and my husband eating these anyway.  You will have to excuse the bald spots on my onion rings in the photo- it was a bit difficult to make the Panko stick.  But these are still worth it if you love onion rings!

We had these for dinner last Friday with Pulled Chipotle Chicken sandwiches, corn on the cob, Caesar salad and fresh strawberries.  Very enjoyable! 

Baked Onion Rings
from For the Love of Cooking

1-2 sweet yellow onions, sliced into thick rings
1/2 cup of flour
Sea salt and freshly cracked pepper, to taste
1 egg
3 tbsp milk
1 1/2 cups of Italian seasoned panko crumbs (I used plain)
Cooking spray or Misto olive oil sprayer

1.  Preheat the oven to 400 degrees. Line a baking sheet with a silpat mat coated with cooking spray (or just grease a baking sheet).

2.  Slice the onion into thick rings then separate them. Pour the flour into a bowl then season it with a bit of sea salt and freshly cracked pepper then mix well. Mix the egg and milk in a bowl until well combined. Pour the panko crumbs into another bowl.

3.  Dredge the onions first in the flour, then in the egg mixture, and finally in the panko crumbs until fully coated. Place each coated ring on the baking sheet. Repeat with the remaining rings. Spray the rings with cooking spray or olive oil, then place into the oven. Bake for 10 minutes, then flip the rings over carefully with tongs. Bake for an additional 10 minutes. Remove from the oven and serve immediately. Enjoy.

**This post and photos are property of http://dishingwithdish.blogspot.com/ **

Monday, March 14, 2011

Another Pi Day!

Happy Pi Day, everyone!  For this year's Pi Day, we had Pizza Pi, fresh Pi-Napple (ha ha ha!), blueberry pie, and mini key lime pies.  I am pie crust-making challenged, obviously.  I like the crust recipe I use, but I have an extremely hard time rolling out the dough in a nice circle, and not having it tear or break on me.  I always have some tearing and breakage.  Then I can't make the edges look nice in a pie pan.  Oh well.  Some might call the pie above rustic, and I would be one of those people.  It was a pain to make (not to mention edges burning and then leaking juice in my oven!) but it was such a joy to eat.  I love blueberry pie, and this one was so tasty and juicy. 

For our pizzas, I did my old stand-by of the copycat Pizza Hut pan crust.  It makes 3 small-ish pizzas.  On two of them, I used red sauce, mozz, and pepperoni, but on one, I spread it with homemade basil pesto instead of red sauce, and topped it with Provolone and mozz, and then black olives.  Red onion and feta would have been awesome, as well.  This one was by far the best- the oil from the pesto seeped into the crust as it was baking, giving it awesome flavor all over.  I also used roasted garlic instead of raw in the pesto, which tasted wonderful.  I might do roasted garlic in my pesto all the time from now on.
I'm posting the blueberry pie recipe below- I think it was too sweet, so in the future, I'd cut the sugar down to 1/2 cup.  I'll reflect that in my post below.  If you like things sweeter, or if you are using fresh blueberries that are more tart, use 3/4 cup.  I used frozen blueberries.  I set them in a bowl in the fridge a few hours before making the pie, thinking they would thaw a little, but they didn't, so they just went in frozen.  If I had thawed them, though, I wouldn't get rid of that precious juice (just be prepared for a juicy pie!)  I added the seeds from one scraped vanilla bean to the blueberry filling.

For the mini key lime pies, I used 6 store-bought mini graham cracker pie crusts, and made a half-recipe of my Key Lime Pie filling.  This was the perfect amount of filling for the 6 mini pies.  I made these mostly for the kids- they all LOVE Key Lime Pie, and it's easier for them to eat than the messy blueberry. 


Betty Crocker's Blueberry Pie
adapted from my Betty Crocker cookbook

Pastry for double-crust pie
1/2 cup sugar (can use 3/4 cup if desired)
1/2 cup all-purpose flour
1/2 teaspoon ground cinnamon
one vanilla bean, seeds scraped (optional)
6 cups blueberries (fresh or frozen)
1 tablespoon lemon juice
1 tablespoon butter

1.  Heat oven to 400.  Prepare pie crust.

2.  Mix sugar, flour and cinnamon in large bowl.  Stir in blueberries.  Turn into pie-crust lined pie plate.  Sprinkle with lemon juice.  Dot with butter.  Cover with top pie crust; cut slits in the top pie crust, and seal and flute the edges.  Cover edge with 2-3 inch strip of aluminum foil to prevent excessive browning.  Remove foil during last 15 minutes of baking.

3.  Bake 35-45 minutes or until crust is browned and juices begin to bubble through slits in crust.  Cool in pie plate on wire rack.
**This post and photos are property of http://dishingwithdish.blogspot.com/ **


Saturday, March 12, 2011

Pan-Fried Salmon in Basil-Caper Sauce

Here's another recipe from the blog Eating, Etc.  This salmon is lightly coated in flour, pan-fried, and then served with a lemony, basil-caper cream sauce.  I think my lemon was very acidic, or something, because my half-and-half curdled upon impact (with the skillet).  However, it still tasted good, and I know half-and-half can be finicky (it curdles on me sometimes in other dishes, like homemade tomato soup.  I've come to terms with it).  If you're scared of potential curdling, you could use regular cream, but I'm willing to cut some fat and calories in exchange for curdling once in a while.  (Note- I did use regular half-and-half, NOT fat-free.  Fat free is full of gross chemicals and I don't use it.)  This dish was very good and flavorful and we all liked it (except Picky Kid, who was, of course, scared of the sauce with capers and basil floating in it.  I expected that, too.  I've come to terms with it). 

We had this with brown rice cooked in my homemade chicken stock (yums!) and oven-roasted asparagus (even more yums!!  Recipe to come later). 

Pan-Fried Salmon in Basil-Caper Sauce
adapted from Eating, Etc.

1.5 to 2lbs salmon filets
salt & pepper, to taste
1/2 cup all-purpose flour, for dredging
2 Tablespoons unsalted butter
2 Tablespoons olive oil
1/2 cup dry white wine or chicken broth
4 Tablespoon fresh lemon juice
1 cup half-&-half
2-4 Tablespoons capers, drained
4 Tablespoons fresh parsley, finely chopped
8 Tablespoons fresh basil, finely chopped

1) Rinse fish and pat dry. Season with salt & pepper, then dredge in flour.

2) In a large skillet, over medium-high flame, heat olive oil & melt butter.

3) Fry fish, skin-side down first, for 3-5 minutes depending on thickness of fish, until nicely browned. Turn filets over, removing & disposing of skin if any, and fry for 3-5 minutes. Remove to a plate and keep warm.

4) Reduce heat to medium and stir wine or broth into skillet, scraping up and stirring in any browned bits.

5) Mix in lemon juice.

6) Stir in half-&-half, and simmer for 2-3 minutes until sauce starts to thicken.

7) Add capers, parsley, & basil and stir for another minute.

8) Serve fish with sauce spooned over it.
 
**This post and photos are property of http://dishingwithdish.blogspot.com/ **

Friday, March 11, 2011

Yesterday's Lunch


Grilled Cheese with Provolone, Bacon, and Basil

For each sandwich, you will need:

2 slices whole-grain bread
softened butter, 1-2 teaspoons
2-3 slices of cooked bacon
3 large fresh basil leaves
2 thin slices Provolone cheese
(tomatoes would be awesome, too!)

1.  Preheat oven to 400 F.  Butter one side of one slices of bread, and lay it butter-side down on a baking sheet. 

2.  Lay the bacon, basil, cheese, and optional tomatoes on top of bread (on the un-buttered side).  Butter the other slice of bread, and lay on top of filling ingredients, butter-side up. 

3.  Bake in the pre-heated oven about 5 minutes, or until golden on one side.  Flip, and cook until you reach the desired color, and cheese is melted. 

**This post and photos are property of http://dishingwithdish.blogspot.com/ **


Thursday, March 10, 2011

Cranberry-Spinach Salad

This salad is tangy and fresh.  It's even better with the addition of some crumbled gorgonzola or blue cheese... yum.  We go to a local organic farm to buy fresh baby spinach- it's tender, delish, and so good in here. 

Cranberry-Spinach Salad
adapted from Allrecipes
4 servings

1 teaspoon butter
1/4 (heaping) cup tablespoons almonds, blanched and slivered
1/2 pound (baby) spinach, rinsed and torn into bite-size pieces
1/2 cup dried cranberries
1 tablespoon toasted sesame seeds
1-1/2 teaspoons poppy seeds
2 tablespoons white sugar
1 teaspoon minced onion
1/8 teaspoon paprika
pinch sea salt
2 tablespoons white wine vinegar
2 tablespoons cider vinegar
1/4 cup extra-virgin oil

1.In a small skillet, melt butter over medium heat. Cook and stir almonds in butter until lightly toasted. Remove from heat, and let cool.

2.In a large bowl, combine the spinach with the toasted almonds and cranberries.

3.In a medium bowl, whisk together the sesame seeds, poppy seeds, sugar, onion, paprika, white wine vinegar, cider vinegar, and olive oil. Toss with spinach just before serving.

**This post and photos are property of http://dishingwithdish.blogspot.com/ **

Tuesday, March 8, 2011

Pancake Day!

Well, I think today is Pancake Day.  I was confused last week on March 1, when some of my Facebook friends were stating that IHOP was having free pancakes for Pancake Day.  I'm still going for today, though.  Since it is Pancake Day, I made German Pancakes for dinner tonight.  It's been a while since I've made them, and I've forgotten just how darn easy they are!!  They take almost no time to mix up; the oven pre-heating is the largest time sucker here.  It was just me and two of my kids home for dinner tonight; I think I'd have to make two batches if the whole fam was home.  This is the recipe I started making when I was in college and then newly married, from my Betty Crocker cookbook (I got the book in 2000).  I used my 10.5 inch cast-iron skillet for this.... it baked up awesome!!!  I loved it!  I also didn't have to bake as long- watch this one while it's in the oven. 

Other Pancake recipes for Pancake Day:
Blue Cornmeal Pancakes
Oatmeal Ginger Buttermilk Pancakes
Swedish Pancakes
Vanilla Bean Pancakes
Basic Buttermilk Pancakes
Eggnog Pancakes
Pumpkin Pancakes

German Pancake (Puffy Oven Pancake)
adapted from Betty Crocker

1 tablespoon butter
2 large eggs
1/2 cup all-purpose flour (I've use half ww pastry w/good results)
1/2 cup milk
1/4 teaspoon salt (I used sea salt)

1.  Heat oven to 400 F.  Melt butter in pie plate or cast-iron skillet (9 or 10 inches), in pre-heating oven.

2.  Beat eggs slightly in medium bowl with wire whisk.  Beat in remaining ingredients.  Do not overbeat.  Pour into hot pie plate or skillet.

3.  Bake 18-30 minutes (ovens vary widely; watch it) or until puffy and deep golden brown.  Serve immediatly sprinkled with powdered sugar and lemon juice, if desired, of fruit and maple syrup. 

**This post and photos are property of http://dishingwithdish.blogspot.com/ **

Sunday, March 6, 2011

Penne with Spinach and Bacon

I really like this pasta dish- it is flavorful, easy to put together, uses simple ingredients, and isn't that bad for you!  The original recipe does not call to drain the bacon grease, but I had a lot rendered after cooking the bacon, so I drained out most of it; just left enough to coat the bottom of the skillet in order to cook the garlic.  This was our main dish for dinner today and was ready in the time it takes to boil pasta and cook the bacon.  We had yogurt fruit salad as our side- also very easy!  :)  PS:  Use whole-grain penne if you can find it!

Penne with Spinach and Bacon
adapted from Allrecipes

10 ounces penne pasta
2 tablespoons olive oil, divided
6 slices bacon, chopped
2 tablespoons minced garlic
1 (14.5 ounce) can petite diced tomatoes
1 bunch fresh baby spinach (2-4 ounces... use more or less depending on how much you want), rinsed and torn into bite-size pieces

1.Bring a large pot of lightly salted water to a boil. Add the penne pasta, and cook until tender, 8 to 10 minutes.

2.Meanwhile, heat 1 tablespoon of olive oil in a skillet over medium heat. Place bacon in the skillet, and cook until browned and crisp. Remove bacon to drain on paper towels.  Drain the grease; leave about 1 tablespoon remaining- enough to coat your skillet.  Add garlic, and cook for about 1 minute. Stir in the tomatoes and cooked bacon, and cook until heated through.

3.Place the spinach into a colander, and drain the hot pasta over it so it is wilted. Transfer to a large serving bowl, and toss with the remaining olive oil, and the bacon and tomato mixture.
**This post and photos are property of http://dishingwithdish.blogspot.com/ **

Saturday, March 5, 2011

Avocado Frozen Yogurt

Here is an interesting recipe for you.  I've come across random avocado ice cream or avocado frozen yogurt recipes over the years and came across another one recently.  For some reason, it sounded SO good to me- I just had to make it right away!  Well, after I finally made it (and messed up part of the 1st batch... so I had to start over again) the idea of eating avo-fro-yo was kind of weirding me out.  I couldn't bring myself to eat it. 

My kids seemed excited about it though, so I had my husband give it to them while I was out of the house one night.  Well, the kids LOVED it!!!  They all had seconds, and wanted more.  They ate more than half the batch.  The next day, I had a tiny serving... in a fancy ice cream glass, so I could feel like I was just eating regular ol' ice cream or frozen yogurt.  It wasn't bad!  It is very "fresh" and "green" tasting.  The lime juice helps the flavor of avocado, I think.  I used bottled key lime juice and fresh lemon juice.  I won't be rushing to make this again, but the fact that my kids liked it so much makes me happy.  Plus, my pickiest son said it might be his favorite ice cream ever!  Oh, my husband liked it too.  Not as much as the kids, but still.

*This fro-yo starts out with a cooked custard mix. As with all cooked ice cream bases, you MUST be very careful when adding the eggs back to the hot milk.  Don't stop whisking, don't let the heat be too high, do not let it come to a boil (even a simmer!), and do not let the eggs cook too long, or they will curdle!  This happened to me the 1st time, and I had to throw it out- there is just no way to salvage a curdled, separated, eggy mess.  I've made many ice creams in the past that have cooked eggs, (and never messed up like that) so I'm surprised this happened to me... I'll just say my 4-year old was in the kitchen with me and VERY distracting that day! 

Avocado Frozen Yogurt
from foodess

2 cups whole milk
¾ cup granulated sugar
½ tsp vanilla extract
4 large egg yolks
1 cup plain whole-milk yogurt (use Greek-style yogurt!)
1 tbsp finely grated lemon zest (optional- I omitted)
1 tbsp finely grated lime zest (optional- I omitted)
2 ripe avocadoes, pitted, peeled and cut in large chunks
2 tbsp lemon juice
2 tbsp lime juice

1.  In medium saucepan, combine milk and sugar, cooking over medium heat just until sugar dissolves and milk comes to a boil. Meanwhile, beat egg yolks in a medium-sized bowl. Temper the eggs by slowly adding 1 cup of the hot milk mixture to the yolks, whisking constantly.

2. Slowly pour yolk mixture into saucepan with remaining milk mixture, whisking constantly. Cook over medium-low heat, stirring constantly with a wooden spoon, until the mixture thickens enough to coat the back of a spoon, 5-8 minutes. Do not allow mixture to boil, or egg will curdle. Pour mixture through strainer into a bowl.  Stir in the yogurt and zests, and let cool for a while.  Refrigerate mixture overnight.

3. In a blender or food processor, puree the avocado with 1 cup of the cooled custard, and the lemon and lime juices. Fold the avocado mixture back into the custard. Freeze in an ice cream maker according to the manufacturer’s directions. Transfer frozen yogurt to a container, cover it, and place in freezer until frozen completely, about 4 hours.

**This post and photos are property of http://dishingwithdish.blogspot.com/ **

Friday, March 4, 2011

Yeast-Raised Waffles

I really, really, really loved these waffles.  They are, first of all, easy, but that's not really why I love them.  They are light, fluffy, and crisp at the same time.  They are amazing!!  I even used half whole wheat pastry flour and they were still incredible!  They only use one bowl; not the annoying 3 bowls like a lot of recipes.  You can make them the night before for breakfast, or in the morning for dinner later.  (We had them for dinner).  I will be making these again, that's for sure!  The recipe seems to make quite a few, too- I have a round waffle maker, making pretty much plate-sized waffles, and the waffles just kept coming!  They are so good with just butter and real maple syrup.  Plus, the yummy yeast smell while they're cooking is intoxicating.

Note:  I made these again 6/12, and reduced the butter by half.  So, I used 1/4 cup melted butter instead of the 1/2 cup, and they were just as good!  I am changing the recipe below to 1/4 cup melted butter.
Yeast-Raised Waffles

1/2 cup warm water
1 package active dry yeast (2 1/4 teaspoons)
2 cups milk, warmed
1/4 cup butter, melted
1 teaspoon salt
1 teaspoon sugar
2 cups all-purpose flour (I used one cup whole wheat pastry)
2 eggs, beaten
1/4 teaspoon baking soda

1.  Use a rather large mixing bowl -- the batter might rise a bit.  Put the water in the mixing bowl and sprinkle in the yeast. Let stand for 5 minutes, until yeast dissolves. Add the milk, butter, salt, sugar and flour to the yeast and beat until smooth and blended. Cover the bowl with plastic wrap and let stand overnight at room temperature. (Batter will be thin).

2.  Just before cooking the waffles, stir in the eggs; add the baking soda and stir until well mixed. Cook on a very hot waffle iron and bake until the waffles are golden and crisp to the touch.

Note: If there is any leftover batter, store in a covered container in the refrigerator. It will keep for several days.
**This post and photos are property of http://dishingwithdish.blogspot.com/ **