Sunday, July 31, 2011

Grilled Pork Chops in Cuban Mojo Marinade

This is my 500th post!  I don't have anything celebratory to share with you, but these pork chops are pretty darn good, so they're celebratory enough for me.  They have a wonderful citrusy-garlic flavor, and are SO tender, even with using super-thick cut pork chops.  My husband grilled them and was surprised by how tender they were; he said they were so thick he was sure they'd be tough.  So, we both loved these and the kids all did too.  They each ate at least one whole pork chop, and some of them ate more after that.  Sometimes they're not the biggest fans of pork chops (unless it's this recipe).  I made 6 pork chops and did not increase the marinade; there was more than enough. 

We had these with fresh grilled pineapple, sliced avocados, and Cilantro-Lime Brown Rice.  (Can make the rice with either white or brown; scroll down to the bottom of the post to see instructions for brown). 

Grilled Pork Chops in Cuban Mojo Marinade
adapted from Eating, Etc.
Serves 4-6

fresh garlic cloves
5 Tablespoons olive oil
juice of 1 orange
zest of 1 orange
juice of 2 limes
2 tsp dried oregano
1 tsp ground black pepper
1/4 tsp fine sea salt
1/8 tsp ground cumin
1/8 tsp ground cayenne pepper
4-6 thick-cut pork chops

 1)  In a small food processor or blender, (I used my immersion blender) purée garlic, olive oil, orange juice, orange zest, lime juice, oregano, pepper, salt, cumin, & cayenne pepper. Reserve 4 Tablespoons of sauce for spreading on chops after grilling.

2)  Pour marinade into large ziplock bag with pork chops, seal, and refrigerate for 2 hours, turning occasionally. 

3)  Preheat grill to medium heat (about 300°F-400°F). Cook chops, covering grill, for 7-9 minutes per side, depending on thickness of meat, or until no longer pink in center.

4)  Plate and spoon reserved mojo marinade over chops and serve.

**This post and photos are property of http://dishingwithdish.blogspot.com/ **

Saturday, July 30, 2011

Chocolate Zucchini Bread

This bread is easy, delicious, and a nice answer to any extra zucchini laying around!  I made two loaves to give away, but the smell remaining in the house made me wish I had some for myself, so I made two more loaves.  I meant to give one of those loaves away, but it never actually happened.... oops.  My kids loved this and ate a ton of it.  It's very good warm, and after it cools off, it's good plain or with butter.  I made some changes to the recipe to make it a little more healthy.  Also, zucchini shreds very nicely in a standard food processor.
Chocolate Zucchini Bread
adapted from Allrecipes

2 cups all-purpose flour
1 cup whole wheat pastry flour or regular whole wheat flour
1/4 cup unsweetened cocoa powder
1 tablespoon ground cinnamon
1 teaspoon baking soda
1/2 teaspoon baking powder
1 teaspoon salt
1 3/4 cups white sugar
3 eggs
1/2 cup canola oil
1/2 cup unsweetened applesauce
2 teaspoons vanilla extract
2 cups shredded zucchini (leave the peel on!)
1 cup coarsely chopped walnuts
1 cup mini semisweet chocolate chips

1.  Preheat oven to 350 degrees F (175 degrees C). Lightly grease two 9x5 inch loaf pans.  (Flour the bottom so it doesn't stick).                 

2.  In large bowl, combine flours, cocoa, cinnamon, baking soda, baking powder and salt, mix well. In separate bowl, combine sugar and eggs, beat until well blended. Add oil, applesauce, and vanilla; beat until combined. Stir in zucchini. Add flour mixture; stir just until moistened. Stir in nuts and chocolate chips. Spoon evenly into loaf pans.              

3.  Bake in preheated oven for 40 to 60 minutes, or until toothpick inserted in center comes out clean. Cool in pans for 10 minutes. Remove bread from pans; cool completely on wire rack.     
**This post and photos are property of http://dishingwithdish.blogspot.com/ **

Thursday, July 28, 2011

Noodle Rice Pilaf

This was very good, SO easy to make, and quick, as well.  I was going through my old recipe boxes and came across this- it's from a 2001 issue of Taste of Home.  It looked so easy, I couldn't NOT make it, lol!  I needed a dish to go with baked chicken, and I had just made a batch of homemade chicken broth, so I was good to go.  I also have a large container of tiny egg noodles and not much to do with them, so this helped. 

I wish I could use brown rice with recipes like these- but I think that would turn the pasta to mush.  So I broke out the white for this one.  Using white helped it be ready very quickly, at least.  We had this with a baked chicken dish and steamed green beans.  Even my picky child loved this one!

This is similar to both my Herbed Rice Pilaf and Homemade Rice-A-Roni recipes, but has the benefit of being even easier and still tasting great.  :) 

Noodle Rice Pilaf

1/4 cup butter
1 cup uncooked long grain rice
1/2 cup uncooked fine egg noodles or vermicelli
2-3/4 cups chicken broth
2 tablespoons minced fresh parsley or 1 tablespoon dried

1.  In a large saucepan, cook and stir the rice and noodles in butter for 3-4 minutes or until lightly browned. Stir in broth; bring to a boil. Reduce heat; cover and simmer for 20-25 minutes or until broth is absorbed and rice is tender. Stir in parsley. Yield: 4 servings.
**This post and photos are property of http://dishingwithdish.blogspot.com/ **

Wednesday, July 27, 2011

Gooey Caramel Rolls

Here's another recipe from the Betty Crocker Kids Cook cookbook I talked about on this post.  This was another recipe my daughter picked out and really, really wanted to try.  I resisted, because it called for canned breadstick dough, and I like homemade stuff and try to avoid processed foods like that.  She said we could do homemade dough, but I didn't want to try to figure out a good amount to make, etc, so I just bought the darn breadstick dough!  Lol.  These were actually very good!  The breadstick dough didn't taste fake like I feared, and the caramel sauce you make would probably mask that anyway.  We enjoyed these for breakfast one Saturday morning.  I want to use that caramel sauce and experiment with actual roll recipes sometime.  We left out the nuts just because my kids are weird about that sometimes. 

Gooey Caramel Rolls
from Betty Crocker
Makes 6 Rolls

1/2 cup dark brown sugar
1/3 cup whipping cream
1/4 cup chopped pecans, optional
2 Tablespoons white sugar
1 teaspoon cinnamon
1 can (11 oz) refrigerated original breadsticks

1. Heat oven to 350.  Mix brown sugar and whipping cream in an 8 inch round cake pan.  Sprinkle with pecans. Set aside.

2. Stir sugar and cinnamon in a bowl until mixed.

3. Take breadsticks out of package unrolling the dough but not separating into breadsticks.  Sprinkle on cinnamon-sugar mix over dough. Roll up dough, starting at one of the short sides.

4. Separate dough with a knife using the cut marks to make spirals.  Put slices on top of sauce in pan.

5. Bake for 25 mins or until rolls are golden brown.  Let cool a minute and then invert on a plate.   Let set for a minute so the sauce can drizzle down and then remove pan.
**This post and photos are property of http://dishingwithdish.blogspot.com/ **

Monday, July 25, 2011

Baked Southwest Sandwiches

We love these open-faced sandwiches.  The original recipe calls for turkey deli meat, but we find these taste wonderful without it, so we always leave it out.  Feel free to include it if you want.  The recipe also calls for baking the avocado with the sandwich, but I think it's weird to bake avocados, so I just top the sandwiches with them after they come out of the oven.  The recipe also says to only use 8 slices of Italian bread, but I use 15-20; depending on how many I can fit onto my baking sheet (I have a tiny oven).  As long as you have enough toppings to cover each slice of bread, you're good.  You dont' need a huge amount of the mayo spread on each slice.  Using this amount of toppings on only 8 slices of bread would render soggy, heavy sandwiches that would not be very good.  I love that olive/mayo/sour cream spread; I want to make it once just as a dip and serve with grilled naan bread.  I had something similar in a restaurant once and loved it. 

The whole fam loves these, even Mr. Picky.  We had these recently for dinner with a lot of fresh watermelon.  They would also make a great appetizer, maybe cut into smaller pieces, or a yummy lunch. 
Baked Southwest Sandwiches
adapted from Taste of Home

1 can (4-1/4 ounces) chopped ripe olives, drained
1/2 teaspoon chili powder
1/2 teaspoon ground cumin
salt, to taste (I omit this)
1/3 cup mayonnaise
1/3 cup sour cream
1/3 cup chopped green onions, optional
10-16 slices Italian bread
3/4 to 1 pound thinly sliced cooked turkey, optional
2 medium tomatoes, thinly sliced
1-2 ripe avocados, sliced
3/4 cup shredded sharp cheddar cheese
3/4 cup shredded Monterey Jack OR Pepperjack cheese

1.  In a bowl, combine mayonnaise, sour cream and green onions, if using.  Add olives, chili powder, cumin, and optional salt.

2.  Place bread on an ungreased baking sheet; spread about 1-2 tablespoon of mayonnaise mixture on each slice. Top with cheeses, optional turkey, and tomatoes.  Bake at 350° for 15 minutes or until heated through and cheese is melted.  Add a few avocado slices to each open-faced sandwich.

**This post and photos are property of http://dishingwithdish.blogspot.com/ **

Sunday, July 24, 2011

Garlic Roasted Baby Potatoes

I love most any kind of potato, especially roasted ones.  I found these tiny potatoes at a local grocery store.  They were the smallest I've ever seen- loved them.  This recipe was interesting because you boil baby potatoes first, and then just roast them in a hot oven to crisp up the skin.  I bet this would also work with just roasting longer and skipping the boiling, but it does make them ready a lot faster.  I boiled, drained, and mixed them with olive oil, garlic, and seasonings ahead of time, and then just refrigerated it all together in a bowl.  When I returned home later to make dinner, I just preheated the oven, dumped them in a baking sheet, and they were ready 10 minutes after the oven was hot enough.  These go really well with grilled meats. 

I did not have fresh rosemary or any other fresh herb on hand when I made these; I just sprinkled on dried basil and they were good with just that and the garlic.  You'll want to pick the smallest potato you can find for this recipe; get them as bite-sized as possible.

Garlic Roasted Baby Potatoes
fadapted rom Our Best Bites

1 1/2-2 lbs. baby or fingerling potatoes (or other very small variety), washed
2 1/2 Tbsp. extra-virgin olive oil
2 1/2 Tbsp. coarse-grain or Dijon mustard
2 1/2 Tbsp. chopped fresh rosemary, optional
4-5 cloves of garlic, minced or pressed
Coarsely-ground black pepper
Kosher salt or sea salt

1.  Bring a large pot of salted water to a boil. While the water is heating, combine olive oil, minced garlic, rosemary, mustard, and some black pepper in a medium mixing bowl. Set aside. When the water is boiling, add the potatoes and boil for about 10 minutes or until they are easily pierced with a fork. Drain, return the potatoes to the pan, and then toss with the mustard mixture in the mixing bowl.

2.  For immediate roasting:  Preheat your oven to 425 F and line a baking sheet with aluminum foil.  Sprinkle potatoes with Kosher or sea salt.  Bake for 10-15 minutes or until the skins are browning and sizzling.  Serve.

3.  For roasting later: Wrap the bowl of potatoes and mustard mixture with plastic wrap and refrigerate for up to 6 hours.  When ready to bake, preheat the oven to 425 F.  Line a baking sheet with foil and spread the potatoes out evenly.  Spinkle with Kosher or sea salt.  Bake for 10-15 minutes or until the skins are browning and sizzling.  Serve.  :) 
**This post and photos are property of http://dishingwithdish.blogspot.com/ **

Saturday, July 23, 2011

Fruit Pizza

We love fruit pizza around here.  I try to make it at least once every summer.  When my store got some good-looking berries in, I made it as soon as I could.  I also tried nectarines, and those were delicious as well.  I used my go-to roll-out sugar cookie dough recipe, cutting it in half.  It was a perfect amount to fill one pizza pan.  Make the whole recipe if making two fruit pizzas (obviously, lol).  This did not last very long here.....

Fruit pizzas of the past: One and Two.
Fruit Pizza

Crust:
1/2 cup butter, softened
3/4 cup sifted confectioners' sugar
1 egg yolk
1/2 teaspoon vanilla extract
1/2 teaspoon almond extract
1 1/4 cups all-purpose flour
1/2 teaspoon baking soda
1/2 teaspoon cream of tartar

1.In a large bowl, cream together the butter and confectioners' sugar until smooth. Beat in the egg yolk and stir in the vanilla and almond extract. Combine the flour, baking soda and cream of tartar; blend into the creamed mixture. Cover and chill for at least two hours.

2.Preheat the oven to 375 degrees F (190 degrees C).  Roll the dough out, or pat it out into a lightly greased pizza pan. 

3.Bake anywhere from 8-15 minutes in the preheated oven, until lightly browned.  Cool.

Frosting:
5 ounces cream cheese, softened
1-2 cups powdered sugar (to taste)
1/2 teaspoon vanilla extract
1-3 tablespoons cream or milk, as needed
Using a stand mixer or electric beaters, mix the cream cheese, powdered sugar, vanilla, and cream or milk until smooth and spreadable.  Add more powdered sugar or cream or milk as needed.  Spread on cooled cookie crust.

Fresh Strawberries, sliced
Fresh Blueberries
Fresh Raspberries
Fresh Nectarines, sliced

Arrange prepared fruit over the frosted cookie crust.  Refrigerate until ready to serve. Enjoy!

**This post and photos are property of http://dishingwithdish.blogspot.com/ **

Friday, July 22, 2011

10 Pics for 10 Years

Today, my husband and I have been married for 10 years!  I can't believe how old that makes me feel!  Here are some pictures from today; we did some things with the kids and later had a babysitter, went out to eat and then like always, had fun at a local grocery store! 

Hydrangeas are in full bloom right now!

Another little (well, big) family member on the way.

Nothing like a trough full of food to celebrate 10 years!
We found some donut peaches at the store!
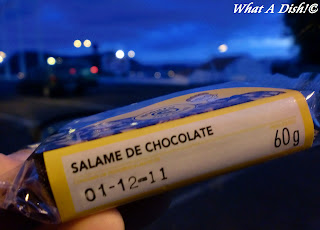
And finished off the day with some chocolate salami.  (In Europe, expiration dates go day/month/year, btw).

**This post and photos are property of http://dishingwithdish.blogspot.com/**/

Tuesday, July 19, 2011

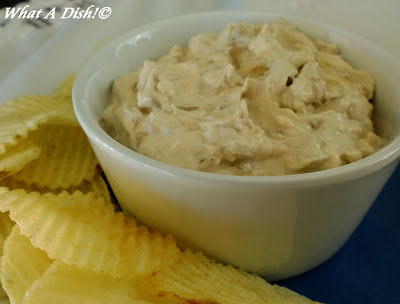
Caramelized Onion Dip

I used to just LOVE that onion dip made from Lipton's French Onion dry soup mix, combined with a tub of sour cream.  The other day, I was missing onion dip.... I don't use the dry packets anymore, full of sodium and probably MSG and who knows what else.  No matter how much I want my dippage.  I had bookmarked some homemade onion dip recipes a while back, and I went searching through them, picked one, and made it.  It was very good!  And best of all, I controlled the ingredients.  I also used low-fat sour cream.  Note: This makes a ton!  If you don't need it for a party or something, try cutting the recipe in half.

Caramelized Onion Dip
adapted from Chaos in the Kitchen

1 tbsp oil
1 tbsp butter
2 onions, chopped
2 cloves garlic, minced
1 tsp beef base or 1 cube beef bouillon
1/2 cup water
2 tsp Worcestershire Sauce
salt and pepper, to taste
16 oz sour cream
4 oz cream cheese

1.  Heat butter and oil in a medium saucepan over medium-low heat.  Cook onions and garlic until soft and browned.  You want them caramelized- this takes a long time, 20-30 minutes or more.  Careful not to burn them.  Add beef base or bouillon and water and continue to cook until mixture is combined.  Season with Worcestershire sauce and salt and pepper to taste. Can be made in advance, cool and refrigerate onion mixture until ready to use.

2.  Using a hand held mixer (if necessary), combine sour cream, cream cheese, and onion mixture.  Chill dip at least 30 minutes or up to several days. Taste and adjust seasonings as desired before serving.
**This post and photos are property of http://dishingwithdish.blogspot.com/**/

Sunday, July 17, 2011

Grilled Zucchini & Chicken Pasta

I loved this pasta dish.  It was easy and quick to make, although as with most pasta dishes, you have to work fast to get everything done in the time the pasta is boiling.  Marinating the chicken ahead of time helps with that, though, and having someone else do the grilling (like my husband).  While he was out grilling the chicken and zucchini, I was inside, boiling pasta, juicing lemons, grating Parmesan cheese, and cooking garlic in oil.  This made a ton and it was ALL eaten, and we wanted more!  I have to admit that my two boys weren't crazy about the actual zucchini, but they loved the pasta and chicken.  My daughter liked the zucchini, and my husband and I LOVED it.  It was my favorite part.  Actually, this dish would be great as a vegetarian dish without any chicken at all, although the chicken was delish too. 

I added some cherry tomatoes I had that needed to go.  (The wonderful thing about pasta dishes- add or take away whatever you want!)  I also used penne (Barilla Plus) because I realized too late I was out of fettucini.  I would use penne again- it made it very easy to eat, especially for the kids.  I didn't even have fresh basil (or oregano, but I never do) when I made this and it was STILL wonderful!  I just used dried- looking forward to making it again with fresh.  The recipe calls for lemon zest, but I was in too much or a hurry to zest my lemons.  Feel free to do it though- I'm sure it would be good!

This is a great summer dish- and pretty inexpensive, too.  If you're lucky enough to have a garden with zucchini, or a friend's garden, it's even cheaper!  It was only about $.60 at my store for the two zucchinis, though.  Love summer produce!

Grilled Zucchini & Chicken Pasta
adapted from Our Best Bites

2 boneless, skinless chicken breast halves or 6-7 chicken tenders
2 lemons, juiced

2 tablespoons red wine vinegar
Olive Oil
8 oz. Fettuccine, Penne, or pasta of your choice
2 medium zucchini
1 cup shredded parmesan cheese
5-6 cloves garlic
fresh basil- about 1/2 cup chopped (or 1 tsp. dried, if you don't have fresh)
Fresh Oregano- about 1/4 cup chopped (or 1/2 tsp. dried)
Olive Oil
Salt and Pepper, to taste

1.  Marinate chicken in the juice of one lemon, a splash of olive oil, and the red wine vinegar.  Sprinkle with salt and pepper.  Let sit for at least 30 minutes, or up to a few hours (not too long- or the acids in the lemon juice and vinegar will start cooking the chicken). 

2.  Preheat your outdoor grill.  Meanwhile, cook the pasta in salted water according to package directions and drain, reserving 1/4 cup cooking water.  Slice your zucchini in half, length-wise.  Drizzle or brush with olive oil and sprinkle with salt and pepper.

3.  Press, or finely mince garlic.  In a small saucepan, on the stove over medium-low heat, place 1/4 cup of olive oil and the garlic.  Don't actually cook the garlic; just warm it through to make a garlic-infused olive oil. 

4.  Grill chicken and zucchini until done.  Don't under or over-cook the zucchini.  When done, remove from grill.  Let chicken rest a few minutes, and then slice.  Slice zucchini. 

5.  Place cooked pasta in a large serving bowl.  Add chicken, zucchini, the juice of the other lemon, parmesan, garlic oil, fresh herbs, and salt and pepper to taste.  Toss.  If you think it needs more moisture, you can add some of the reserved pasta cooking water.  Garnish with more fresh herbs and shredded Parm if desired. 
**This post and photos are property of http://dishingwithdish.blogspot.com/**/

Saturday, July 16, 2011

Peanut Butter & White Chip Chocolate Cookies

Here is another recipe we all loved from Our Best Bites.  They were easy and fun to make; I made these with my 4-year old while everyone else was gone.  They were yummy too, and very popular with the kids; they were gone in no time.  The recipe calls for part butter-flavored shortening, but I just used plain, organic shortening for no trans-fats.  If I didn't have the organic shortening on hand, I would have used all butter.
Peanut Butter & White Chip Chocolate Cookies
from Our Best Bites

1/2 cup butter, softened
1/2 cup shortening (I used organic... no trans-fats)
1 cup brown sugar
1 cup granulated sugar
1 1/2 teaspoons pure vanilla extract
2 eggs
2 1/2 cups flour (can use some whole wheat pastry)
1 teaspoon baking soda
1 teaspoon baking powder
1/2 teaspoon salt
6 tablespoons unsweetened cocoa powder
1 cup peanut butter chips
1 cup white chocolate chips

1.  Preheat oven to 350 F.

2.  Cream together butter, shortening, brown sugar, and granulated sugar.  Add the vanilla, and then the eggs, one at a time. 

3.  In a separate bowl, whisk together flour, baking soda, bakind powder, salt, and cocoa powder.  Add flour mixture to the butter mixture to combine and then mix in the chips. 

4.  Using a cookie scoop or a spoon, drop onto an ungreased or parchment-lined cookie sheet.  Bake for about 8-10 minutes.  Allow to cool for about 5 minutes and then transfer to a cooling rack to cool completely. 
**This post and photos are property of http://dishingwithdish.blogspot.com/**/

Friday, July 15, 2011

Grilled Potatoes & Onions

We had this easy, tasty side dish with grilled steaks, corn on the cob, and fresh watermelon for the Fourth of July last week.  It's very simple and if you slice your potatoes thin enough, they cook very quickly on the grill!  For the kids, I made foil packets with just the potatoes, butter and seasonings and no onions. 

Grilled Potatoes & Onions
adapted from Our Best Bites

1 potato per person (we used yellow- like Yukon Gold)
1/2 small onion per person (we used red onions)
1/2 Tbsp. butter per person, cut into pieces
1/4 tsp. salt per person
Freshly-ground black pepper
Smoked paprika
Aluminum foil

1.  Tear sheets (1 per person) of aluminum foil into about 12″ pieces (can use a little less or more).  Preheat grill. Slice potatoes into pieces about 1/8-1/4″ thick.  Slice onions about 1/8″ thick. 

2.  Place 1 potato in the middle of each foil square and dot with butter pieces.  Sprinkle with salt and pepper and then sprinkle generously with smoked paprika.  Paprika is very mild, so it’s hard to add too much. Top each pile with onions.

3.  Fold edges in and secure tightly. It’s important to get a good seal because the moisture will cook the potatoes and onions and you want all those yummy juices, so if it seems like there’s not quite enough foil, wrap packet in another layer.

4.  Turn heat on grill to low (I think we did medium-low). Place each packet on the grill. Close lid for 15 minutes. Turn and allow to cook for another 15 minutes. Remove from heat and carefully open each packet.  May want to check for done-ness before time given, especially if using medium-low heat. 
**This post and photos are property of http://dishingwithdish.blogspot.com/**/

Wednesday, July 13, 2011

Molten Chocolate Cakes (Chocolate Lava Cakes)

These cakes were so fun to make, eat, and photograph.  What's not fun is the butter content.... but we can just ignore that for now.  I excused it because we were celebrating Father's Day like a month late... my husband was gone on Father's Day.  (I first wrote "Fake Father's Day" but then that sounded like the Father was fake, not the day, and the might have been confusing to some of you.  Sorry). 

This is a recipe I've had my eye on forever, but was recently nudged to make it by the delish-looking photos posted on Eating, Etc.  When I started making these, I thought I had some caramel sauce in the fridge, but I didn't, so we just had these with plain vanilla ice cream.  Still so good, though! 
After baking these, I called everyone down so they could watch me un-mold them.  The kids were totally fascinated by the first one I did... it broke upon impact, releasing hot fudgy goodness.  Then they watched me unmold the rest and were still fascinated, asking how I made the chocolate lava inside, etc.  Try this recipe, at least once!  It's such a cool recipe to make and SOOOO good!!  If you do not own ramekins, you can make this recipe in 8 extra-large muffin cups, or 12 regular ones (just bake for less time). 
Molten Chocolate Cakes
adapted from Allrecipes and Eating, Etc.

1 cup unsalted butter*
8oz semisweet chocolate chips
5 large eggs
1/2 cup sugar

pinch of salt
4 tsp all-purpose flour
6-8 small ramekins
cooking spray
whipping cream or ice cream


1) Preheat oven to 450°F.  (I was more comfy with 400 F, because my oven is crazy). 

2) Melt butter & chocolate in double boiler or medium heat-proof bowl over a saucepan of simmering water; remove from heat.

3) In a separate medium bowl, with a hand mixer, beat eggs, sugar, & salt until sugar dissolves.

4) Mix egg mixture into chocolate until smooth.

5) Stir in flour until just combined.

6) Spray bottom & sides of 6-8 ramekins with cooking spray.

7) Divide batter among ramekins.  May place ramekins on cookie sheet if desired.

8) Bake on middle rack until batter puffs but center is not set. This can vary from 8-12 minutes, depending on size of your ramekins. Mine were done in about 10, I think.

9) Carefully lift cakes from ramekins and serve, inverted, on dessert plates.

10) Top with whipped cream and drizzle with caramel sauce. Serve warm.

*If you use salted butter (like I had to; my store was out of unsalted), just omit the salt, or else the cakes will be too salty.


**This post and photos are property of http://dishingwithdish.blogspot.com/**/

Sunday, July 10, 2011

Overnight Steel-Cut Oats

I love oatmeal, and I love steel-cut oatmeal, but I rarely make it because I don't want to devote 20 minutes to stirring it in the mornings.  This is an overnight recipe for it, meaning, you soak the oats overnight in liquid, so they are softened by morning.  Then, you only need to cook them for 5-8 minutes or until they are tender enough for you.  There are recipes out there for doing them in your slow-cooker overnight, but I tried that once with yucky results.  However, I think I will research recipes and try that method again sometime, because having them ready when you wake in the morning would be even better!

But anyway, back to this recipe.  You soak the oats in milk and applesauce, which makes for a great flavor and creamy texture, but the milk stuck badly to my cooking pan.  In the future, I might just try water and see what happens.  However, this was very yummy and I was probably just not stirring often enough (was trying to make lunches and unload the dishwasher at the same time). 

I added a little extra sugar to mine and topped with milk and chopped white peaches.  (The peaches were a nice surprise- they were labeled yellow peaches at the store and turned out to be white when I cut them open!  Love all peaches, but white peaches are a treat.  They smell like flowers, too). 
Overnight Steel-Cut Oats
from The Novice Chef
2 Hearty Servings

1 cup steel cut oats
1 3/4 cups skim or 1% milk
2 tablespoons brown sugar
4 ounces all-natural applesauce (about one snack-sized cup)
1 teaspoon cinnamon
a pinch of salt

1.  In a nonmetal bowl, combine oats, brown sugar, applesauce, cinnamon and salt. Stir in milk; cover and chill for 8 to 24 hours.

2.  To serve, transfer oatmeal mixture to a medium saucepan. Heat just to boiling; reduce heat. Simmer, uncovered, for 5 minutes or until oatmeal is done, adding additional milk if desired and stirring occasionally (or a little more often).

3.  Remove from heat. Add your favorite mix-ins (may need more sugar). Spoon into 2 bowls. Serve with additional milk, if desired.
**This post and photos are property of http://dishingwithdish.blogspot.com/**/

Friday, July 8, 2011

Easy Caramel Corn

At the library last week, my kids spotted a Betty Crocker Kids' Cookbook and wanted to check it out.  We did, and went through the book together when we got home, bookmarking recipes we could make together.  This was the first one we tried.  Some of the "recipes" were things that weren't really recipes, like grilled cheese, scrambled eggs, etc.  But there are some good-looking ones in there, and this was one was delicious!!  The kids did help me make this; but we had to be very careful since this recipe involves stirring a hot sugar mixture, which cookes VERY hot and can be dangerous if you get it on your skin.  Just be careful.  This didn't make very much; it was gone quickly, but it's probably for the best, health wise.  Lol.  One could double it, if needed.  My oven is too small for that, but if I had a huge American oven, I'd totally double it next time.  :) 

I've made Caramel Popcorn Balls a million times, but I've never made a baked caramel corn recipe.  This was so good- like Cracker Jacks but actually yummy!  Lol.  One could add nuts or other peanuts to make it even more Crackers Jack-like.  I used salted butter, and with the extra salt, it had that sweet-salty thing going on which was really delicious. 

Baked Caramel Corn
from Betty Crocker

6 cups popped popcorn (about 1/4 cup unpopped)
1/2 cup packed brown sugar
1/4 cup (1/2 stick) butter
2 tablespoons light corn syrup (I used Lyle's Golden Syrup)
1/4 teaspoon salt (I used coarse sea salt)
1/4 teaspoon baking soda

1.  Heat the oven to 200 F.  Put the popped popcorn into a 9x13 pan.  (It says not to grease the pan, but I did, using nonstick cooking spray).

2.  Put the brown sugar, butter, corn syrup, and salt in a small saucepan.  Cook over medium heat, sitrring a few times with a wooden spoon, until mixture is bubbly around edges.  Keep cooking over medium-low heat for 5 minutes, stirring occasionaly.

3.  Take the saucepan off the heat.  Stir in the baking soda until mixture looks foamy.  Quickly pour the caramel mixture over popcorn in pan, and stir until popcorn is coated with caramel.

4.  Bake in the oven for 1 hour, stirring every 15 minutes.  Cool for 15 minutes before eating.  Store any leftovers in an airtight container. 

**This post and photos are property of http://dishingwithdish.blogspot.com/**/

Thursday, July 7, 2011

Make-Ahead or Freezer Meal- Manicotti

I realize this manicotti looks kind of funky, but it's just hard to photograph certain food items!  Look at the pretty salad in the background, though!  Those baby greens come from a local organic farm.  They're bee-you-ti-ful!! 

Ok, I made this back in May, I think, but was un-impressed.  At the time, I made a big batch for our fam to eat the next day, and a small batch (8x8 pan) for the freezer.  I took the lazy way out and did not pre-boil my manicotti shells.  So, the first batch, the un-frozen one, was ok.  (That's the one in the pic above... turned out a bit too dry for us).  I wasn't even going to post in on here.  But.... about a month and half later, we took the frozen one out, baked it, and ate it.  It was SO much better!!  It was very good.  A great texture- just moist enough, great flavor, etc.  I added some good-quality Parmigiano Reggiano to the second batch, and I'm sure that helped, as well.  But freezing it must have done something- it was just perfect after being frozen.  (If you do freeze this, cover first w/plastic wrap, then foil.  For extra protection, stick the whole thing in a freezer bag.  Thaw in fridge 24 hours before baking, or at least overnight). 

Maybe I should stick one of these in my freezer for a post-baby dinner that's ready to go!  I'll post a small (8x8 pan) recipe below; double it if needed.  It's filling, so the small recipe fed my fam of 5 just fine with some steamed broccoli on the side.

Cheese Manicotti
adapted from Skinner's Pasta

1/2 package (4 oz) Manicotti noodles, uncooked
1 1/2- 2 cups part-skim ricotta cheese
3/4 cup shredded part-skim mozzarella cheese
1/3 cup grated Parmesan cheese, divided
2 tablespoons fresh parsley, or 1 teaspoon dried
1/4 teaspoon salt, or to taste
1/4 teaspoon fresh ground black pepper
2 cups spaghetti or pasta sauce (I prefer meatless)

1.  In a large bowl, stir together ricotta, mozzarella, 2 Tablespoons Parmesan cheese, parsley, salt and pepper; spoon into uncooked pasta tubes (you may boil them first if you really want to). 

2. Spread 1/2 cup sauce on bottom of an 8x8 or 9x9 baking dish; arrange filled pasta in single layer over sauce.  Cover with remaning sauce and Parmesan cheese. 

3.  If baking right away: Cover with foil and bake at 375 for 25-35 minutes or until hot and bubbly. 

4.  For freezing:  Use a disposable aluminum pan (small cake pan).  Prepare as directed but do not back.  Cover with plastic wrap; then foil.  If desired, stick the whole pan into a freezer-safe ziploc bag.  Label the package- include baking temp and time.  Freeze up to 2 months.  When ready to bake: Remove plastic wrap, replace foil.  Thaw out overnight in fridge for faster cooking.  If thawed, baked at 350 F for 30-40 minutes or until heated through and bubbly.  If cooking from frozen; bake at 350 for about 2 hours or until hot and bubbly. 
**This post and photos are property of http://dishingwithdish.blogspot.com**

Monday, July 4, 2011

Fourth of July Strawberry Shortcakes

All you need to make these strawberry shortcakes is your fave pound cake, good, fresh strawberries, a bit of sugar (vanilla sugar if you have it), and some whipping cream.  I used my favorite pound cake recipe and cut it in half to fit my mini bundt pan (my pan makes 6 single-serving-size minis).  The minis are SO fun to eat and make a great presentation, but to make this even easier, you could cut the pound cake recipe in half and just put it in a loaf pan- that way you could just use thick slices as the base of the strawberry shortcakes. 

We had a big Fourth of July barbecue lunch with grilled chicken legs, grilled, planked steak, grilled onions & potatoes, corn on the cob, and watermelon.  A few hours later, we enjoyed these little cakes.  The kids LOVED them and so did my husband and I.  I added some almond extract to the poundcake recipe, used vanilla sugar on the strawberries, and added the seeds from one vanilla bean to the homemade whipped cream. 
Fourth of July Strawberry Shortcakes

Pound cake of your choice (This is a good one- cut in half if desired)
Fresh, sliced strawberries
Sugar or vanilla sugar
Whipping cream
Vanilla bean, optional

1.  Prepare pound cake and set aside.  This can be done the day before.

2.  Wash and hull fresh strawberries.  Slice each one into 3 or 4 pieces and lay in a mixing bowl.  Sprinkle sugar or vanilla sugar over strawberries- 1 to 2 tablespoons, and let sit at room temp for about 30 minutes.  This will allow some of the juices to come out.  Stir.  If desired, you can mash some of them.

3.  Whip the cream in a large, metal or glass mixing bowl (I stored mine in the freezer for 30 minutes prior to whipping).  Add sugar, if desired- I only added one big spoonful of vanilla sugar.  If adding vanilla bean seeds, add them toward the end of mixing time and incorporate fully.

4.  Assemble the cakes- on a dessert plate, place some pound cake.  Top with sliced strawberries and whipped cream.
**This post and photos are property of http://dishingwithdish.blogspot.com**

Sunday, July 3, 2011

Berries & Yogurt

This really isn't a "recipe", and it's not a novel idea, but it's one of my fave things to do with fresh berries, and since the 4th of July is coming up, I thought I'd put it on here.  Plus, I love pics of fresh berries.  :)  This is just fresh berries with a bit of vanilla bean yogurt spooned over the top.  I love showcasing fresh berries this way and my whole family LOVES it too.  There are actually a few nectarine slices under all those berries, so you can add those or peaches, too, or, just do fresh berries like this.  Make sure to use a high-quality, flavorful creamy yogurt.  I used a German brand with vanilla bean specks.... German yogurt is the BEST!  :)  In the States, a good Greek yogurt or a natural whole-milk vanilla yogurt would be good (Stonyfield Farms, etc). 

Have a healthy, seasonal treat this Fourth of July!

Berries & Yogurt
by What a Dish!

fresh strawberries
fresh blueberries
fresh raspberries
good-quality vanilla bean yogurt (hopefully whole-milk... just go for it)

1.  In a nice, small dish or ramekin, layer the berries in order desired.  I lay strawberries first because they are bigger and sturdier.  Dollop with as much vanilla yogurt as desired.  You can sprinkle with finely chopped nuts or cinnamon, if desired, or just eat as-is. 

**This post and photos are property of http://dishingwithdish.blogspot.com/**

Friday, July 1, 2011

Taco Rice

Taco Rice
I spotted this recipe in the Summer 2011 Penzey's Spice Catalog.  Besides offering spices for sale, they also feature different recipes using their spices.  This recipe uses thier taco seasoning, but I just used my own

This was very good!  I used brown rice, extra-lean ground beef (97% lean, I think), and light sour cream.  This was popular with the whole fam.  I put everything in separate bowls on the table, and everyone could dish up as much rice, meat, and toppings as they wanted.  I will definitely make this again.  Add whatever toppings you want; be creative!

Taco Rice is actually a Japanese dish, surprisingly!  Actually, it comes from Okinawa.  Check out this Wiki article.

(Update 3/18/2013: I've made this many times since I first posted it, and my whole fam loves this.  I took new photos last time.)
Taco Rice

Taco Rice

2-4 cups cooked rice (I used brown)
1 lb. ground beef or turkey
2-4 Tablespoons taco seasoning
3/4 cup water

Toppings:
salsa
shredded lettuce
shredded Cheddar cheese
chopped onion
sliced black olives
diced avocado
chopped tomatoes
sour cream

1.  Heat a large skillet over medium-high heat.  Add ground beef or turkey and cook for 5-10 minutes or until nice and browned, breaking it up into chunks and stirring to brown all sides.  Add the taco seasoning, cook, stirring, for a minute.  Add water, stir to combine, reduce heat to medium, and cook 8-10 minutes until most of the water has been cooked away but mixture is still saucy. 

2.  Serve the taco meat over rice, and top with any and all desired toppings.  Enjoy!
**This post and photos are property of http://dishingwithdish.blogspot.com/**