Friday, February 28, 2014

Filipino Pancit

pancit4W
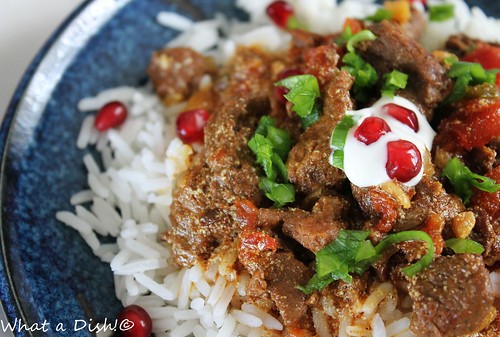
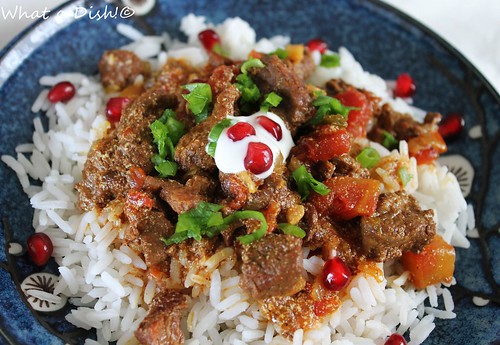
A few weeks ago, a friend came over and we made Panict together.  We also made a Filipino cake, which I'll blog about later.  I loved this- it brought me back to my childhood; the 2 short years we lived in the Philippines.  I got to sample all kinds of delicious Filipino food back then and I still enjoy eating it now.  Pancit is chicken and veggies cooked together with rice noodles and a little broth.  Such a simple, but satisfying dish.  And it makes a ton!  My friend had to bring over her wok, since I don't have one.  There's no way it could have fit in my largest skillet.  Note:  The recipe calls for 12 oz. of noodles; we only had an 8 oz. package and used that; it was PLENTY!!  Lol.  I'll include both below.  
pancit3W
Filipino Pancit
adapted from Allrecipes

1 (8 OR 12 ounce) package dried rice noodles
1 teaspoon oil
1 onion, thinly sliced and then quartered
3 cloves garlic, minced
1 small head cabbage, thinly sliced
4 carrots, cut into matchsticks
2 cups diced cooked chicken breast meat*
1/4 cup soy sauce
1/2- 1 cup broth, or more
2 lemons - cut into wedges, for garnish, optional
green onions, sliced, for garnish, optional

1.  Place the rice noodles in a large bowl, and cover with warm water. When soft, drain, and set aside.
2.  Heat oil in a wok or large skillet over medium heat. Saute onion and garlic until soft. Stir in cabbage, carrots and soy sauce. Cook until cabbage begins to soften, then add chicken.  Toss in noodles and about 1/2 cup broth, and cook until heated through and noodles are tender, stirring constantly. Add more broth if necessary; as the noodles soak it up.  Transfer pancit to a serving dish and garnish with quartered lemons.

*To cook the chicken, we boiled it in a few cups of lightly salted water.  We reserved the broth afterwards and used this to cook the noodles.  
pancit6W
Leftover pancit with lumpia, and orange chicken!
**This post and photos are property of http://dishingwithdish.blogspot.com/ **

Wednesday, February 26, 2014

Snickerdoodles Without Cream of Tartar

Snickerdoodles (No Cream of Tartar)
I know some people think that Snickerdoodles have to have Cream of Tartar, and I have a great recipe I love that calls for that, but I wanted to try something new this time.  I've been making this easy sugar cookie recipe forever, and I love the soft chewiness and the crackly tops the cookies have.  Recently I realized they were just like Snickerdoodles, just without the Cream of Tartar!  So I made them a few weeks ago and dipped them in cinnamon-sugar and they were delicious!!  Just as good as regular Snickerdoodles, and even a bit chewier, maybe.  
Snickerdoodles (No Cream of Tartar)

Snickerdoodles (No Cream of Tartar)
Snickerdoodles Without Cream of Tartar
adapted from Allrecipes

2- 3/4 cups all-purpose flour
1 teaspoon baking soda
1/2 teaspoon baking powder
pinch salt
1 cup butter, softened
1 1/2 cups white sugar
1 egg
1 teaspoon vanilla extract
1/4 cup sugar
4 tsp ground cinnamon

1.  Preheat oven to 375 degrees F (190 degrees C). In a small bowl, stir together flour, baking soda, and baking powder. Set aside.  

2.  In a large bowl, cream together the butter and sugar until smooth. Beat in egg and vanilla. Gradually blend in the dry ingredients. In a small bowl, mix together 1/4 cup sugar and cinnamon.  Roll rounded teaspoonfuls or tablespoons of dough into balls, roll in cinnamon-sugar mixture, and place onto ungreased cookie sheets. (Use leftover cinnamon-sugar for toast or topping oatmeal.)

3.  Bake 8 to 10 minutes in the preheated oven, or until golden. Let stand on cookie sheet two minutes before removing to cool on wire racks.
Snickerdoodles (No Cream of Tartar)
**This post and photos are property of http://dishingwithdish.blogspot.com/ **

Monday, February 24, 2014

Slow Cooker Jalapeno Popper Chili

Jalapeno Popper Chili
We liked this soup- very flavorful, and you can make it as spicy or as mild as you want, and you can also make it as flavorful as you want by adding more bacon, green onions, croutons, whatever garnish you want.  I love a good crockpot recipe.  You use dry beans for this, and I would highly recommend soaking them overnight first- if you don't, they may not cook enough, and there's really no harm doing it, even if they may cook through all the way if you don't soak.  So yeah, let's soak.   
Jalapeno Popper Chili
Slow Cooker Jalapeno Popper Chili
adapted from Mel's Kitchen Cafe

1 cup chopped yellow or white onion
3 cloves garlic, finely minced or pressed
1 pound chicken breasts or tenders, trimmed of fat (about 2 chicken breasts)
1 teaspoon chili powder
1 teaspoon ground cumin
1 teaspoon dried oregano
1 (14-ounce) can diced tomatoes, undrained
4 cups low-sodium chicken broth
12 ounces dry white beans, rinsed and picked through, then soaked overnight
1/2 teaspoon salt, or to taste
1/2 teaspoon pepper
2 jalapeno peppers, seeded and finely chopped
1/2 cup red or yellow bell pepper, small diced
8 ounces light cream cheese, cut into cubes
1 cup frozen corn kernels
6-8 slices bacon, cooked and crumbled or chopped
green onion and small pieces of bell pepper, optional

1.  Add all the ingredients except the jalapeno and bells peppers, cream cheese, corn and bacon to a 5-quart slow cooker. Cook on high for 6-9 hours. (I need to cook on High to cook my dry beans.  If your crockpot cooks hotter, you may be able to cook on Low.)   About an hour or two before eating, stir in the jalapenos and bell peppers.

3.  Next, remove the chicken and chop into pieces or shred into bite-sized pieces with two forks right in the slow cooker.  At this point, you may puree some of the beans, if desired.  I didn't do this.  Then return the chicken to the slow cooker.  

4.  Stir in the cubed cream cheese and the corn. Cover the slow cooker to let the cream cheese soften and the corn heat through, about 10-15 minutes.  Stir to combine. Add additional salt and pepper to taste. Serve topped with the crumbled bacon and optional green onion and fresh bell pepper.
chili2W
**This post and photos are property of http://dishingwithdish.blogspot.com/ **

Friday, February 21, 2014

Salted Coconut Caramel Sauce

Coconut Caramel Sauce
I spotted this recipe a long time ago; I'm not sure how, probably Pinterest.  I couldn't wait to make it. It was very good, and we used it for a home ice cream sundae party, along with homemade hot fudge.  
Coconut Caramel Sauce
This recipe uses a can of full-fat coconut milk in place of the heavy cream one usually uses in caramel sauce. Coconut milk is perfect for this, because of its creamy richness.  There is a slight coconut flavor, but I couldn't taste it with all the ice cream, lol!  I also spread it on pancakes one day.... so good!  This recipe calls for coconut palm sugar, which I happen to have on hand.... I think because of this recipe, lol!  If you don't have that, just use brown sugar.  

Note:  The pic below is taken after resting in the fridge for a while.  All other pics are taken of it "freshly made".  PS:  The author of this recipe is the blogger behind An Edible Mosaic.  She has an awesome Middle-Eastern cookbook out now; check out her blog page.  I have it and everything looks so delicious.   
Coconut Caramel Sauce
Salted Coconut Caramel Sauce
adapted from An Edible Mosaic

1 (14 oz/400 g) can full-fat, unsweetened coconut milk
1/4 cup (60 ml) pure maple syrup or honey
1/4 cup (50 g) coconut palm sugar (or brown sugar)
1 teaspoon pure vanilla extract
1/2 teaspoon coarse sea salt
1 tablespoon unsalted butter

1.  Combine the coconut milk, maple syrup (or honey), and coconut palm sugar in a medium saucepan over medium-high heat.  Bring to a boil, then turn the heat down so it doesn't boil over, and boil until thickened, dark amber in color, and reduced to between 1 to 1 1/4 cups, about 15 minutes, whisking frequently. (The cooking process is all about evaporating off the extra liquid. Because of this, it could take longer depending on the weather.)

2.  Turn off heat and whisk in the vanilla, salt, and butter until smooth.  Cool completely, and then use or store in lidded glass jar in the fridge for up to 3 weeks.

Notes:  Vegan Option: Use maple syrup (instead of honey) and use a vegan “butter” spread.

**This post and photos are property of http://dishingwithdish.blogspot.com/ **

Wednesday, February 19, 2014

Quick Orange Chicken


This dish was very quick to put together, and flavorful.  To make dinner time a little easier, I made the orange sauce a few hours before and stuck it in the fridge; then I had to just saute the chicken in a bit of oil, add the sauce, cook a few minutes, and then add the cornstarch mixture.  Dinner was done in no time.  I also cut the chicken up during the day, saving me time later.

Quick Orange Chicken
adapted from Closet Cooking

1 tablespoon oil
1 pound boneless and skinless chicken breasts or thighs, cut into 1 inch pieces
1/3 cup orange juice (I used about a tablespoon more or so)
3 tablespoons honey
3 tablespoons soy sauce*
2 tablespoons rice vinegar
1 teaspoon chili sauce such as Chinese or Sriracha
1 tablespoon orange zest, grated
1 clove garlic, grated (on microplane)
1 teaspoon ginger, grated (on microplane)
1 tablespoon water
1 tablespoon cornstarch
1/4 cup green onion, sliced (optional)

1.  Heat the oil in a pan over medium-high heat, add the chicken and cook until cooked through, about 2-4 minutes per side.

2.  In a liquid measuring cup, combine the orange juice, honey, soy sauce, rice vinegar, chill sauce, garlic, and ginger.  This can be done ahead of time and stored in the fridge.  Add this mixture to the chicken and cook for a few minutes.  Then, combine the water and the corn starch; add to the pan, and  toss to coat and cook until the sauce thickens, about a minute.  Remove from heat and serve over rice and garnish with sliced green onions.
*If cooking gluten-free, check your soy sauce for gluten.
*This post and photos are property of http://dishingwithdish.blogspot.com/ **

Monday, February 17, 2014

Jalapeno-Artichoke Dip

dip5W
I love artichoke dip and jalapeno popper dip, so I decided to combine the two recipes, using a few other recipes on the web for inspiration.  The results were delicious, of course.  I don't know of a dip that isn't delicious.  We had this a few weeks ago for our second annual un-Superbowl party.  We rented a movie and ate this with some chips, and we had some other snacks too.  It was fun times. Besides the links above, I also got inspiration from Valerie's Kitchen and Shugary Sweets.  
dipW
Jalapeno-Arthichoke Dip
adapted from here and other places on the web (listed above)

1 (8 ounce) package cream cheese (or Neufchatel), room temperature
1/2 cup mayonnaise
1/2 cup shredded cheddar cheese or colby-jack
1/2 cup grated parmigiano reggiano (or parmesan)
1 (4 ounce) can sliced jalapenos (pickled), drained (use more or less, if desired)
2 fresh jalapeno peppers, chopped (optional)
1 can (about 14 oz) artichoke hearts, coarsely chopped
1/2 tsp. garlic powder
1/4 tsp. onion powder
1 TBSP. pickled jalapeno juice
1/4 cup panko bread crumbs
1/4 cup parmigiano reggiano (parmesan), grated

1. Mix the cream cheese, mayonnaise, cheddar cheese, parmigiano reggiano, jalapenos, artichokes, spices, and jalapeno juice in a bowl (I used stand mixer) and pour into a small, lightly greased baking dish.

2. Mix the panko bread crumbs and 1/4 cup parmigiano reggiano and sprinkle over the dip.

3. Bake in a preheated 350F oven until the sides are bubbling and the cheese cheese has melted and turned golden brown on top, about 15-20 minutes.

*This post and photos are property of http://dishingwithdish.blogspot.com/ **

Friday, February 14, 2014

Easy Vanilla Frozen Yogurt

fro4W
I LOVE this frozen yogurt.  It's so incredibly easy, and just delicious, and only three ingredients.  This is so much better than any store-bought stuff with all the weird ingredients.  I made this twice in one week.  My kids loved it too.  We topped it off with strawberry mochi from Nuts.com....... SO GOOD!!!  (I love their mochi!  It's deliciously soft.)  (PS: Happy Valentine's Day; we're having chocolate lava cakes later but it will be too dark to take pics.  So I'm posting this delicious fro-yo... I said fro-yo again!)
fro2W
This is a David Lebovitz recipe, and you know any frozen treat from his has got to be good.  I have his ice cream book and love it; I've made quite a few recipes from there.  This one is as easy as mixing up 3 cups of whole milk yogurt (I used Greek whole milk yogurt), adding some sugar, and vanilla.  To give this one a little extra boost, I also added the seeds from one vanilla bean.  You just stir it together, stick it in the fridge for an hour, and then pour into your ice cream maker.  
fro7W
For any local readers, three cups of yogurt is 5, 150 gram containers of the good, German-made, Greek yogurt we can get here (lol!).  So it's 750 grams (or 3 cups) of yogurt total.  (The one I used is pictured below; that is good stuff to use for this if you can get it!)
fro8W
Easy Vanilla Frozen Yogurt
adapted from David Lebovitz

3 cups (about 750 grams) plain Greek yogurt (I used full-fat)
3/4 cup sugar
1 teaspoon vanilla extract
1 vanilla bean, scraped, optional

1.  Stir together the yogurt, sugar, vanilla, and optional vanilla bean seeds.  Stir until sugar is fully dissolved.  Refrigerate for one hour.

2.  Freeze in your ice cream maker according to manufacturer's directions.  I love this ice cream "soft-serve", or right out of the ice cream maker.  If frozen, let it soften a bit before serving, or it will kind of chip out.  
froW
*This post and photos are property of http://dishingwithdish.blogspot.com/ **

Wednesday, February 12, 2014

Beef Korma (Afghan Style)

korma3W
We loved this Beef Korma dish.  I found it (somehow, I don't remember) on the food blog Adventuress.  It was very similar to this Red Beef Curry that we also really enjoyed.  Until recently I had never tried a beef curry, but really love them now that I have.  We garnished this with pomegranate seeds and it was SO delicious!  (I got the idea from the same blogger; another recipe she posted.)

I did this in the slow cooker; look below the recipe to see directions for that.
korma7W
Beef Korma (Afghan Style)
adapted from Adventuress

2 tbsp Oil (and 1 tbsp butter to brown meat)
1 tbsp fresh chopped garlic
1 tbsp fresh ginger
1 finely Chopped onions
1/2 to 1 lb (or more) stewing beef
6 tbsp plain yogurt
2 tsp fresh corriander (cilantro), or more
1 green chili chopped (I used jalapeno)
1 tsp garam masala
salt (to taste)
1/2 tsp chili powder
1/2 tsp black pepper
1/4 tsp turmeric
1 tbsp tomato paste
2 whole tomatoes (from a can or fresh; dice if using fresh) 
yogurt, cilantro, and pomegranate seeds, for garnish, optional

1. In a large pot, heat the butter and add a drop of oil and once it's hot adding all the stewing beef to brown on all sides. Don't be afraid just let it brown until you see brown bits on the bottom of the pan.

2. Remove the beef onto a plate.

3. Add some more oil if necessary to the pot and then onions and sautee until they look clear on medium.  Next, add the spices and toast for a few seconds, then the fresh garlic and ginger.

4. Meat gets added back in and finally, add the yogurt into the pot.  Cook a bit until things look a little brown.

5.. Add the chopped tomato and some liquid (about 1 cup beef broth or water) to cook. Add the jalapeno and cilantro. Simmer and let cook until meat is tender.  Add more yogurt or cilantro to taste, if needed.  Garnish with pomegranate seeds.

*For slow cooker, do up unto step 3 on the stovetop, just adding the ingredients to the slow cooker when done cooking them.  Deglaze the pan with the one cup of water or beef broth, adding that to the slow cooker too.  Add the tomato paste and tomatoes to the slow cooker and the jalapeno.  Cook on low for 6-8 hours.  At the end of cooking time, stir in the yogurt and serve.
korma6W
*This post and photos are property of http://dishingwithdish.blogspot.com/ **

Monday, February 10, 2014

Strawberry Shortcake Cupcakes

cup1W
These would be great cupcakes for Valentine's Day!  A vanilla cupcake is topped with strawberry-flavored frosting.  You flavor and color the frosting by using pulverized freeze-dried strawberries.  These can be bought at grocery stores (if you live Stateside, lol), or online.  I got mine at Nuts.com.  If you order from Nuts.com and live in the States, the shipping is super super fast.  For another way to make natural strawberry frosting, one can use freezer jam.
cup9aW

cup8W
Strawberry Shortcake Cupcakes

1 cup + 2 Tbsp all-purpose flour
2 Tbsp cornstarch
1 1/4 tsp baking powder
1/4 tsp salt
3/4 cup granulated sugar
2 large eggs, at room temperature*
1 1/4 tsp vanilla extract
1/4 cup butter, melted and cooled slightly
1/4 cup vegetable oil
1/2 cup whole milk, at room temperature*
1 recipe Strawberry Buttercream Frosting, recipe below
12 small fresh strawberries or strawberry slices, for decoration

1.  Preheat oven to 350 degrees. In a mixing bowl, whisk together flour, cornstarch, baking powder and salt for 30 seconds, set aside. In a separate large mixing bowl, using an electric hand mixer or stand mixer, set on medium-high speed, whip together eggs, sugar and vanilla until mixture is very pale, fluffy and thickened slightly, about 3 minutes. Mix in melted butter and vegetable oil. Working in three separate batches, beginning and ending with flour, add 1/3 of the flour mixture followed by 1/2 of the milk, blending until well combined after each addition.

2.  Pour batter into 12 paper lined muffin cups, filling each cup 2/3 full. Bake in preheated oven 15-20 minutes, until toothpick inserted into center of cupcake comes out clean. Cool completely on a wire rack, then frost with Strawberry Buttercream Frosting (recipe below) and top with a small whole fresh strawberry or fresh strawberry slices.

*To bring the eggs to room temp quickly, simply submerge in a bowl of warm water for 5 - 10 minutes. To bring milk to room temperature quickly, simply heat in microwave on high powder in a microwave safe dish for 15 - 20 seconds until no longer cold.
cupW
Strawberry Buttercream Frosting

3/4 cup butter, at room temperature
1 cup (15g) freeze dried strawberries
2 1/2 Tbsp heavy cream or whole milk
2 cups (230g) powdered sugar

1.  In the bowl of an electric stand mixer, fitted with paddle attachment, whip butter on medium-high speed until very pale and fluffy 6 - 8 minutes, frequently scraping down sides and bottom of bowl. Meanwhile, pulverize freeze dried strawberries in a food processor** until finely ground (wait about 10 second before opening food processor allowing the powder in the air to settle a bit. There should be 3 1/2 Tbsp of the strawberry powder). Transfer strawberry powder to whipped butter and blend mixture until combined. Stir in heavy cream followed by powdered sugar and whip mixture 4 - 5 minute longer on medium-high speed, until very pale and fluffy, frequently scraping down sides and bottom of bowl.  Frost cupcakes.

**If you don't own a food processor, you can place the strawberries in a resealable bag, seal bag and crush to fine powder with a rolling pin.
cup9bW

                                                        *This post and photos are property of http://dishingwithdish.blogspot.com/ **

Friday, February 7, 2014

Coconut Cream Chocolate Fudge

fudge7W
I wanted to try coconut cream, or coconut butter (not the same as cream of coconut), so I bought a jar from Vitacost a few months ago.  Coconut butter is just raw coconut that is so blended up it becomes like a spread, almost solid at room temp.  This is because it contains the whole coconut flesh, which contains the oil.  It's very good just by itself, but I had a whole jar to use, so I needed to make something with it. 
fudge5W
I originally bought it so I could make my own coconut peanut butter, but decided not to do that after all.  So I chose this recipe- it's a dairy-free fudge that would be vegan if not for the honey. (One could use agave.)  I like nuts in my fudge, so I added 1/2 cup of chopped macadamias to this, and it was a good move.  
fudge1W
This fudge is supposed to set up in the fridge, but after that, I'd remove it and store and eat it at room temp.  For some reason, I thought you were supposed to store this in the fridge, and I really didn't like it very much!!  I finally took it out of the fridge to try it at room temp and it was SO MUCH better.  Out of the fridge, its' hard and tastes almost bitter.  At room temp, it's soft and creamy, melts in your mouth, and is not bitter at all.  I love it at room temp.  The first pic on this post is taken of room temp fudge, the rest of the pics are taken of cold fudge.

Coconut Cream Chocolate Fudge
adapted from the Coconut Mama

1 1/2 cups coconut butter
1/3 cup organic cocoa powder
1 tablespoon vanilla extract
1/2 cup raw honey
1/8 teaspoon sea salt
1/2 cup chopped macadamias, optional

1. Heat a medium saucepan over low heat. Add coconut cream concentrate/coconut butter, cocoa powder, vanilla and sea salt. Mix well as the coconut cream melts. Slowly add the raw honey into the coconut mixture until combined.  If using nuts, mix them in now.

2. Pour the warm fudge into greased 8 inch square pan. Cover and refrigerate. Allow fudge to refrigerate for 4 hours or until its completely set. Cut into squares and serve at room temp.
fudgeW
**This post and photos are property of http://dishingwithdish.blogspot.com/ **

Wednesday, February 5, 2014

Homemade Wood-Fired Pizza

pizz8W
Many of the local homes here have an outdoor wood-burning oven.  Sometimes they are little stand-alone ones, or built into an outdoor cooking area.  One of our neighbors recently installed one in his yard, and constructed a nice little building for it, too, so that they can prepare food, cook and eat out there!  And a few weeks ago, he invited us over for a wood-fired pizza party.  Both families prepared a batch of dough and gathered some toppings and went to work.  The adults made the food while the kids from both families had a blast playing outside in their large yard.  In total, we made about 9 pizzas, each with a different combo of toppings.  It was so fun and the pizza was absolutely delicious.  Following are some photos of the fun.  (Some have captions underneath.)
pizz3W
Using the workspace right by the oven to prepare a pizza.
pizz5W
The pizza peel is ready.
pizzW

pizz1W

pizz4W

pizz9W

pizz9aW
About 1/3 of the pizzas we made.

**This post and photos are property of http://dishingwithdish.blogspot.com/ **