Monday, March 31, 2014

Chocolate Cookies & Cream Ice Cream

Chocolate Cookies & Cream
I love trying new ice cream recipes.  I've already tried a few different cookies and creams, so I thought I'd do this chocolate recipe when I saw it.  I don't enjoy store-bought chocolate ice cream at all, but I am ok with homemade.  :)  
Chocolate Cookies & Cream
Chocolate Cookies & Cream Ice Cream
adapted from Cooking Classy

2 cups heavy cream
2 cups whole milk
6 oz semi-sweet chocolate chips or chopped chocolate
1 Tbsp light corn syrup
2/3 cup granulated sugar
3 large egg yolks
2 tsp vanilla extract
1 pinch salt
2 Tbsp cocoa powder
1-2 cups crushed Oreos (I used 2!)

1.  In a medium saucepan set over medium heat, combine cream, milk, chocolate and corn syrup and cook mixture, stirring frequently just until mixture nearly boils. Meanwhile combine sugar, egg yolks, vanilla extract and salt in a small mixing bowl and using an electric hand mixer set on medium speed, whip mixture until pale and fluffy, about 2 minutes. Blend in cocoa powder.

2.  Reduce cream mixture to medium-low and take 1/2 cup of the hot cream mixture and pour into the egg yolk mixture while whisking, then add egg yolk mixture to saucepan while stirring. Cook mixture, stirring constantly until thickened about 4 - 5 minutes. Transfer mixture to a bowl, let cool a few minutes, then cover with plastic wrap and chill until very cold; overnight is best.

3.   Pour mixture into an ice cream maker and process according to manufactures directions, mixing in Oreos after ice cream is removed from the machine. Store in freezer in an airtight container.
Chocolate Cookies & Cream
**This post and photos are property of http://dishingwithdish.blogspot.com/ **

Friday, March 28, 2014

Easy Old Bay Salmon Cakes

salmon5W
These were very simple and yummy.  They are good for days I don't want to take the time to make these more involved salmon cakes.  (I love those ones, though, they're so good!)  I like how these ones use stuff I usually have on hand and they are just so fast to make!  They're also pretty inexpensive.  I want to make them again, play around with the flavors (add some mustard, lemon, etc) and make salmon cake sliders out of them, with toasted Hawaiian rolls!  I'm very excited about this. If they turn out, I'll post them too.  
salmonW
Easy Old Bay Salmon Cakes 
adapted from Aggie's Kitchen

2 6oz cans wild salmon, drained (boneless, skinless)
2 teaspoons Old Bay seasoning
2 eggs
2 tablespoons mayonnaise
squirt of favorite mustard
3/4 cup panko bread crumbs
1/2 small green/red/yellow/orange pepper, finely chopped
2 tablespoons chopped fresh chives
olive oil, for frying
lemons, for serving

1.  In a large bowl, gently combine all ingredients until mixed well. Form into 6-8 small patties.

2.  Heat a non stick pan over medium heat. Drizzle 2 tablespoons of oil in pan and spread around. Gently place each patty into hot pan and cook on first side for about 2-3 minutes or until golden brown. Carefully flip, and cook for an additional 3-4 minutes until second side is browned.

3.  Once cooked, set aside and sprinkle coarse salt over salmon cakes. Serve with a squeeze of lemon.
salmon1W
**This post and photos are property of http://dishingwithdish.blogspot.com/ **

Wednesday, March 26, 2014

Homemade Ranch Seasoning Mix

ranch7W
Here's an easy recipe to make your own dry ranch dressing mix.  I had everything on hand; including buttermilk powder. If you don't have buttermilk powder, you can still make this, just mix with buttermilk instead of milk. Actually, mixing this with milk and mayo produces a pretty thin dressing, so you may want to use buttermilk anyway.  To make this thicker, I used plain Greek yogurt in place of half of the milk. It was thick and delicious!!  I do use the dry Ranch packets you can buy, but those contain MSG, and this doesn't. :)
ranch2W

ranch5W
Homemade Ranch Seasoning Mix
adapted from Gimme Some Oven

1/3 cup dry buttermilk (**see note below**)
2 Tbsp. dried parsley
1 1/2 tsp. dried dill weed
2 tsp. garlic powder
2 tsp. onion powder
2 tsp. dried onion flakes
1 tsp. ground black pepper
1 tsp. dried chives
1 tsp. salt

1.  Whisk all ingredients together until blended. If you want a more finely-ground seasoning mix, you can pulse the mixture in a food processor until it reaches your desired consistency.  Store in an airtight container for up to 3 months.

**To Make Ranch Dressing: Combine 1 Tbsp. seasoning mix with 1/3 cup mayo and 1/3 cup milk (or buttermilk OR Greek yogurt, to add thickness), and whisk to combine.

**You can omit the buttermilk powder if you would like to use fresh buttermilk, or if you would just like the straight spices for the seasoning mix.**
ranchW
**This post and photos are property of http://dishingwithdish.blogspot.com**

Monday, March 24, 2014

Almond Poppy Seed Muffins

muffin2W
I love Almond Poppy Seed flavor, as illustrated by this quick bread and these pancakes.  My mom used to make that Almond Poppy Seed bread all the time when I was a kid.  I loved it then and I still love it.  So when I spotted these muffins, I bookmarked them to make sometime.  I love that this recipe contains both buttermilk and coconut oil.  I had a lot of reasons to be excited about these.  :)
muffin3W
Almond Poppy Seed Muffins
adapted from The Daring Gourmet
Makes 6 jumbo or 12 regular-sized muffins

2 cups all-purpose flour (can use some whole wheat pastry flour)
2½ teaspoons baking powder
½ teaspoon baking soda
½ teaspoon salt
1 cup white granulated sugar
¼ cup unsalted butter
¼ cup virgin coconut oil
2 large eggs
1 tablespoon good quality almond extract (I used a bit less)
1 teaspoon vanilla extract
1 cup buttermilk
2 tablespoons poppy seeds
Sliced almonds

1.  Preheat the oven to 365 degrees F.  Combine the flour, baking powder, baking soda, and salt in a small bowl and set aside.

2.  In a large mixing bowl, or in a stand mixer, cream the butter, coconut oil, and sugar for at least 3 minutes. Add the eggs, almond and vanilla extract, and buttermilk and beat until combined.  Add the dry ingredients to the wet ingredients and beat just until combined, being careful not to over-beat. Lumps of flour will remain and that’s okay.  Add the poppy seeds and stir gently until combined.

3.  Fill 6 jumbo/king-sized greased muffin tins till almost full, or you can use a regular sized, 12-cup greased muffin tin.  Sprinkle with a few sliced almonds.

4.  Bake for 20-25 minutes or until a toothpick inserted into the middle comes out clean but moist. Be careful not to overbake and do not open the oven too early.
muffinW
**This post and photos are property of http://dishingwithdish.blogspot.com**

Sunday, March 23, 2014

Window

Week6Window
We were on a group hike/outing last Saturday and it ended in this building in the middle of the island for a hot cocoa break.  The weather was rainy and cool and misty, so it was a nice ending.  I'm doing a photo challenge this year and my assignment at the time was "window", so this was perfect.  Just wanted to share this picture; another aspect of island life; although this island is tiny, you can go up into the hills here and forget you are on an island, if just for a little.  

Friday, March 21, 2014

Blue Macarons with Chocolate Cream Cheese Filling

Blue Macaroons w/Chocolate Cream Cheese Filling
After these Strawberry Macarons turned out not-so-perfectly, I wanted to try again soon to redeem myself and prove that I could do them "right"!  So a few days after the strawberry ones, my daughter and I made these blue ones.  She took the majority of them to school to share with friends, as they had all been jealous when she'd brought a strawberry macaron to school earlier in her lunch.  
Blue Macaroons w/Chocolate Cream Cheese Filling
I was happy to see that these turned out well!  They have the ruffly "foot", and only some of them came out with a "peak" (foot= good; peak= bad).  I used the same filling as I did for the strawberry ones, but used a bit of cocoa powder to make it chocolate-flavored. 
Blue Macaroons Shells

Blue Macaroons w/Chocolate Cream Cheese Filling

Blue Macaroons w/Chocolate Cream Cheese Filling
Blue Macarons with Chocolate Cream Cheese Filling
adapted from here; filling from here

110 g almonds meal/flour
200 g powdered sugar
1 scant teaspoon powdered blue food coloring
50 g granulated sugar
100 g egg whites (about 3 egg whites), aged (left out) a day at room temperature

1. Line 2 baking sheets with parchment paper or silicone mats.

2. Pulse almond flour, powdered sugar, and powdered food coloring in a food processor until evenly mixed.

3. In the bowl of a stand mixer fitted with a whisk attachment, whip the egg whites until foamy, then gradually add the granulated sugar and continue to whip until a shiny, stiff, glossy meringue forms (but not dry).

4. Remove the bowl from the stand mixer, and add the almond mixture. Using a rubber spatula, briskly and quickly fold the almond meal into the egg whites. After a few brisk strokes, slow down and then gently incorporate the rest into the batter.You want a batter that flows and "ribbons" for at least 5 seconds.

5. Pour the batter into a pastry bag fitted with a large round tip (I use Wilton 12). Pipe the batter into 1 1/2-inch rounds, spacing them about 1-inch apart. (May want to trace circles on a paper and stick it under parchment for a "key".)  Whack the baking sheets on the counter a few times, then allow to sit at room temperature for about 1 hour, or until a hard shell forms.

6. Meanwhile, preheat the oven to 280 degrees. Bake the macarons 10-12 minutes, depending on size. (Should be dry and lift away easily from parchment when done.) Allow to cool completely on the pan before using a small spatula to remove them. Match the cookies according to size and pipe filling on half, using the other half to form a sandwich.

Chocolate Cream Cheese Filling

4 Tbsp butter, at room temperature
4 ounces cream cheese, softened (can use reduced-fat)
1/2 to 1/3 cup cocoa powder, to taste
1 1/3 cups powdered sugar, or more to taste

1.  Beat butter and cream cheese in a large mixer bowl on medium speed until light and fluffy. Reduce speed to low; gradually add cocoa powder and  powdered sugar, 1/3 cup at a time and beat just until smooth.
Blue Macaroons w/Chocolate Cream Cheese Filling

Blue Macaroons w/Chocolate Cream Cheese Filling
**This post and photos are property of http://dishingwithdish.blogspot.com/ **

Wednesday, March 19, 2014

Lasagna Soup

Lasagna Soup
I loved this soup- it tasted just like lasagna in a bowl!!  I'd seen a few recipes for Lasagna Soup floating around the internet, and just needed to make this one when I saw it on Cooking Classy.  It's perfect for the finicky March weather (warm or cold- it can't decide) and makes your house smell good too. 
Lasagna Soup
Lasagna Soup
adapted from Cooking Classy

2 Tbsp extra virgin olive oil, divided
1 lb lean ground beef
1 large yellow onion, diced (about 2 cups)
3 - 5 garlic cloves, to taste, minced
4 cups low-sodium chicken broth
1 (14.5 oz) can petite diced tomatoes
1 (14.5 oz) can crushed tomatoes
2 1/2 Tbsp tomato paste
2 tsp dried basil
3/4 tsp dried oregano
1/2 tsp dried rosemary, crushed
1/2 tsp fennel seeds, crushed
1/2 tsp dried thyme
1/2 tsp granulated sugar
2-4 Tbsp fresh basil, chopped, optional
1 1/2 Tbsp chopped fresh parsley, plus more for garnish
Salt and freshly ground black pepper, to taste
6-8 lasagna noodles, broken into bite size pieces
1 cup shredded mozzarella cheese
1/2 cup finely shredded parmesan cheese
8 oz ricotta cheese

1.  Heat one tablespoon olive oil in a large pot over medium-high heat. Once hot, crumble beef into pot, season with salt and pepper to taste and cook, stirring occasionally until browned. Drain majority of fat from beef and set aside. Heat remaining 1 Tbsp olive oil in pot, add chopped yellow onion and saute until it begins to soften, about 3 minutes. Add in garlic and saute 30 seconds longer. Add in chicken broth, diced tomatoes, crushed tomatoes, tomato paste, basil, oregano, rosemary, fennel seeds, thyme, sugar, parsley, the cooked ground beef and season with salt and pepper to taste. Bring just to a boil, then reduce heat to medium-low, cover and simmer 20 minutes.

2.  Meanwhile, prepare lasagna noodles according to directions listed on package, reserving 1 cup pasta water before draining pasta.

3.  Add cooked pasta to soup along with 1/2 cup - 1 cup pasta water as desired. Add fresh basil, if using. In a mixing bowl, using a fork, stir together mozzarella, parmesan and ricotta.

4.  Ladle soup into bowls, dollop with a large scoop of the cheese mixture and sprinkle with chopped parsley and basil, optional.
Lasagna Soup
**This post and photos are property of http://dishingwithdish.blogspot.com/ **

Monday, March 17, 2014

St. Patrick's Day- Chocolate Mint Sandwich Cookies

stpW
Happy St. Patrick's Day!  This year, I tried this Chocolate Mint Sandwich cookie recipe (the filling is light green, if you can't tell.)  These cookies are very tasty- the cookie is soft and chewy, and the filling is minty and contains marshmallow creme- which I love, and that adds a delicious smooth texture.  I had a little trouble with the dough spreading and making the cookies so large and thin they were falling apart.  So instead of slicing dough logs into slices and baking, like the recipe suggested, I just used my smallest cookie scoop to scoop dough balls, which I then baked.  This worked much better for me.  The dough had also been chilled- I think this is very necessary with this recipe.  After I did that, this recipe worked out very well. I'll include my changes below.

Tonight I'm making green mac and cheese for dinner, but not all healthy-like with spinach and other veggies in it, because the kids wouldn't eat it that way.  I'll be using the dreaded food coloring!  They'll eat broccoli on the side though, so we're also having that with some baked salmon.
stp5W
Chocolate Mint Sandwich Cookies
adapted from the Daring Gourmet
makes 25-30 sandwich cookies

2½ sticks unsalted butter, at room temperature (if using salted, reduce salt below)
2 cups sugar
2 large eggs
1 tablespoon vanilla extract
¾ cup cocoa powder
2 cups all-purpose flour
1 teaspoon baking soda
½ teaspoon salt

Marshmallow Mint Filling:
½ cup (1 stick) salted butter, at room temperature
1 jar (7 oz) marshmallow creme
2 cups powdered sugar (confectioner’s sugar)
1 teaspoon mint extract
A few drops of green food coloring

1.  In a large bowl (or bowl of stand mixer), add the butter and sugar and cream together.  Add the eggs and vanilla extract to the creamed mixture and mix until combined. In a medium bowl, mix the cocoa powder, flour, baking soda, and salt. Slowly add the dry ingredients and continue mixing until incorporated.  Cover the dough, and refrigerate for 2-3 hours. 

2.  Preheat oven to 350 degrees F.  Using a small cookie scoop (1 tablespoon), form dough into balls and place on a parchment paper lined cookie sheet.  Bake for 8-10 minutes. Transfer to a wire rack to cool.

3.  To make the filling, add the butter, marshmallow cream, and mint extract. Use an electric mixer (or stand mixer) to beat until thoroughly combined and add green food coloring according to your desired shade of green. Spread about a tablespoon of the filling on the bottom side of one of the cookies and then place the other cookie on top. Repeat for all of the cookies.  
stp2W

plate1
Our St. Patty's Day dinner- Greenish Mac & Cheese, Broccoli, Salmon... with Parsley
**This post and photos are property of http://dishingwithdish.blogspot.com/ **

Friday, March 14, 2014

Pi Day 2014

pi8W

pizza1W
Happy Pi Day!  (3.14)  I think this is the 7th Pi Day our fam has celebrated.  We love it- we make pizza and pie every year.  :)  Pictured above is Crispy Thin-Crust pizza, with leftover Alfredo sauce instead of red sauce, a mix of Italian cheeses, bacon sprinkled around the edge, and green pepper strips making the Pi sign. Below is our cool Pi plate; thanks to a friend for pointing this out to me a while ago; I got it for my husband, who loves math.  
piW

pi3W
Pictured above is Caramel-Pecan Cheesecake Pie with my mom's crust recipe.  This one is so delicious, and pretty easy, as well!  The hardest part is making the pie crust, which isn't even that hard.  (Recipes posted at the bottom of this post.)
pie5W
Pictured above (and below) are mini Key Lime pies.  For this recipe, I just use a 6-pack of mini graham cracker crusts, and cut the pie recipe in half- it's perfect for six minis.  This is the kids' fave pie; it's a little too sweet for me.  
pie6W

Thin-Crust Crispy Pizza
adapted from here, via Lauren's Latest
makes two 14-16 inch pizzas (I double this)


Dough:
1 cup warm water
2 1/4 teaspoons active dry yeast
1 tablespoon honey (or sugar)
2 teaspoons salt
2 tablespoons olive or canola oil
3 cups bread flour (give or take 1/2 cup…depending on humidity)

Pizza Sauce
Toppings like mozzarella & Parm cheese, red onions, red peppers, olives, pepperoni

1. In a large mixing bowl, preferably that of a stand mixer, stir yeast and honey or sugar into warm water. Sit for 5-10 minutes or until bubbles form and mixture starts to foam. Pour in salt, oil and half the flour and mix. Once that flour is incorporated, start adding flour in bit by bit until you get the pizza dough to the consistency you want: slightly tacky, but when you touch it it doesn’t stick to your hands.

2. Once you reach this stage, turn the mixer on high to knead for about a few minutes, adding bits of more flour if needed. The dough should be smooth and easy to work with. And the bowl should be clean. Lightly grease the bowl & the dough so it doesn’t dry out, cover with plastic wrap and let it rise 1-2 hours.

3. During the last 30 minutes or rising time, preheat your oven to 425-450 F or the hottest it will go. Before turning on the oven, place your pizza stone inside. (An upside down cookie sheet is supposed to work in place of a pizza stone, but I've never tried it....)

4. Tear off two pieces of parchment paper that fit your cookie sheet. Divide dough in half, and roll/stretch each piece of dough thinly over each piece of parchment. I try to go to the edges of the parchment, getting the dough as thin as I can.

5. Spread each raw pizza with your favorite pizza sauce, and then a layer of cheese, and then any toppings you want. Make sure to use a lighter hand with the toppings so the pizza doesn't get weighed down and soggy under them. What is shown in the photos above was a perfect amount.

6. Bake pizzas one at a time for 9-12 minutes in the hot oven. Do this by carefully removing the hot pizza stone from the oven and setting it on hot pads. Working quickly, slide one pizza, complete with the parchment, onto the hot stone and place the whole thing in the oven and shut the door. When pizza is done, crust and cheese will be browned and golden.

Mom's Pie Crust
(makes 2 single crust pies or one double; will only need half recipe for pie below)

1 cup vegetable shortening
3/4 teaspoon salt
2 cups all-purpose flour, stirred and measured
1/4 cup cold water

1.  Measure shortening into bowl. Add salt and half of flour. Stir with a spoon until ingredients cream together and mixture is smooth and satiny. Add water and remaining flour. Stir with spoon until mixture clings together in ball. Roll out as desired on a generously floured board. Don't be afraid to handle or overmix. Makes 2 (9-inch) pastry shells or enough for 1 double pie.

To use this pie crust as a filled (pre-baked crust), roll out, place in pie pan, prick with a fork, and bake at 450 degrees for 8-10 minutes or until lightly browned.

*If desired, wrap in plastic wrap to freeze. I have frozen these (unbaked, in a ball) for 3 months, and then just thaw on the counter. It still rolls out very well and, after baking, tastes just like you made it fresh.

Caramel-Pecan Cheesecake Pie
from Taste of Home

1 package (8 ounces) cream cheese, softened
1/2 cup granulated sugar
4 eggs
1 teaspoon vanilla extract
1 unbaked pastry shell (9 inches)
1-1/4 cups chopped pecans
1 cup caramel ice cream topping

1.  Preheat oven to 375.  In a small bowl, beat the cream cheese, sugar, 1 egg and vanilla until smooth. Spread into pastry shell; sprinkle with pecans. In a small bowl, whisk remaining eggs; gradually whisk in caramel topping until blended. Pour slowly over pecans. Bake for 35-40 minutes or until lightly browned (loosely cover with foil after 20 minutes if pie browns too quickly). Cool on a wire rack for 1 hour. Refrigerate for 4 hours or overnight before slicing. Refrigerate leftovers. Yield: 6-8 servings. Editor's Note: This recipe was tested with Smucker’s ice cream topping.

Mini Key Lime Pies
adapted from Allrecipes.com

1 6-pack prepared graham cracker mini pie/tart shells
1 (14 oz) can sweetened condensed milk
1/4 cup sour cream or plain yogurt (light sour cream works)
1/4 cup plus 2 tablespoons key lime juice
1/2 tablespoon grated lime zest, optional

1. Preheat oven to 350 degrees F (175 degrees C).

2. In a medium bowl, combine condensed milk, sour cream, lime juice, and lime rind. Mix well and pour into mini graham cracker crusts.

3. Bake in preheated oven for 5 to 8 minutes, until tiny pinhole bubbles burst on the surface of pie. DO NOT BROWN! Chill pie thoroughly before serving. Garnish with lime slices and whipped cream if desired.
pi5W

pizzaW
**This post and photos are property of http://dishingwithdish.blogspot.com/ **

Wednesday, March 12, 2014

Avocado Chicken Salad

Avocado Chicken Salad
This Avocado Chicken Salad was so good.  It's also pretty easy to make.  I picked up a half rotisserie chicken the day before and pulled off all the meat and chopped it up.  (Then I made chicken stock from the bones.  Oh yeah... I also ate all the skin.  Oops.  Rotisserie chicken skin is sooo good though!)  This was a filling snack on a weekend for my husband and I with some Triscuit crackers.  And it's green, you know, for upcoming St. Patrick's Day!!  
Avocado Chicken Salad
adapted from Family Fresh Meals

2 cups cooked shredded chicken
1 avocado
1/2 tsp garlic powder
1/2 tsp salt
1/2 tsp pepper
2 tsp lime juice
1 tsp fresh cilantro
1/4 cup mayonnaise
1/4 cup plain Greek Yogurt

1. Mix all ingredients in a large bowl. Cover and refrigerate for at least 20-30 minutes to let all those yummy flavors blend together. (Or eat right away, if you can't wait, like us.)  Serve on your favorite bread, crackers, inside pita pockets or on a bed of lettuce.
*Serve with gluten-free crackers, or just veggies, for a gluten-free snack.
Avocado Chicken Salad
**This post and photos are property of http://dishingwithdish.blogspot.com/ **

Monday, March 10, 2014

Strawberries & Cream Macarons

macW
I love making 
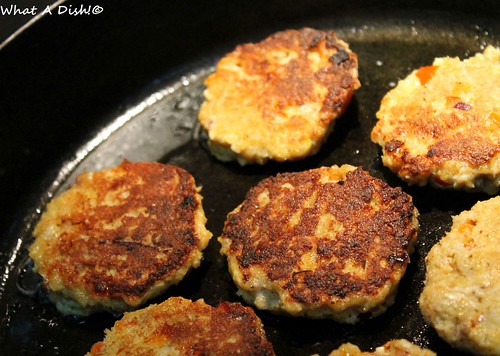
macarons, and have done so a handful of times over the last two years or so.  They've always turned out pretty well for me, until this last time I made them.  :)  Some turned out ok; I saved the best ones for the photos, but the "feet" aren't very pronounced at all, and a lot of them cracked, and many more had little "peaks" that didn't go down with the resting period.  I think this is due to two problems: this recipe called for more egg whites than I was used to; I aged 3 egg whites and I didn't realize it wasn't enough until I was making the macarons.  Also, I think I didn't mix these enough, hence the peaks that didn't flatten.  
mac9W
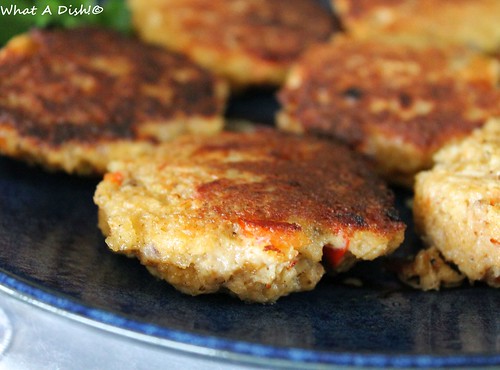
For the first time, I tried a fruit flavor for the shells. To do this, I had to pulverize freeze-dried strawberries.  My oven browns macarons so much; these were such a pretty pink before baking, but oh well!  They tasted amazing.  The filling is vanilla bean cream cheese.  I do want to attempt another fruit-shell recipe, maybe with dried blueberries next time.  :)
mac9aW
I actually "taught" a friend how to make these; it was my first time making them with someone else besides my daughter.  I should have chosen a more basic macaron recipe!!  Lol.  It was disappointing to have most of them not come out right when I was supposed to be teaching someone else how to make these.  To redeem myself and restore my self-confidence, I made more macarons yesterday, using a much simpler recipe.  They turned out great- will share those ones sometime later.  They had pronounced feet and everything.  Note:  You'll need a kitchen scale for this recipe, able to measure both grams and ounces.
mac4W
Strawberries & Cream Macarons
adapted from Tutti Dolci

Shells:
3/4 ounce freeze dried strawberries
115g almond flour
230g powdered sugar
144g egg whites, at room temperature overnight
72g sugar
2g (1/2 tsp) salt
red powdered food coloring, optional

Cream Cheese Filling:
4 Tbsp butter, at room temperature
4 ounces cream cheese, softened (can use reduced-fat)
pinch of salt
1 1/3 cups powdered sugar, or more to taste
1 vanilla bean, optional

1.  Fit a large disposable pastry bag with a round tip. Line two-three baking sheets with parchment paper. On a third sheet of parchment paper or plain white paper, trace out 24 1.5-inch circles (use a round cookie cutter or stencil as a guide), spaced 1 inch apart. Set aside as a master guide.

2.  Process freeze dried strawberries and almond flour in a food processor until finely ground. Use a fine mesh sieve or sifter to sift strawberry-almond flour mixture and powdered sugar together twice; use a firm spatula to push any large particles through or just discard. Set aside.

3.  Combine egg whites, sugar, and salt in a large mixer bowl fitted with wire whip attachment. Whip on medium speed (4 on a KitchenAid), until egg whites begin to foam. Increase speed to medium-high (7 on a KitchenAid) and whip until meringue forms soft peaks. Increase speed to 8 and whip for another few minutes. Turn off mixer and add food coloring; whip another minute on high speed to evenly distribute color until meringue is stiff. The meringue should clump in the center of the wire whip attachment; knock against mixer bowl to release.

4.  Add dry ingredients to meringue all at once. Use a rubber spatula to fold dry mixture into meringue.  After 25 folds, your mixture may still look lumpy. Continue to fold about 10 to 12 more times, checking texture after each fold. The batter is ready when it holds its shape when spooned onto itself and slowly flattens out and "ribbons" after 15 to 20 seconds. If the batter is stiff and doesn’t flatten out, it’s undermixed. If the batter is runny and fluid, it’s overmixed and won’t hold a shape.

5.  Transfer half the batter to pastry bag. Slide master guide of circles between baking sheet and parchment paper. Hold piping bag vertically and pipe batter to within 1/8″ from the edge of the circle. Carefully remove master guide from underneath piped circles and transfer to second baking sheet, repeating with remaining batter. Remove guide and save for future use. Tap pans sharply on counter; rotate 90 degrees and tap two more times (to deflate air bubbles and prevent cracked shells).

6.  Let shells sit out at room temperature about one hour to harden.  After 40 minutes, preheat oven to 280°F.  Bake for 12-20 minutes, until you can cleanly peel the parchment paper away from the macaron. Place pans on wire racks and cool completely before removing shells*. For the cream cheese frosting, beat butter, cream cheese and salt in a large mixer bowl on medium speed until light and fluffy. Reduce speed to low; gradually add powdered sugar 1/3 cup at a time and beat just until smooth.  Add seeds from vanilla bean and mix, optional.

7.  When ready to assemble, fit a large disposable pastry bag with a round tip and fill with frosting. Pipe about a tablespoon of frosting onto the bottom of half the shells, then sandwich with remaining shells. Store in an airtight container in the refrigerator up to three days. Bring to room temperature before serving.

*My oven bakes hot and browns these quickly.  If I leave them on until they easily peel away, they will be way too brown and hard.  So I take them out when the bottoms are still a little sticky, and then let them rest a few minutes on the baking sheet.  Then I use a brownie server and firmly scrape them off the parchment without ruining the feet.
Yield – 64 shells, 32 macarons
mac9cW
**This post and photos are property of http://dishingwithdish.blogspot.com/ **

Saturday, March 8, 2014

Jalapeno Popper Toast

sand3W
You can make Jalapeno Popper anything these days (and I do!)  I almost didn't post this because it's kind of funny-looking, but it's so good if you enjoy Jalapeno Popper foods.  It's just toast, spread with spreadable cream cheese, lined with pickled jalapeno slices and sprinkled with cheddar.  I love this.  I first made it when I wanted a Jalapeno grilled cheese but was too lazy to make it (like it's sooo hard!  Lol).  

Jalapeno Popper Toast
by What a Dish!
makes 1 toast

1 sliced favorite bread (I used sourdough)
1-2 tablespoons spreadable cream cheese
pickled jalapeno slices (enough to cover bread, 8-12)
1-2 tablespoons shredded sharp cheddar cheese

1.  Toast bread in toaster (ha ha.)  Immediately spread with cream cheese, top with jalapenos, and sprinkle with cheese.  Enjoy.

**This post and photos are property of http://dishingwithdish.blogspot.com/ **

Thursday, March 6, 2014

Nutella Stuffed French Toast Sticks

nutella4W
These french toast sticks were soooo good.  I loved them, and I don't even like Nutella that much.  (What a crime!)  However, I always have it on hand, because my boys love it.  This is a simple recipe; you pretty make a bunch of Nutella sandwiches, cut them into strips, dip in egg/milk, and cook.  The original recipe calls for baking, but I already had my large pancake skillet out, so I thought I'd be smart and cook them on that. It was when they were cooking that I realized the reason the recipe calls for baking is probably so they will cook through and also cook on the sides.  So I had to turn them all on their little sides to cook that part.. lol.  But it worked!!  So you can either bake or skillet-cook these.
nutella7W
Weirdly enough, my boys didn't really care for these; but my toddler and daughter LOVED them.  They didn't need any syrup.  My husband and I loved them too.  I'd totally make these again; the others can have plain french toast or just plain bread, whatevs.  
nutellaW
Nutella Stuffed French Toast Sticks
adapted from Valerie's Kitchen

10 slices white sandwich bread (I used Rudi's Organic Sourdough)
5 heaping tablespoons Nutella (or to taste)
5-6 eggs
1/2 cup milk
2 tablespoons sugar (vanilla sugar, if you have it)
1 teaspoon pure vanilla extract
Powdered sugar, for sprinkling (optional)
Maple syrup for serving, optional

1.  Preheat oven to 400 degrees. Generously coat a large baking sheet with non-stick cooking spray*. Spread a heaping tablespon of Nutella on one slice of bread and top with another slice to make a sandwich. Use a serrated break knife to slice the sandwich into thirds, making the sections as equal in size as possible. Repeat with remaining bread and Nutella.

2.  In a pie plate or similar dish, whisk together eggs, milk, sugar, and vanilla extract. Using your hands, dip each assembled french toast stick into the egg mixture, turning to coat all sides well. Allow excess egg mixture to drip off of french toast stick and then transfer it to the prepared baking sheet. Lightly coat the top of the french toast sticks with non-stick cooking spray or brush with a tiny bit or oil or butter. Bake for 8 minutes then remove the baking sheet from the oven and use a spatula to flip each stick over. Return to oven for an additional 7 or 8 minutes or until well toasted on both sides. Remove from oven. Sprinkle with powdered sugar, if desired, and serve with maple syrup for dipping.

To flash freeze:  Before sprinkling with powdered sugar, lay french toast sticks on a baking sheet that is large enough to hold them without touching each other. Place baking sheet in the freezer for about 4 to 6 hours till frozen solid. Transfer the french toast sticks to a gallon sized zippered plastic storage bag. Store in freezer for up to 3 months.  To reheat frozen sticks place a few on a microwave safe plate and cook on high for one minute. Touch and if not warmed completely, set microwave for additional 15 second increments until warmed to your liking. Dust with powdered sugar, if desired.

*You can cook these on a regular pancake skillet.  Just prepare according to directions, but cook on a preheated, lightly greased skillet. Cook on one side and flip, cooking the other side.  Then, carefully flip them on their sides so that part can cook too for about 30 seconds or so.  Cook uncooked each side.  
nutella5W
**This post and photos are property of http://dishingwithdish.blogspot.com/ **

Tuesday, March 4, 2014

Island in the Sun

fb1
We've been having some wonderful, warm and sunny weather here lately.  On Saturday our family went walking on our favorite boardwalk.  I love the views from this one.  The kids love walking (or riding bikes or scooters) on this one too.  Everything was just stunning colors of blue or green, with some wildflowers thrown in as well.  I will miss this place when we move!  (PS: Happy Fat Tuesday, or Pancake Day!  Or it might be Malasadas Day, if you're Portuguese.  We'll celebrate with some Ricotta Pancakes tonight.)
fb2

fb

fb3


**This post and photos are property of http://dishingwithdish.blogspot.com/ **