Saturday, June 20, 2015

Poppies


 I love poppies.  We took these pics last month at a nearby field.  The poppies are all gone now.  :)


**This post and photos are property of http://dishingwithdish.blogspot.com/ **

Friday, June 19, 2015

First Solo Attempt at Homemade Gnocchi (+ Sauces)

A few months ago, my Italian friend Stefania taught me how to make homemade gnocchi.  It was so easy and fun with her!  I didn't write anything down (she just did it my memory) so this is my attempt at recreating the recipe.  I also made it about three months later.  It was a lot harder without her!  I had my kids helping me roll everything out though, and they cut it, too.  Then I cooked batches on the stove and they were able to choose from a butter/fresh sage sauce, or tomato Parmesan (Grana Padano).  I took some pics I'll share. I'm no expert at this, so the recipe isn't exact.  Just like making bread dough, you may have to add more or less flour.


Homemade Gnocchi
from my friend Stefania

2-3 pounds yellow, waxy potatoes, cooked, peeled
1/2 cup flour; may need more
1 egg
salt and pepper
olive oil

1. Boil potatoes whole, let cool a few minutes, and peel the skin off.  (May use a pressure cooker; cutting up potatoes first, but I won't include instructions on that since I am not familiar with them.) 

2.  While still warm, run peeled potatoes through a ricer or spaetzle maker (what we used).  Add the other ingredients and mix with your hands until the dough is smooth, like playdough, and a little tacky still, but not sticky.  (The dough needs to hold together in boiling water but not be tough.  If you're unsure if it will hold together, boil one piece in a little pot and see if it holds. We had to add a LOT of flour to ours.)

3.  On a floured table, board, or cloth, roll into ropes, as big or little as you want.  I like little ones. Cut into bite-size pieces.  If desired, you can roll pieces on a fork or special board to make ridges. (Look this up on Youtube if interested).  

4.  Cook batches in boiling, salted water until they float.  Lift out with a slotted spoon.  Serve with favorite sauce immediately. (Ideas below.)
Butter-Sage Sauce

Salted butter
Fresh sage leaves

1.  In a small saucepan, melt butter (I used 1/2 cup).  Add fresh sage leaves and cook a little until the sage gets a bit crispy and the butter is infused with sage flavor.  Spoon over fresh cooked gnocchi and top with freshly grated Grana Padano or Parmesan cheese.  

Tomato-Grana Sauce
adapted from Yea Dad's Home

2 x 14.5 ounce cans crushed tomatoes (or 1 big can)
1/3 cup cream
1/2 cup Parmigiano or Grana Padano cheese, shredded
a few fresh basil leaves, cut into strips

1.  Combine in a medium saucepan and heat until it starts to bubble.  Serve over fresh gnocchi with extra cheese on top.  If sauce is too thick, thin with some pasta water.
**This post and photos are property of http://dishingwithdish.blogspot.com/ **

Wednesday, June 17, 2015

Cook's Illustrated Drop Biscuits


I get the Cook's Illustrated newsletter a while ago and these biscuits were in there.  I knew I was going to make them soon, and I did. They are so easy to make, taste great, and have a perfect texture. The whole family loved them and they were gone in no time.   Since they are drop biscuits, you mix everything together; you don't have to cut in the butter.  You also don't have to roll them out and cut them out. Love it!
Cook's Illustrated Drop Biscuits
from Cook's Illustrated

2 cups (10 ounces) unbleached all-purpose flour
2 teaspoons baking powder
1/2 teaspoon baking soda
1 teaspoon sugar
3/4 teaspoon table salt
1 cup cold buttermilk
8 tablespoons unsalted butter, melted and cooled slightly (about 5 minutes), plus 2 tablespoons melted butter for brushing biscuits

1.  Make sure oven rack to middle position and heat oven to 475°F. Whisk flour, baking powder, baking soda, sugar, and salt in large bowl. Combine buttermilk and 8 tablespoons melted butter in medium bowl, stirring until butter forms small clumps.

2.  Add buttermilk mixture to dry ingredients and stir with rubber spatula until just incorporated and batter pulls away from sides of bowl. Using greased 1/4-cup dry measure, scoop level amount of batter and drop onto parchment-lined rimmed baking sheet (biscuits should measure about 2 1/4 inches in diameter and 1 1/4 inches high). Repeat with remaining batter, spacing biscuits about 1 1/2 inches apart. Bake until tops are golden brown and crisp, 12 to 14 minutes.

3.  Brush biscuit tops with remaining 2 tablespoons melted butter. Transfer to wire rack and let cool 5 minutes before serving.

**This post and photos are property of http://dishingwithdish.blogspot.com/ **

Monday, June 15, 2015

Sweet Cherry Crisp


 Just like the cherry pie and cherry ice cream I posted about recently, this Cherry Crisp was made with cherries from our cherry tree. We even served this with the cherry ice cream.  The whole family really loved this crisp.  For some reason, they boys weren't crazy about the cherry pie.  Too bad, because that one was a lot more work!  This one is super easy, so I'd probably make this recipe again next time instead of the pie, although making the pie was very satisfying.
I just got two of my wisdom teeth out on Saturday, so I'm only eating soft foods right now and liquids.  We made this crisp a few weeks ago, and I have some stuff backed up to post here.  BTW, I'm in Italy and apparently they don't use "the good meds" after dentist work that one might enjoy back in the US.  The stuff they gave me didn't really do anything.  I want to be totally out of it and loopy, gosh-darn-it!!!  Oh well, I think the worst days are behind me now.  I only have an ache in my mouth and a huge swollen cheek now.  For some reason, one side is fine and dandy and on the other, it looks like I'm holding a giant grapefruit inside my mouth. But anyway.  Also, the best thing I've eaten for the past 2 days had to be last night when I made myself mac and cheese... sauce.  Just the cheese sauce.  And cooled it to lukewarm, and ate it with a spoon.  It was almost like eating real food!!  Yum!  Lol.
Sweet Cherry Crisp
adapted from Food

4 cups pitted sweet cherries (measure after pitting)
3 tablespoons vanilla sugar (or regular sugar)
2 tablespoons cornstarch
1⁄2 tablespoon lemon juice
1⁄8 teaspoon almond extract

Crisp:
1/2 cup brown sugar
1/2 cup flour
1/2 cup rolled oats
1/3 cup cold butter, cut into pieces
3/4 tsp cinnamon

1.  Preheat oven to 375 degrees. In a large bowl, gently toss first 5 ingredients together. Place in a greased casserole dish, 8 inch square pan, or a deep-dish pie pan.

2.  In another bowl, mix the rest of the ingredients, using a pastry blender or fork. The mixture should resemble course crumbs. Spread mixture over pie filling. Bake for 30 minutes or until brown. Serve warm with vanilla ice cream.

**This post and photos are property of http://dishingwithdish.blogspot.com/ **

Friday, June 12, 2015

Whipped Feta Dip & Baba Ghanoush

A few weeks ago we had a Middle-Eastern tapas (mezze) night, where we had whipped feta dip (not sure if this is Middle-Eastern of just Middle-Eastern inspired), Baba Ghanoush (eggplant dip), fresh veggies, fruit, and pomegranate seeds.  I loved it.  I've never had Baba Ghanoush before.  And the whipped feta dip was just delightful.
Whipped Feta Dip
adapted from The Kitchn
Serves 4-6

8 ounces feta cheese, softened at room temperature for 1 hour
4 ounces cream cheese, softened at room temperature for 1 hour
1 to 3 tablespoons milk
1 lemon, zested
1/4 cup finely chopped chives
1/4 teaspoon salt, plus more to taste
Freshly ground black pepper
Extra-virgin olive oil, to garnish
Ground sumac or cayenne, to garnish

1.  Blend the feta cheese in a small food processor until it breaks up. Add the cream cheese and continue blending for 4 to 5 minutes, adding milk if necessary to keep the mixture smooth.

2.  When the cheese is whipped and and very smooth add the lemon zest, chives, salt, and a generous quantity of black pepper. Blend to combine then transfer to a serving dish and drizzle lightly with olive oil. Dust lightly with ground sumac or cayenne, if desired.  Serve with chopped vegetables, pita chips, pretzel chips, or or toasted baguette.


Baba Ghanoush 
adapted from The Kitchn
serves 4-6 as an appy

1 large eggplant (1 1/4 to 1 1/2 pounds)
Extra virgin olive oil
Kosher salt
2 cloves garlic, smashed
2 to 3 tablespoons fresh lemon juice, from 1 lemon
1/4 cup tahini
Freshly ground black pepper
Ground sumac, to garnish

1.  Heat the oven to 425ĀŗF. Line a cookie sheet with foil and spray with non-stick spray.  Cut the eggplant in half lengthwise. Oil the cut side lightly with olive oil and sprinkle generously with kosher salt. Roast, cut side up, for 1 hour, or until very soft and blackened around the edges. The eggplant halves will be puffy and expanded, but will collapse as they cool. Let cool for 1 hour.

2.  Scoop the flesh away from the skin and discard the skin. Put the eggplant flesh in in a fine mesh strainer. Press out and drain any juice that will come out. Transfer to a mortar or food processor. Add the garlic, lemon juice, tahini, and black pepper and blend thoroughly until very smooth. Taste and add additional lemon juice, olive oil, salt, or pepper to taste, if desired.

3.  You can eat this at room temp (my fave) or refrigerate for at least one hour to let the flavors blend. Before serving dust lightly with ground sumac. Serve with warm pita bread, baked chips, or chopped raw vegetables.

**This post and photos are property of http://dishingwithdish.blogspot.com/ **

Wednesday, June 10, 2015

Sweet Cherry Pie!

This is another dessert I made with cherries from my cherry tree.  The cherries are sweet, not pie cherries, but a friend pointed out this recipe to me, and I tried it, and loved it!!  The cherries I used were similar to Bing cherries.  (But we used them before they turned really dark... they were still sweet though.)  I've also made freezer jam and cherry crisp with my cherries, and will share those recipes later.

Some reviewers complained about an overly-juicy pie.  Mine was juicy when I cut into it a few hours after baking, but I thought that was normal for fruit pies.  We stuck the leftover pie in the fridge and it firmed up really well.  Pic below is of "first cutting".  Lol.  The first pic on this post is after being in the fridge overnight.  I use my mom's pie crust recipe for this, but you can use your favorite recipe.


Our cherry blossoms in April; pics above and below.


Sweet Cherry Pie
adapted from Simply Recipes

Pie crust for double crust pie, recipe follows (or use own recipe)
5 cups sweet cherries, pitted (I measure after pitting)
1/2 cup sugar
1/2 teaspoon almond extract
2 Tbsp lemon juice
3 Tbsp corn starch
1 Tbsp of butter, cut into small pieces

1.  In a large bowl, combine the pitted cherries, sugar, almond extract, lemon juice and corn starch. Toss until the cherries are well coated with everything.

2.  On a lightly floured counter or large cutting board, roll out the bottom crust. Place it into a 9 or 10-inch pie pan. Trim the edges, if needed, so that they extend beyond the edge of the pie pan by about 1 inch.

3.  Roll out the top crust to about the same size as the bottom crust.  Place the filling on top of the rolled crust in the pie plate. Dot with small pieces of butter. Cover with the top crust. Trim the edges. Crimp to seal the edges together. Cut slits in the top crust so that the steam can escape while the pie is cooking. Cover and refrigerate for 30 minutes before cooking.

5.  Preheat the oven to 425°F. Bake the pie in the middle rack, with a baking sheet on the rack below to catch any drippings. Bake for 15 minutes, then reduce the temp to 350°F and bake for 35 to 45 minutes longer, or until the crust is nicely browned and the filling is thick and bubbly.  Allow to cool completely before serving. (A few hours.... to firm up the filling, refrigerate overnight.)

Mom's Pie Crust
from my Mom... obviously 

1 cup vegetable shortening
3/4 teaspoon salt
2 cups all-purpose flour, stirred and measured
1/4 cup cold water

1.  Measure shortening into bowl. Add salt and half of flour. Stir with a spoon until ingredients cream together and mixture is smooth and satiny. Add water and remaining flour. Stir with spoon until mixture clings together in ball. Roll out as desired on a generously floured board. Don't be afraid to handle or overmix. Makes 2 (9-inch) pastry shells or enough for 1 double pie. (Will use the whole recipe for the cherry pie.)

**This post and photos are property of http://dishingwithdish.blogspot.com/ **

Monday, June 8, 2015

Fresh Bamboo Shoot Red Curry (+ Basil Stir Fry)


About one month ago, a friend from Thailand came over and she helped me harvest, process, and then cook the fresh bamboo shoots that were starting to show up in my yard.  They pop out of the ground like round swords, but are actually tender and very easy to just break off.  You peel the bamboo, and then chop it, and boil it twice until tender.  This also gets rid of any trace levels of cyanide that might be in the bamboo (some plant foods contain natural levels of cyanide.  Only some bamboo species contain it, but you should boil to make sure).
Bamboo shoots plucked right from my lawn.
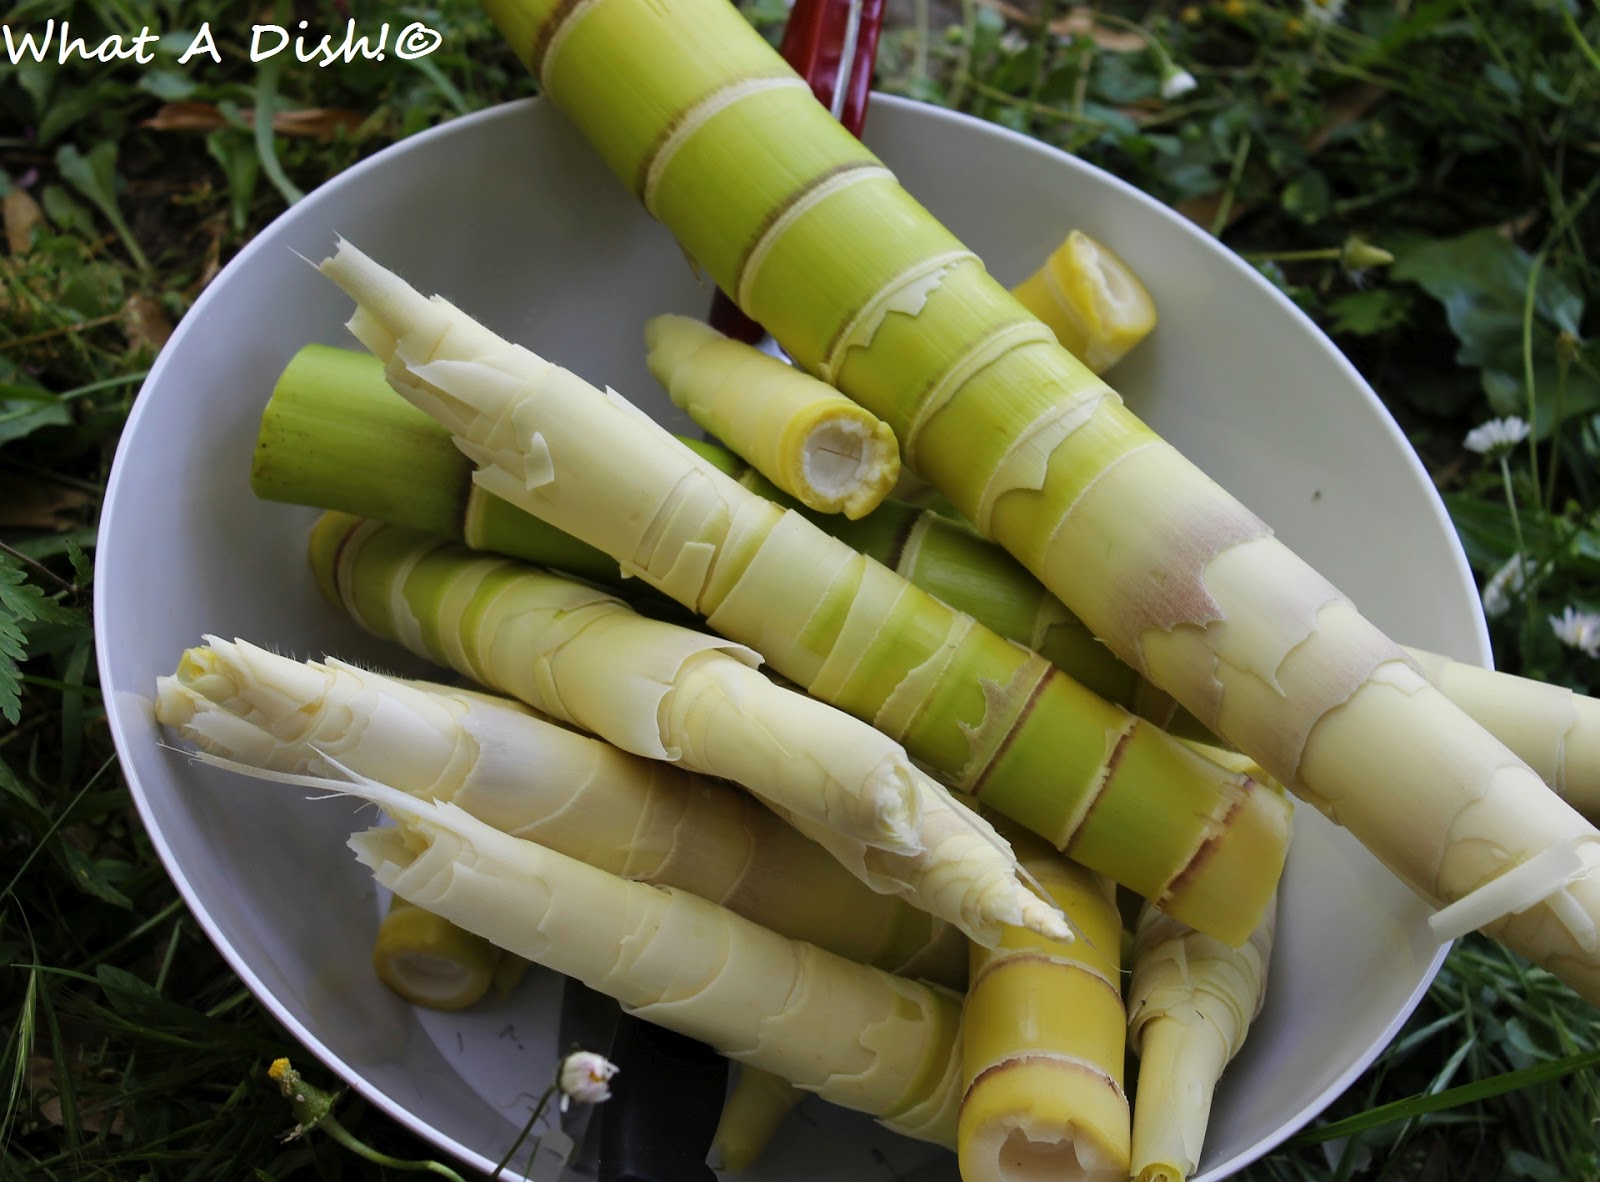
Peeled bamboo shoots, ready to be chopped.  We didn't use the larger green parts; just the more tender top parts.
All chopped up.  You can chop lengthwise, or into coins.
Boiling.  Boil twice, (drain after each time) each time for about 10 minutes or more.
Thai Basil Stir Fry with Bamboo Shoots, above
Fresh Bamboo Shoot Curry 
from my friend P.W.

fresh bamboo shoots 
one can coconut milk
Thai red curry paste
favorite veggie, such as a bell pepper
chicken, about 1 breast
fresh basil, chopped
fish sauce
palm sugar
white rice, for serving

1. Prepare the bamboo shoots.  Peel all the outer skin off.  Only use the tender parts.  If the bottom is not tender, discard it.  Chop up the tender part of the bamboo.  Fill a large pot with salted water, and bring to a boil.  Add the chopped bamboo shoots about boil for 10-15 minutes. Drain.  Fill the pot with salted water again, and bring to a boil again. Add the bamboo shoots and boil for another 5-10 minutes.  Drain.  

2.  In a large skillet, add the cream from the top of the can of coconut milk.  Add as much red curry paste as you want and let it cook into the coconut cream.  Add the chicken, bamboo shoots, any other veggies, and the rest of the coconut milk from the can.  Cook until everything is cooked through, adding palm sugar, fish sauce, and fresh basil to taste.  Enjoy over steamed white rice.

Chicken basil stir fry, pictured right, and bamboo chicken red curry, pictured left.

Thai Basil Chicken Stir Fry
from my friend P.W.

oil
prepared bamboo shoots (see #1 in recipe above)
boneless chicken, cut into strips
fresh basil
oyster sauce
steamed rice, for serving

1.  Heat the oil in a large skillet.  Add the chicken and prepared bamboo shoots, and cook and stir until the chicken is cooked through.  Add the oyster sauce to taste, and the fresh basil.  Serve with steamed rice.  


**This post and photos are property of http://dishingwithdish.blogspot.com/ **

Friday, June 5, 2015

White Chocolate Cherry Ice Cream

 I love David Lebovitz's ice cream book.  We have a cherry tree in our yard (yay! we thought it was an apple tree; lol.) that is full of cherries right now.  Or, was.  It's winding down now.  But anyway, we picked a bunch of them and I wanted to make ice cream.  In his book, there were many good ideas for using cherries in ice cream recipe, but this one jumped out at me because I love white chocolate.
You make a white chocolate custard base, and then cook cherries in sugar and water until they turn into a candy-like consistency.  Let both cool (I did overnight), and use the drained cherries in the ice cream and the leftover syrup on top.  Very good!  


White Chocolate Cherry Ice Cream
adapted from David Lebovitz

For the candied cherries:
1 pound fresh or frozen cherries, pitted (I measure after pitting)
1 1/2 cups water
1 cup granulated sugar
1 Tablespoon lemon juice
1/4 teaspoon pure almond extract

For the white chocolate ice cream:
8 ounces white chocolate, finely chopped
1 cup whole milk
2/3 cup sugar
Pinch of salt
5 large egg yolks
2 cups heavy cream

1.  Cherries: (Make the cherries ahead of time.) In a large heavy saucepan, combine the cherries, water, sugar and lemon juice. Heat over medium to medium high heat, until the liquid starts to boil.

2.  Turn down the heat to a low boil and cook, stirring frequently at first and then occasionally, for another 25 to 35 minutes, until the juice reduces to a thin syrupy consistency. Remove from the heat, stir in the almond extract and allow to cool to room temperature.

3.  Set a strainer over a bowl, and drain the cherries for at least 1 hour before folding into churned ice cream.  Overnight is good, too.  Coarsely chop the cherries or you can keep them whole. Reserve the liquid and store the candied cherries and syrup separately in the refrigerator for up to 2 weeks. To use, fold cherries into ice cream or drizzle the syrup as a topping.

4. Ice Cream Base: Place the chopped white chocolate in a large bowl with a mesh strainer set over top; set aside.

5.  In a medium heavy saucepan, heat the milk, sugar, and salt over medium-low heat until warm. In a separate medium bowl, beat the egg yolks together. Slowly pour the warm milk into the bowl with the egg yolks, whisking constantly, then transfer the mixture back into the saucepan.

6.  Set the saucepan back on the stove and heat the mixture over medium heat, stirring constantly with a heat-proof spatula or whisk, until the mixture thickens slightly. Pour the custard through the strainer over the white chocolate bowl. Stir the strained custard and white chocolate together until the white chocolate is completely melted and smooth. Stir in the cream.  Partially cover the bowl (at first) and chill the ice cream mixture in the refrigerator overnight. The next morning, freeze according to your ice cream maker's manufacturer's directions.

7.  As the ice cream comes out of the ice cream maker, place it into a freezer-safe container and fold in the candied cherries.  Cover, and freeze until hardened (or until desired consistency is reached.  My ice cream had a hard time freezing this time around; not sure why.)

**This post and photos are property of http://dishingwithdish.blogspot.com/ **