Saturday, June 30, 2012

Maple Blueberry Syrup

This is a delicious, easy and versatile recipe for homemade blueberry syrup from Joy the Baker.  We use it to make our own blueberry sodas (just add carbonated water and ice).  We also used it as a syrup over pancakes or homemade waffles

The only sugar added is in the form of pure maple syrup, so you can feel a little better about it.  I loved it and want to make it again sometime!  Maybe using frozen blackberries next time.
Maple Blueberry Syrup
adapted from Joy the Baker

3 cups water
1 (16-ounce) bag frozen blueberries, thawed or still frozen is fine.
juice of half a lemon
small handful of fresh mint leaves
1/2 cup pure maple syrup

1.  In a saucepan, combine water, frozen blueberries, lemon juice, mint leaves, and maple syrup. Bring to a boil, reduce heat, and simmer for 20 minutes. Remove from heat and strain through a fine mesh strainer into a large bowl. Using a spatula, press the blueberries into the strainer, releasing any juices.

2.  Return the warm, strained liquid to the saucepan. Bring to a boil once again, reduce heat and simmer for about 10-25 minutes, until syrup is reduced to 2 cups of liquid.  Place in a jar and allow to cool in the refrigerator.

3.  To make blueberry soda, add a few tablespoons of blueberry syrup to iced soda water. Also good over pancakes or waffles.  Enjoy!
**This post and photos are property of http://dishingwithdish.blogspot.com/ **


Thursday, June 28, 2012

Navajo Tacos (Fry Bread) with Anasazi Beans

As a child, I lived in Monument Valley for a few years, situated on the Utah/Arizona border.  This fry bread recipe comes from that region.  My mom made it for us from time to time growing up and I just loved it.  I tried making it myself, about 4-5 years ago, but it was before I had a blog and I never took any photos.  When my mom visited us a few months ago, she made them for us, and I just finally got around to making them myself, again, a few days ago, so I could take pics and finally put them up here. 

The dough is pretty easy to mix up.  My mom adds just a bit of shortening for some fat, although some recipes call for no fat.  It makes the dough more tender, though.  You roll them out to about 6 inches in diameter, and then fry them.  I tried to roll as thin as I could, because the dough puffs up a lot during the frying. 
We topped our Navajo Frybread with cooked Anasazi beans, available from Bob's Red Mill.  I got mine from Vitacost.com.  I just soaked them overnight and cooked them in the crockpot till tender.
My Dad is a very good photographer, and I want to share some photos he took of the Monument Valley area while we lived there.  I was only about 5 when we lived there, and I've always wanted to go back to visit- I have not been back since we moved away.  Top three pictures, below, are of the famous Monument Valley Mittens.  We could see some of these formations from the windows in our house!  The fourth (bottom) picture, is of an ancient Anasazi dwelling we visited while we lived in that area.  Recipe following all the pics.  :)

Navajo Tacos (Fry Bread) with Anasazi Beans
Frybread recipe from my Mom
I increase this recipe by 50% for my family

2 cups unbleached flour
1/2 teaspoon salt
1/2 cup instant dry milk powder
1 tablespoon baking powder
1 1/2 tablespoons shortening
2/3 to 3/4 cup water
Canola or Vegetable oil for frying

1.  Mix dry ingredients; cut in shortening as for pastry with pastry cutter. Add water gradually, mixing to form a firm ball. Divide into 8-12 balls; let rest, covered, for 10 minutes. Roll or pat each ball into a 6 inch circle, rolling the dough thin. Poke a hole in center with your finger. Heat 1 inch oil in Dutch oven* to 350- 400 degrees. Slip each circle into oil; fry each side about 1 minute or until puffed and golden. Drain on paper towels.  Top with beans or chili, cheese, sour cream, tomatos, lettuce, etc., to make Navajo tacos.  (Bean recipe below). 
*(I used a small (about 8 inch) skillet so I'd use less oil and just fried one at a time.  I also didn't use a thermometer for my oil). 

Simple Anasazi Beans
by What a Dish!

2 cups dry Anasazi beans, sorted through (to remove any pebbles, etc) and rinsed
water, to cover
1/2- 1 teaspoon garlic salt, to taste
1 tablespoon tomato paste
1-2 teaspoons chicken bouillon base, such as Better than Bouillon or Trader Joe's

1.  After the beans are clean, place them in a glass, plastic, or ceramic bowl and cover with 1 inch of cold water.  Let soak overnight.
2.  The next morning, drain and rinse the beans.  Place in a slow cooker and cover with fresh water.  Cook on High for about 4 hours.  If the beans are pretty tender, switch slow cooker to low and cook a few more hours, or until very tender.  Drain (reserving some bean water) and return to slow cooker.  Stir in the garlic salt, tomato paste, chicken bouillon base, and a few spoonfuls of reserved bean water.  Beans should turn creamy.  Taste for salt and add more if needed. 

**This post and photos are property of dishingwithdish.blogspot.com/ **

Tuesday, June 26, 2012

Vanilla Bean Macarons with Raspberry Mascarpone Filling

These Macarons were supposed to be pure white, but I had a hard time getting them cooked through and not browning them at all.  I found it pretty much impossible, even though the oven temp was low.  I even took some out too soon, but later I realized I shouldn't have done that, because they were all sticky.  Oh well.  The powdered food coloring I ordered is here, so next time, I want to make some brightly colored ones! 
For the filling, I just combined Mascarpone cheese with a good-quality, seedless raspberry jam.  Then I stuck it in the fridge to firm up a bit before piping.  These were fun to make.  They are my second macaron attempt, and they turned out just as good as the first

Next I want to try a pistachio with maybe white chocolate filling.  These are so fun!

PS:  I'm SO tired of people saying "Yes please!" all the time.  As in "Two something for the price of one?  Yes please!"  Or something similar; my brain is too fried by the Yes Please's to think of more examples.  It's all over FB and blogs.  If you don't know what I'm talking about, you are one of the lucky ones.  I've seen it so much that it gives me word rage now.  Please stop saying it, people!!

Vanilla Bean Macarons with Raspberry Mascarpone Filling
shells adapted from Pink Parsley; filling from a few ideas I saw on the web

Shells:
110 g almonds meal/flour
200 g powdered sugar
seeds from 1 vanilla bean
50 g granulated sugar
100 g egg whites (about 3 egg whites), aged a day at room temperature

1.  Line 2 baking sheets with parchment paper or silicone mats.

2.  Pulse almond flour and powdered sugar in a food processor until evenly mixed.  Split the vanilla bean in half lengthwise, and scrape the seeds out using a paring knife. Add the seeds to the granulated sugar and whisk to combine.

3.  In the bowl of a stand mixer fitted with a whisk attachment, whip the egg whites until foamy, then gradually add the granulated sugar and continue to whip until a shiny, glossy meringue forms (but not dry).

4.  Remove the bowl from the stand mixer, and add the almond mixture. Using a rubber spatula, briskly and quickly fold the almond meal into the egg whites. After a few brisk strokes, slow down and then gently incorporate the rest into the batter.You want a batter that flows and "ribbons" for at least 5 seconds.

5.  Pour the batter into a pastry bag fitted with a large round tip. Pipe the batter into 1 1/2-inch rounds, spacing them about 1-inch apart.  Whack the baking sheets on the counter a few times, then allow to sit at room temperature for about 1 hour, or until a hard shell forms.

6.  Meanwhile, preheat the oven to 300 degrees. Bake the macarons 8-10 minutes, depending on size. Allow to cool completely on the pan before using a small spatula to remove them. Match the cookies according to size and pipe filling on half, using the other half to form a sandwich.

Raspberry Mascarpone Filling:
1 cup (about) mascarpone cheese, room temp
2-4 tablespoons good-quality, seedless raspberry jam

1.  Stir ingredients together until well-combined.  Add more or less jam to taste, and to get the consistency you want.  Refrigerate until thickened a little.  Let sit at room temp again for about 10-15 minutes to soften enough to pipe.  Fill a ziplock bag with the filling, snip a small hole in the corner, and pipe it out onto the macaron shells.
**This post and photos are property of dishingwithdish.blogspot.com/ **

Monday, June 25, 2012

Chicken & Zucchini Soup with Heart-Shaped Carrots

Another rainy, blustery day calls for sharing another soup recipe.  This one is summer-friendly in that it uses zucchini.  I was making this along with some bread product (can't remember now) and in order to avoid the double starchy carbs, I swapped out noodles for sliced zucchini.  It was really killing two birds with one stone, as I had some zucchini that was really, really needing to be used up, and I wanted to avoid noodles!

The most fun thing about this recipe is the heart-shaped carrots.  I saw this recipe over on SophisiMom and knew I had to make it soon!  I love the heart-shaped carrots.  Click on the link for a tutorial on how to make the carrots into hearts- it's a lot easier than you think!  She has great step-by-step photos that made it so easy.  Go take a look!

For this recipe, I just simmered two large chicken breasts in water and a bit of garlic salt.  My chicken breasts had bones and skin, so after simmering, I just took off the skin/bones and threw them away.  I kept the simmering water and used it as my broth in the recipe. 
Chicken & Zucchini Soup with Heart-Shaped Carrots
adapted from SophistiMom

1 tablespoon olive oil
three large carrots, cut into hearts (see instructions)
1 medium onion, diced
2 celery stalks, sliced into 1/4 inch pieces
2 stalks fresh thyme (optional)
1 bay leaf
1/2 teaspoon dried thyme
2 large sage leaves (optional)
4 cups low sodium chicken stock
2-3 cups water
1/2 teaspoon vinegar
pinch cayenne pepper
salt and pepper, to taste
2 large chicken breasts, cooked and shredded
1 large or 2 small zucchini, diced (do not peel)
fresh parsley

1. In a large pot set over medium-low heat, combine olive oil, carrot hearts, diced onion, celery, thyme (both kinds), bay leaf, and sage. Sprinkle with a pinch of kosher salt. Cook until tender, stirring occasionally, about 10 minutes. Add in stock, a cup of water, and vinegar. Add in cayenne pepper, and bring to a boil.

2.  After about 20 minutes, check the soup for flavor, and add more water, salt and pepper, as necessary.  Add cooked chicken and zucchini, and simmer until zucchini is tender (5-10 minutes).  Stir in fresh parsley, and serve. 

**This post and photos are property of http://dishingwithdish.blogspot.com **

Saturday, June 23, 2012

Blueberry Buttermilk Pancakes

 I love buttermilk pancakes and have many recipes for them on my blog (just search "buttermilk pancakes"!)  This is a new recipe I tried recently, from Smitten Kitchen, and it's a bit different in that it uses a TON of buttermilk, making them very soft pancakes, but very light and fluffy at the same time.  The large amount of buttermilk makes flipping them a bit difficult, but just use a steady hand.  :)

These are blueberry pancakes although you can't really see the blueberries; the best way to make blueberry pancakes is to pour plain batter on your hot griddle, and drop individual blueberries into each pancake.  This way, the blueberries don't bleed funky colors into your pancake batter.  You can also leave blueberries out for picky kids who prefer to eat theirs on the side.  Yes, even frozen blueberries- my kids love frozen blueberries right from the freezer.  They have to, since fresh blueberries are a rare treat where we live.  And if they're here, they're expensive!

Anyway, on to the recipe.  These were simple, basic and yummy.  Need to use up a ton of buttermilk?  Make these!  :)
Blueberry Buttermilk Pancakes
adapted from Smitten Kitchen

2 cups all-purpose flour (I used half whole-wheat pastry)
2 teaspoons baking powder
1 teaspoon baking soda
1/2 teaspoon kosher salt, or slightly less table salt
3 tablespoons sugar
2 large eggs, lightly beaten
3 cups buttermilk
4 tablespoons unsalted butter, melted, plus 1 tablespoon extra for brushing griddle
1 cup blueberries, fresh or frozen

1. Preheat an electric griddle to 375°F, or place a griddle pan or cast-iron skillet over medium heat. Whisk together the flour, baking powder, baking soda, salt, and sugar in a medium bowl. Add the eggs, buttermilk, and 4 tablespoons melted butter, and whisk to combine. The batter should have small to medium lumps.

2.  Using a 1/4 cup measuring cup, pour the batter in pools 2 inches apart. If you wish to make blueberry pancakes, arrange a handful over the cooking pancake, pressing them in slightly. When the pancakes have bubbles on top and are slightly dry around the edges, about 2 1/2 minutes, flip over. If any batter oozes or blueberries roll out, push them back under with your spatula. Cook until golden on bottom, about 1 minute.  Repeat with remaining batter. 
**This post and photos are property of http://dishingwithdish.blogspot.com **

Friday, June 22, 2012

Gnocchi Chicken Soup

I've been wanting to make a soup like this ever since I heard about it, sometime last year.  I had ordered some gnocchi online right before that and this soup sounded good.  Although we're into summer now, it's been cool and rainy here and still soup weather.  We've had many nice and sunny days, but it keeps going back and forth between sunny and cool and rainy. 

I found two soup recipes from Food.com and kind of took what I wanted from each of them.  Both recipes called for cooked chicken (or turkey), but I just threw some raw chicken tenders in with the simmering broth and shredded them later.  Perfect!  My kids do not like gnocchi for some reason, so they didn't love this soup, but I made blue cornbread on the same night, so they had their fill of that.  :) 

I loved this!  And good thing, too, since I ate the leftovers for lunch for two days afterward.  :)  Instead of 2 cups of half and half, I used 2/3 cup cream, and 1 1/3 cups store bought almond milk.  No need for cornstarch to thicken it- it was SO smooth, thick and creamy.  I loved the texture!

Gnocchi Chicken Soup
from here and here

1 tablespoon olive oil
1/2 large onion, diced
1 large carrot, shredded
1 stalk celery, sliced
1 garlic clove, minced
4 cups low-sodium chicken stock
2 chicken breasts OR 4-5 chicken tenders, raw or cooked (see directions)
1 teaspoon dried thyme
1/2 teaspoon dried oregano
salt and pepper, to taste
16 ounces potato gnocchi
2 cups half and half (or 2/3 cup cream; 1 1/3 cups store bought almond milk; works wonderfully!)
1 cup fresh spinach, chopped
1/2 cup mozzarella cheese

1.  In a large soup pot, heat olive oil over medium heat.  Add onion, carrot, celery, and garlic clove and stir and cook until onion is translucent. 

2.  Add chicken broth.  Bring to a simmer.  If using raw chicken, add it now, whole.  Cover the pot and simmer 10-15 minutes until cooked.  (You can shred it later, after cooking).  If using breasts, you may need 20 minutes or more.

3. If using raw chicken, shred when it is cooked through, using two forks.  If using cooked chicken, simmer 10 minutes.  Proceed with recipe:  Add dried thyme, oregano, and salt and pepper.  Add gnocchi to gently simmering broth and cook for about 3 minutes.  Turn the heat down to medium-low, and gently stir in the half-and-half, or cream/almond milk mixture, until heated through.  Add the chopped spinach and cover pot to allow spinach to wilt.  When spinach is wilted, turn the heat to very low, add mozzarella cheese.  Stir just until melted and remove from the heat. 

4.  This should be thick enough, but to thicken further, you may add about 2 Tbs. cold water to 1 Tbs. cornstarch and whisk into the soup over medium heat. 
**This post and photos are property of http://dishingwithdish.blogspot.com/**

Wednesday, June 20, 2012

First Day of Summer Cupcakes!

My daughter has been asking to make cupcakes when the first day of summer comes for a few weeks now.  I had forgotten about it until last night, so we made these today.  (The first day of summer!)  She abandoned me for the pool, but I made the actual cupcakes while she was gone and then we frosted and decorated them together when she got back. 

I googled Summer Cupcakes and found this blog showing these.  I thought they were cute, and I had a stray bag of candy corns leftover from Halloween anyway.  They were easy to make, which was a plus!  I have some little drink umbrellas on the way from Oriental Trading; sadly they are not here yet, because they would have been cute on these!

I used this recipe, just omitting the lemon.  I was just in too much of a hurry today to take the extra steps of juicing and zesting the lemon, so I just did these vanilla.  Lemon would be great for summer though, and the frosting is yellow anyway!  That recipe for yogurt cupcakes is my go-to recipe for any vanilla cupcakes.  I also mention it here

Sunshine Cupcakes
idea from here

12-15 vanilla or lemon-flavored cupcakes, baked in yellow liners, if possible
1-2 cups of yellow (vanilla or lemon) frosting
1 bag (about 16 oz.) candy corns
1-2 Tablespoons mini chocolate chips
Red or pink sprinkles, or pink/red thin licorice

1.  Frost cupcakes with yellow frosting.  Add candy corns around the cupcake for the rays of sunshine.  Add inverted mini chocolate chips for eyes.  Form a smiley mouth with sprinkles or a thin strip of red or pink licorice. 
**This post and photos are property of http://dishingwithdish.blogspot.com/ **

Tuesday, June 19, 2012

Black Bean & Corn Salad

I love the flavors and freshness in this salad.  It's actually kind of a salsa too, and it tastes awesome with tortilla chips.  I use fresh lime juice and reduce the olive oil.  The original recipe calls for 2 cans of black beans, but the first time I made this, I only had one can in the house, so I made it that way, and I've made it that way ever since.  I'm sure it would be just as good with two, though!

Actually, the first time I made this, I brought it to an extended-family camp out in Mt. Rainier national park.  I actually brought it just for my little family (this was back in 2005, I think!) but ended up sharing it with everyone there who wanted some and it got many rave reviews! 

Don't skip the cilantro unless you're one of those cilantro-haters.  It really makes this; I wouldn't make this salad without it!  That's why, last week when I made this, when my regular store was out of cilantro, I went out of my way to go to another one to get some even though it was highly inconvenient at the time!
Black Bean & Corn Salad
adapted from Allrecipes

1/3 cup fresh lime juice

1/3 cup olive oil
1 clove garlic, minced
1/4 teaspoon salt
1/8 teaspoon ground cayenne pepper
1-2 (15 ounce) cans black beans, rinsed and drained
1 1/2 cups frozen corn kernels, thawed at room temp
1 avocado - peeled, pitted and diced
1 red or orange bell pepper, chopped
2 tomatoes, chopped (or a bunch of halved cherry tomatoes)
6 green onions, thinly sliced
1/2 cup chopped fresh cilantro

1.  Place lime juice, olive oil, garlic, salt, and cayenne pepper in a small jar. Cover with lid, and shake until ingredients are well mixed.

2.  In a salad bowl, combine beans, corn, avocado, bell pepper, tomatoes, green onions, and cilantro. Shake lime dressing, and pour it over the salad. Stir salad to coat vegetables and beans with dressing, and serve.

**This post and photos are property of http://dishingwithdish.blogspot.com/ **

Monday, June 18, 2012

German Amerikaners

 A while ago, for school, my son had to select a country he was interested in, and bring in a food from that country.  He chose Germany, so it was a great excuse to break out my German Baking Book and look through it with him!  I bought the book in January 2011 in Germany; it seems kind of hard to get in the States.  We looked at every single recipe and it was quite hard to decide which one to make- so many looked delicious!  We narrowed it down to 10, then to 5, and then we finally decided on these Amerikaners, both for ease and kid-friendliness. 
He helped me mix up the dough, but because of time constraints, I frosted them right before bringing them into his class in the morning.  You never know how children will act with food- I thought these would be quite popular but the classroom kids all approached them with trepidation.  :)  I guess they look scary?  I should have added sprinkles! 

These are pretty much a very cakey cookie, flipped over, with the bottom frosted.  They were fun to make, and pretty easy.  I loved how the recipe for the chocolate coating calls for just chocolate and a tiny bit of oil; I always thought you weren't supposed to add oil to chocolate, but it helped melt the chocolate super-smooth and shiny; I'm doing this from now on! 
German Amerikaners
from German Baking Today

For the Amerikaners:

75g/3oz soft butter
100g/3 1/2 oz/ 1/2 cup sugar
2-3 drops vanilla extract in 1 Tablespoon sugar
5 drops vanilla extract
1 pinch salt
2 medium eggs
250g/ 9 oz/ 2.5 cups all-purpose flour
3 teaspoons baking powder
100 ml/ 3 1/2 oz/ 1/2 cup milk
3-4 teaspoons milk, for brushing

White Icing:
200g/ 7 oz/ 1 1/3 cups powdered sugar
2 Tablespoons lemon juice or water

Chocolate Icing:
150g/ 5 oz plain chocolate (we used a mix of milk and semi-sweet)
2 teaspoons oil (like canola, sunflower)

For decoration, optional:
chopped almonds
chopped pistachios
sugar crystals
dried coconut

1.  Preheat the oven to 350 F (180 C).  Line 2 or 3 baking sheets with parchment paper. 

2.  To make the cake mixture, stir the softened butter with a hand mixer or whisk until it becomes smooth.  Gradually add the sugar, vanilla sugar, vanilla extract and salt and stir until mixture thickens.  Add 1 egg at a time, whisking each one for about 1/2 minute at the highest setting.

3.  Mix together the flour and baking powder, sift and add to the butter mixture in 2 stages, alternating with the milk, stirring briefly with the mixer at the medium setting.  Spoon the mixture onto the lined baking sheet in small heaps (about 1-2 tablespoon), not too close to each other.  Then shape using a moistened knife (to flatten a bit). 

4.  Bake for about 8-10 minutes, then brush the tops with milk.  Bake 2-5 more minutes, until golden brown.  Repeat with remaining dough.  Cool completely on wire racks.

5.  For the icing, mix the powdered sugar with the lemon juice or water to make a thick mixture.  (This is the white icing).  For the chocolate icing, coarsely chop the chocolate and melt together with the oil in a double boiler over low heat.  (Homemade double boiler- oven-proof Pyrex bowl set over a pan of simmering water on the stove). 

5.  Turn the Amerikaners around to expose their bottoms.  Coat their undersides with icing- either all white, all chocolate, or half and half of both.  If desired, sprinkle with the optional decorations. 

(Note:  I had some leftover chocolate coating, so I dipped these Peanut Butter Pretzel sandwiches into it.... these little chocolate-covered pb pretzels were SO good!  Pictured below.)

**This post and photos are property of http://dishingwithdish.blogspot.com/ **

Saturday, June 16, 2012

Pasta with Yogurt Sauce

Here is another Lebanese recipe from one of my favorite blogs, Taste of Beirut.  I had never seen the combination of pasta and yogurt before but this was delicious!!  I used thick Greek yogurt; a mix of full-fat and fat-free (what I had on hand).  I reduced the yogurt from 3 cups to 2; just use as much as you think you need.  You can use whatever pasta you want; I used wagon wheel because it's fun.  I also made my own Lebanese Seven-Spice for this.  I forgot to take a photo of that, so I will share that recipe at a later date.  You can see it here, though (scroll down). 

I LOVED the flavors of this, and it was so easy, too!  I can't wait to make it again.  My 10-month old loved it.  I just did not give him any of the pine nuts.  It's good to expose babies to different flavors and spices like this.  Hopefully he'll always enjoy eating such things.  :)  The leftovers of this were good, too.  I warmed it in the microwave just enough so it wasn't cold anymore.

Pasta with Yogurt Sauce
adapted from Taste of Beirut

8 oz dry pasta (any shape)
1/4 pound lean ground beef
1 onion
2-3 cups yogurt (I used 2)
1/4 cup tahini
3 garlic cloves, mashed in a mortar with a pinch of salt
1 tbsp fresh lemon juice
1/2 cup pine nuts, previously toasted in a dry skillet till golden-brown
salt, to taste
1 tsp spices such as seven-spice or red Aleppo pepper ( more if needed)
butter, as needed (or olive oil)

1.  Cook the pasta as directed. Coat in a little butter or a tablespoon of olive oil and set aside. Chop the onion, heat some butter or oil in a skillet, and fry the onion till golden; add the meat and fry till browned with the spices. Drain the meat if needed of most of its fat.

2.  In a bowl, add the yogurt, mix in the tahini and mashed garlic as well as the lemon juice. Taste and adjust seasoning, adding more tahini or garlic to taste. Transfer the sauce to the pasta and mix to combine well. Add the ground meat and onion, and finally sprinkle the pine nuts. Sprinkle with additional Seven-spice, if desired.  Serve at room temperature.


**This post and photos are property of http://dishingwithdish.blogspot.com/ **

Friday, June 15, 2012

Favorite Restaurant on the Island

These pictures are over 3 months old!  We went here for lunch one day when my mom was visiting us.  (I mention this place here.)  We love this place- it's usually expensive (I think the most expensive place on the island), but every weekday during lunch, they offer a 9 Euro special that includes soup, roll, drink, main dish choice of meat or fish, and dessert.  (If you're local and don't know which restaurant this is, ask me!)
On this particular visit, my husband chose the meat (1st photo).  I know it was some kind of beef and I've forgotten more than that.  It was served with broccolini (baby broccoli) and I think a butter sauce or something?  It was really good though!  The soup of the day (above), was creamy vegetable and SO GOOD!  I wish I could have it again... like right now.

My mom and I chose the fish special of the day.  One nice thing about this restaurant is that their fish is always a fillet- they told me there is never any bones in their fish, and none of that "whole fish on your plate, staring at you with wide, creepy eyes" business.  So I always feel safe ordering the fish here, which is more than I can say for any other place on the island.  I've accidentally eaten fish guts here once... I'm still not over that.  And the fish here is ALWAYS delicious.  Cooked to perfection. 

The first time we visited this place was on my last birthday.  My husband and I both got the salmon and it was so good- seared perfectly and resting on top of a bed of quinoa with sauteed veggies.  I bought some quinoa so I could re-create that but haven't gotten around to it yet. 

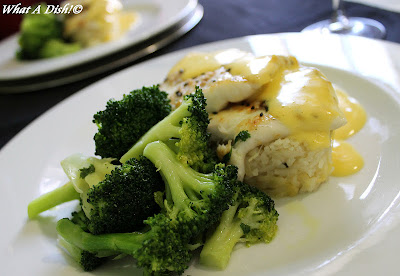
Anyway, the fish my mom and I ordered back in March was Espada Preto, a large, black, SUPER creepy-looking, deep sea fish with a mouth full of fangs.  Or at least they look like fangs. It is a tasty fish though!  It came on a bed or rice (that was actually seasoned- something rare in restaurants here), covered with a light lemon sauce and a nice hearty serving of broccoli on the side.  Everything was done to perfection, not over or under-done. 
The desserts here are always unique.  Well, I've only been here three times.  But the time we went with my mom was my favorite of all the times we've gone.  It was a light Mango Mousse, garnished with fresh mint, chopped red grapes, and fresh pineapple.  (Below.)  I LOVED it!  I actually am planning to make it myself..... sometime in the future. 

Maybe I'll get a chance to go again soon... this restaurant is delicious, classy, and has a very friendly wait-staff.  It is extremely popular so it fills up fast and can get loud, but it's so worth it!  We've brought our baby with us every time we've been and they are very accomodating and even have a high chair.  :) 
**This post and photos are property of http://dishingwithdish.blogspot.com/ **

Thursday, June 14, 2012

Quark Pancakes


I wanted to try making pancakes using Quark, the fresh, soft German cheese, because I thought the texture would be good and similar to using Ricotta cheese in pancakes.  Plus, I'm sure the pancakes using quark are full of protein and calcium!

I found a recipe on a blog on this blog so I just went with that.  The recipe contained a lot of eggs, but no oil or butter, so I added about a tablespoon of canola oil.  We had these with lemon curd, and/or my parent's neighbor's sour cherry preserves!  I thought some German-made jam deserved to go on top of these pancakes.  :)  You'll need your kitchen scale for this one.

Quark Pancakes
adapted from The Sweetest Brunch

200g flour
2 tsp baking powder
150g quark (if this is not easy to get hold of you could substitue with ricotta)
150ml milk
4 eggs
1 tbsp sugar
pinch of salt

1.  Mix the flour and baking powder together. In another, slightly bigger bowl, whisk the eggs, quark, milk & sugar and then whisk the flour-baking powder mix in.

2.  To cook, heat a little oil in a frying pan or griddle and use about 1/4 cup of batter per pancake.  Cook for 3-4 minutes and then flip.  Cook until cooked through and nicely browned.
**This post and photos are property of http://dishingwithdish.blogspot.com/ **

Wednesday, June 13, 2012

Nutella Fudgesicles

I saw these easy little guys on Pinterest.  They are so good, and so simple!  The original recipe calls for Hazelnut Chocolate milk, which is something that is not available here, but I wish it was- sounds good!  I tried looking for chocolate almond milk but of course my store was out.  So I just made my own chocolate milk using cow's milk. 

After making these once, I tried them again, using peanut butter instead of Nutella, but they weren't nearly as good.  The PB made them almost too salty, and I usually like salty-sweet things, but it wasn't working here.  I'll stick with Nutella! 

Note:  I'm not even a big Nutella fan and I still found these delicious!  I love Nutella Gelato too.  ;) 

Nutella Fudgesicles
adapted from The Daily Waffle

1 1/2 cups chocolate milk (cow's, hazelnut, almond, or other)
1/2 cup Nutella

1.  Whisk together the chocolate milk and Nutella.  Pour into popsicle molds and freeze until hardened (like overnight).  To loosen popsicles when ready to eat, run briefly (a few seconds) under warm water. 

**This post and photos are property of http://dishingwithdish.blogspot.com/ **

Tuesday, June 12, 2012

Fatoosh- Lebanese Bread Salad

This salad was soooo good and flavorful- I loved it.  We had it with these Lebanese Chicken Skewers and it complemented the meal perfectly.  (You can see more photos of this salad in that post).  The recipe called for Pita bread, but the stuff I can buy here is not tasty, and since I make Naan all the time, I just made a batch of that.  I cut up two for the salad and we ate the rest with this meal. 

I tried Sumac for the first time when I made this- I bought mine online at Penzeys.com; they have almost every spice you can think of!  I love Sumac- it's almost lemony. 

I will definitely be making this salad again! 

Fatoosh- Lebanese Bread Salad
adapted from Allrecipes

2 pita breads (or naan)
8 leaves romaine lettuce, torn into bite-size pieces
2 green onions, chopped
1 cucumber, halved and sliced
3 tomatoes, cut into wedges (or handful halved grape tomatoes)
1/4 cup chopped fresh parsley
1 clove garlic, peeled and chopped
2 tablespoons sumac powder
1/4 cup lemon juice
1/4 cup olive oil
1/4 teaspoon salt, or to taste
1/4 teaspoon ground black pepper
1/4 cup chopped fresh mint leaves

1.  If using pitas, toast them 5 to 10 minutes in a 350 degree F oven, until crisp. Remove from heat, and break into bite size pieces.  If using naan, just grill and then cut or tear into bite-sized pieces.

2.  In a large bowl, toss together toasted pita (or naan) pieces, romaine lettuce, green onions, cucumber, and tomatoes.               

3.  In a small bowl, mix the parsley, garlic, sumac powder, lemon juice, olive oil, salt, pepper, and mint. Pour over the pita mixture, and toss just before serving.               


**This post and photos are property of http://dishingwithdish.blogspot.com/ **

Monday, June 11, 2012

Lebanese Chicken Skewers (Shish Tahouk) with Garlic Sauce

I LOVED this meal!!!  Very heavy on the garlic, but garlic is good for ya!  Chicken is marinated in spices, lemon, and garlic, and grilled.  The garlic sauce is 2 whole heads (!) of garlic with oil and lemon.  The garlic sauce was too strong for me, though, because the garlic is raw.  If you can, find Elephant garlic, which is not nearly as strong.  I wonder if this would still be authentic if I roasted the garlic first- I think I may try that next time!  (Roasting really mellows out the sharpness of garlic). 

We had this with Lebanese salad- Fatoosh- which I will post next.  We also had Grilled Naan Bread with this meal.  I'm really loving trying out more Middle-Eastern recipes- they are so flavorful and healthy! 
The kids didn't love this- I think because the cinnamon flavor is a little strong.  They love Indian food though, which has similar spices, so go figure.  Only my daughter tried the garlic sauce.  My whole kitchen smelled like garlic for a few days after this one!  Next time, I might try marinating this chicken in Lebanese 7-Spice mixture instead of just the cinnamon and paprika.  I made my own mixture from a recipe found online, which I will share some other time.  :)
Lebanese Chicken Skewers (Shish Tahouk) with Garlic Sauce
adapted from Taste Buddies

Chicken Shish Tahouk:
4 chicken breasts
6 crushed garlic cloves
1/4 cup lemon juice
1/4 cup olive oil
1 tsp paprika
1 tsp cinnamon
1/4 tsp sea salt
Metal Skewers, OR wooden skewers soaked in water to prevent burning

1.  Cut the chicken into thin strips. Add chicken to a large non-reactive bowl (or large ziptop bag) along with the garlic, lemon juice, olive oil, paprika, cinnamon and sea salt. Mix well to coat the chicken. Cover with plastic wrap (if using a bowl) and refrigerate for at least 2 hours.

2.  Meanwhile, prepare the garlic sauce (instructions below).

3.  Skewer the chicken pieces.  Heat up the barbecue or a hot skillet and brush with a little olive oil. Cook chicken, until done, about 5 minutes on each side. Serve with garlic sauce.

Lebanese Garlic Sauce:
2 garlic bulbs
1/4 cup good quality olive oil
2 tbs lemon juice
1/2 tsp sea salt

1.  Peel the garlic and place cloves in a blender. Add the lemon juice and start to blend. You may from time to time have stop and push the garlic down with a spoon if it sticks to the side. Add the salt and continue to blend.  (Try using an immersion blender- I didn't, but wish I had). 

2.  Add the olive oil in a slow stream while continuing to blend.The sauce should have the consistency of mayonnaise.  Cover and refrigerate sauce until serving time.

**This post and photos are property of http://dishingwithdish.blogspot.com/ **

Sunday, June 10, 2012

Non-Alcoholic PiƱa Colada

This is the last fruity, frozen mocktail I'm going to blog about- I've already done Margaritas and Strawberry Daiquiris.  I used fresh pineapple for this and a whole can of coconut milk.  You can strain the mixture after blending if you want, but I didn't.  You'll get tiny bits of pineapple that way, but we didn't mind.  This one wasn't as popular with the kids as the other two, but it was still fun.  I think the favorite so far has been the Virgin Margaritas!  The kids loved the salt on the rim. 

Non-Alcoholic PiƱa Colada
adapted from Food
Serves 4-6

1 can (14 ounces) coconut milk
1 cup cut fresh pineapple
5-7 ounces pineapple juice
1 cups crushed ice
brown sugar, honey, or agave nectar to taste (a few tablespoons)
Fresh pineapple slices for garnish, optional

1.  Pour all ingredients into a blender and blend until smooth.  Poor into glasses.  Garnish with a fresh pineapple slice.


**This post and photos are property of http://dishingwithdish.blogspot.com/ **

Friday, June 8, 2012

Fruit Pizza with Mascarpone

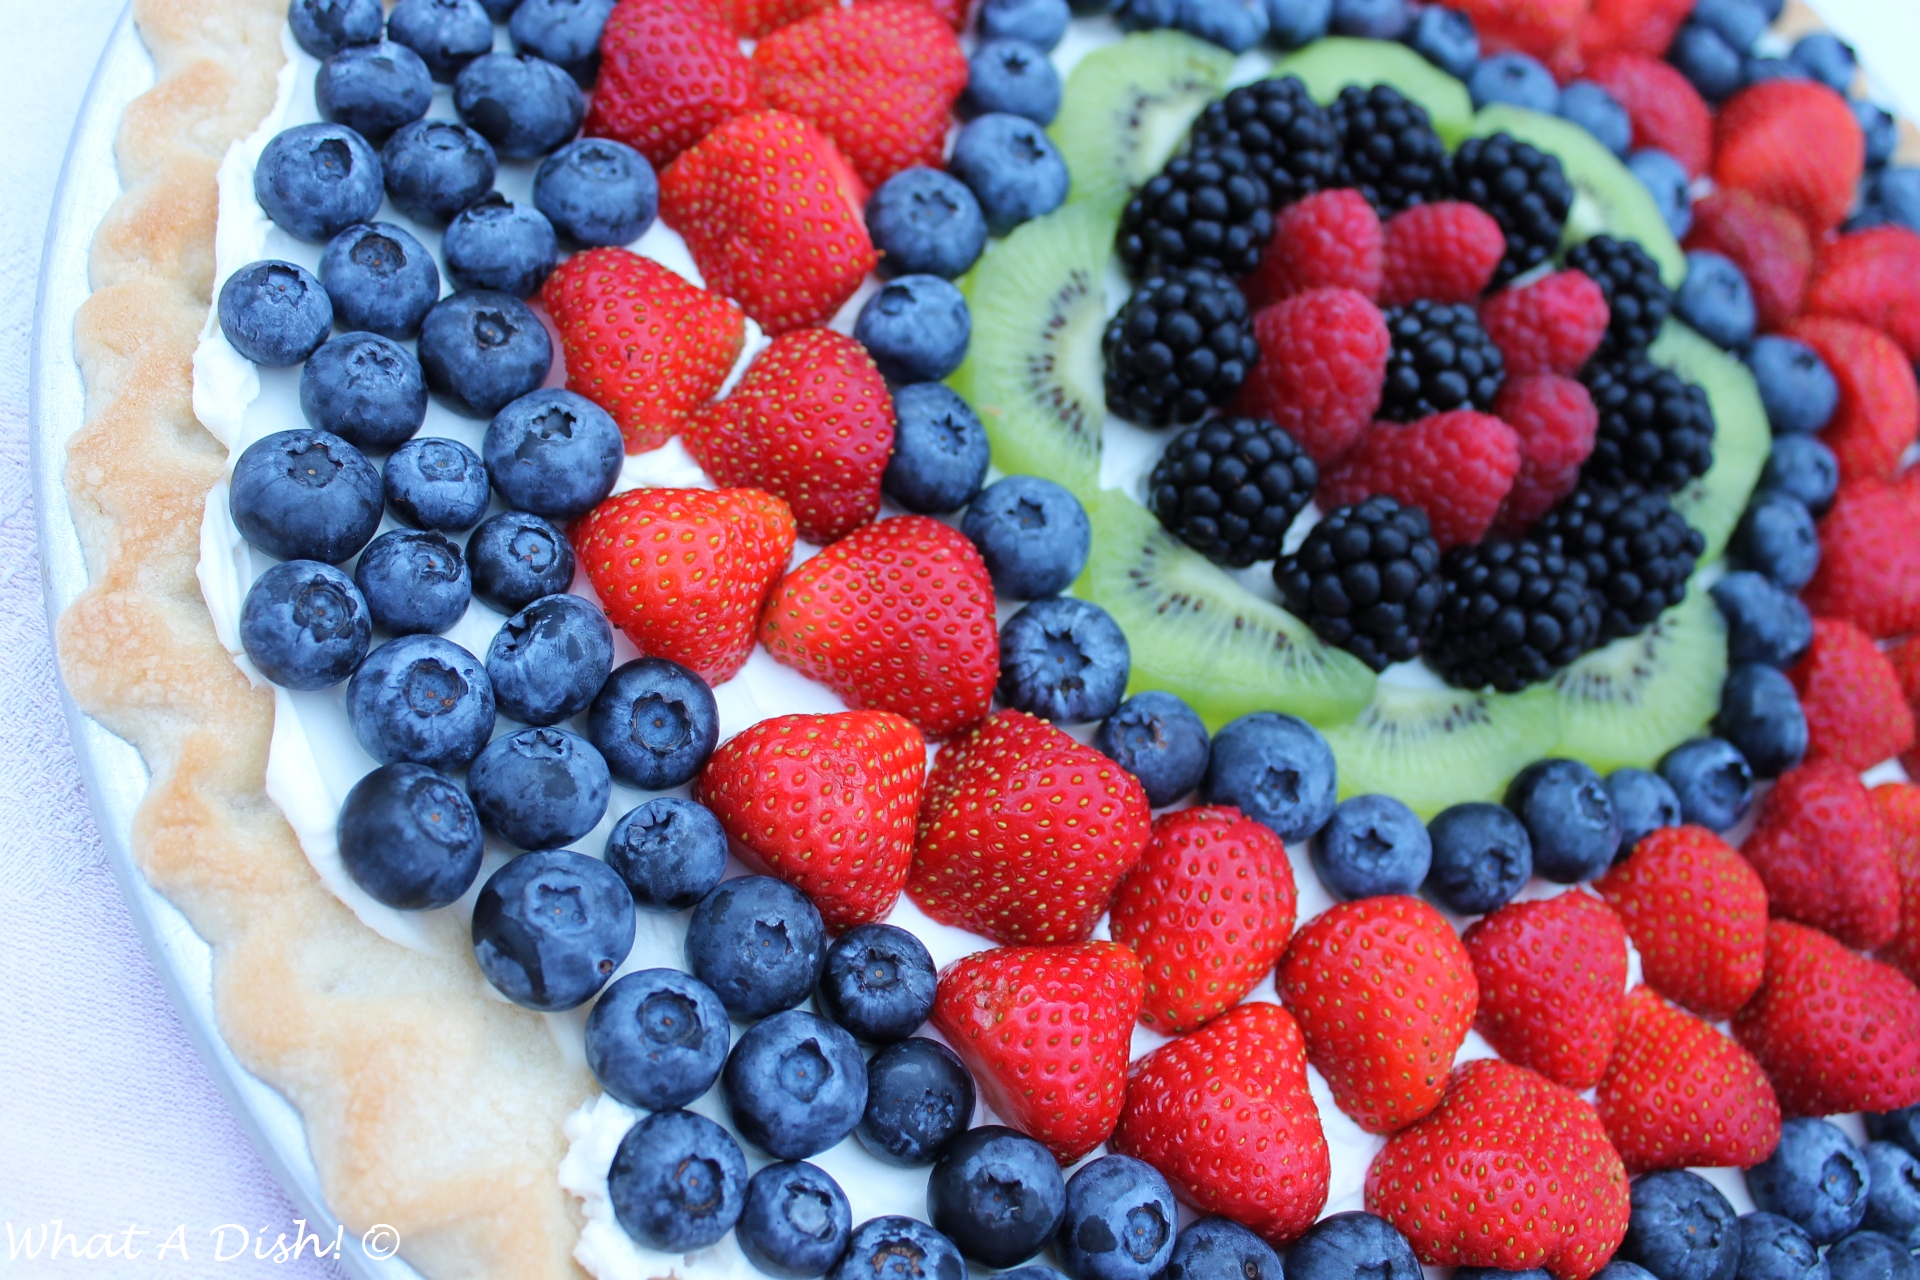
I've made Fruit Pizza a few times before, but never used Mascarpone to top it with, so I'm posting it here because I liked it so much.  I'm never going back to cream cheese or frosting; Mascarpone is the way to go!!  This Italian soft cheese has a naturally sweet tang.  Just using this alone for the topping provided great flavor, and no sugar is needed.  The Mascarpone + cookie crust + fruit is just sweet enough.  For local readers, I buy Mascarpone at Continente.  It comes in little tubs.
All that was available at the store the day I needed to make this were kiwis and strawberries, which I was kind of disappointed about at first, but I really love the way these turned out!  And, the strawberries were local and very good!
Fruit Pizza with Mascarpone
Crust from here
Easily doubled for 2 pizzas; if doubling, use 1 whole egg

Crust:
1/2 cup butter, softened
3/4 cup sifted confectioners' sugar
1 egg yolk
1/2 teaspoon vanilla extract
1/2 teaspoon almond extract
1 1/4 cups all-purpose flour
1/2 teaspoon baking soda
1/2 teaspoon cream of tartar

1.In a large bowl, cream together the butter and confectioners' sugar until smooth. Beat in the egg yolk and stir in the vanilla and almond extract. Combine the flour, baking soda and cream of tartar; blend into the creamed mixture. Cover and chill for at least two hours (optional).

2.Preheat the oven to 375 degrees F (190 degrees C). Roll the dough out, or pat it out into a lightly greased pizza pan.

3.Bake anywhere from 8-15 minutes in the preheated oven, until lightly browned. Cool

Note:  Easily doubled for 2 fruit pizzas.  If doubling, use one whole egg.

Topping:
1/2- 3/4 cup Mascarpone cheese, room temp
Cut fruit of your choice

1.  Spread the Mascarpone on your cooled crust, as thin or thick as you want.  Layer on the fruit in a decorative pattern.

fruity
Fruit pizza me and my mom made, Aug. 2013.

**This post and photos are property of http://dishingwithdish.blogspot.com/ **

Thursday, June 7, 2012

Lemon Chicken Drumsticks

I decided to make this chicken after my friend over at Domestic Creativity mentioned how good it was.  My kids love chicken legs and I don't really make them often, so I bought a package of them and make this recipe.  They're so cheap!  I made the whole package; I think it was about 2.5 pounds.  I used dried herbs for this recipe.

We had this with Parmesan Orzo and probably broccoli- it was a few weeks ago, lol! 
Lemon Chicken Drumsticks
adapted from Annie's Eats

2 tbsp. fresh grated lemon zest
1/3 cup freshly squeezed lemon juice
2 cloves garlic, crushed
2 tsp. fresh thyme leaves (1 tsp. dried)
1 tsp. fresh rosemary leaves, finely minced (1/2 tsp. dried)
1/4 tsp. salt, or to taste
1/2 tsp. black pepper
2-4 lbs. of bone-in, skin-on chicken thighs or drumsticks
2 tbsp. melted butter
Thinly sliced lemons, for garnished

1.  Combine the lemon zest, lemon juice, garlic, thyme, rosemary, salt and pepper in a large zipper-lock plastic bag. Seal the bag and shake well to blend. Place the chicken pieces in the bag with the marinade, pressing out excess air and sealing once more. Refrigerate and let marinate for 2 hours.
Preheat the oven to 400˚ F. Remove the chicken pieces from the marinade and transfer to a baking dish, skin-side up, reserving the leftover marinade. Brush the top of each piece of chicken with melted butter.

2.  Bake for 30-45 minutes, until the skins are crispy and well-browned. Halfway through baking, pour the remaining marinade over the chicken pieces in the baking dish. Once fully baked, cover loosely with foil and let rest 10 minutes before serving. Transfer to a serving platter, garnish with lemon slices and serve.
**This post and photos are property of http://dishingwithdish.blogspot.com/ **

Wednesday, June 6, 2012

Rainbow Chard

I saw Rainbow Chard for the first time in real life a few weeks ago, at our local Organic Farm, so I bought it right away to try.  I've never had any kind of chard, but the Internet came to the rescue in my recipe search.  I basically sauteed it with a bit of butter, olive oil, shallots, and salt and pepper.  (I was out of garlic, fresh basil, pine nuts, AND Parmesan, like the original recipe called for- ha ha ha!!)  Greens like this wilt down and reduce in size drastically when cooked.  It looks like they won't all fit in the pan, but they will get much smaller- especially if you partially cover the skillet with a lid so the steam helps it out a bit. 
SautƩed Rainbow Chard
Loosely adapted from Fine Cooking

1 large bunch Rainbow Chard (13-16 oz)
1/2 Tbs. extra-virgin olive oil
1/2 Tbs. butter
kosher salt
1 shallot, thinly sliced

1.  Pull or cut the stems from the chard leaves. Here is a vid on how to stem them.  Cut or rip the leaves into 1- to 2-inch pieces and wash and dry them well. Rinse the stems and slice them crosswise 1/4 inch thick.

2.  In a 12-inch nonstick stir-fry pan or skillet, heat the olive oil and butter over medium heat.  Return the pan to medium-high heat, add the chard stems and a pinch of salt, and cook, stirring occasionally, until shrunken and beginning to brown lightly, 6 to 7 minutes. Add the shallot and cook just until fragrant, about 15 seconds. Add the chard leaves and 1/4 tsp. salt. For faster wilting, cover the skillet with a lid.  Toss with tongs until just wilted, 1 to 2 minutes. (If using a skillet, you may need to add the chard in batches, letting the first batch wilt before adding more.) Remove the pan from the heat, and serve immediately. 
**This post and photos are property of http://dishingwithdish.blogspot.com/ **